
User Manual


112
Lesson 16 LCD1602
Introduction
In this lesson, w e will learn how to use LCD1602 to display characters and strings.
Components
- 1 * Raspberry Pi
- 1 * Breadboard
- 1 * LCD1602
- 1 * Potentiometer
- Jumper wires
Principle
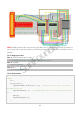
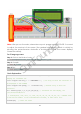
LCD1602
Generally, LCD1602 has parallel ports, that is, it would control several pins at the same time.
LCD1602 can be categorized into eight-port and four-port connections. If the eight-port
connection is used, then all the digital ports of the SunFounder Uno board are almost
completely occupied. I f you want to connect more sensors, there will be no ports available.
Therefore, the four-port connection is used here for better application.
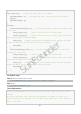
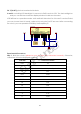
LCD1602 uses the standard 16-pin port, among which:
Pin 1 (GND): connected to Ground
Pin 2 (Vcc): connected to 5V pow er supply
Pin 3 (Vo): used to adjust the contrast of LCD1602; the lev el is lowest w hen it’s connected to
a positive pow er supply, and highest when connected to ground (you can connect a
10K potentiometer to adjust its contrast when using LCD1602)
Pin 4 (RS): register select pin, controlling w here in the LCD’s memory you are w riting data to.
You can select either the data register, which holds what goes on the screen, or an
instruction register, where the LCD’s controller looks for instructions on what to do next.
Pin 5 (R/W): to read/write signals; it reads signals w hen supplied w ith high lev el (1), and writes
when low lev el (0) (in this experiment, you only need to write data to LCD1602, so just
connect this pin to ground)
Pin 6 (E): An enable pin that, when low-lev el energy is supplied, causes the LCD module to
execute relevant instructions
SunFounder