Preface About SunFounder SunFounder is a technology company focused on Raspberry Pi and Arduino open source community development. Committed to the promotion of open source culture, we strive to bring the fun of electronics making to people all around the world and enable everyone to be a maker. Our products include learning kits, development boards, robots, sensor modules and development tools. In addition to high quality products, SunFounder also offers video tutorials to help you make your own project.
Contents Components List ............................................................................................................................. 1 Overview ......................................................................................................................................... 3 Features ....................................................................................................................................... 3 Applications ..................................................
Using PiSmart Box with Python ..................................................................................................... 35 Su nF o un d er pismart.py .................................................................................................................................. 35 adc.py........................................................................................................................................ 37 led.py ...........................................................
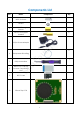
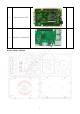
Components List Component Qty. No. Name 1 M2.5*12 Screw 2 M3 Nut 3 M2.5*10 Through Spacer 6 4 M2.5*11+6 Copper Standoff 6 10 4 1 Transparent Silica Ring 7 Philip Screwdriver 8 40mm FFC 0.
1 11 PiSmart Bottom PCB 1 Raspberry Pi Model 3 B Su nF o Acrylic Plates - PiSmart un d er 12 2
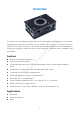
Overview er The PiSmart is an intelligent platform based on the Raspberry Pi designed by SunFounder, integrating the Speech to Text (STT), Text to Speech (TTS), and servo and motor control. It un d includes a 5-channel 10-bit ADC, and utilizes the 8-channel digital built in the Raspberry Pi, making DIY program easier and the human-computer interaction more intelligent and Features Su nF o humanized.
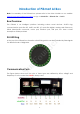
Introduction of PiSmart AI Box Note: For assembly of the PiSmart box, please refer to the video tutorials on our website: https://www.sunfounder.com/video and go to Robot Kits -> PiSmart Car -> Part 2. Box Overview The PiSmart is an intelligent platform including various smart devices: 24-LED ring, communication ports like SPI, UART, and I2C, I/O ports like digital, analog and PWM ones, HDMI video/audio connector, motor port, Ethernet port, USB port, etc. Here a brief description will be provided.
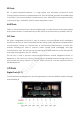
SPI Ports SPI, or Serial Peripheral Interface, is a high speed and full-duplex synchronous serial communication interface for peripheral devices. The CE0 (GPIO8) provides the enable signal, CLK (GPIO11) the communication for serial clock to sync, MOSI (GPIO10) the signal of master output/slave input, and MISO (GPIO9) master input/slave output. UART Ports UART, or Universal Asynchronous Receiver/Transmitter, converts between serial and parallel data communication.
PWM Ports (0-7) The PiSmart Box uses PCA9685, 12-bits 4096-steps I2C output chip, for all PWM output. On board PCA9685 I2C address is set to 0x40. Channel 0~7 expose at PWM Port of PiSmart AI Box (PWM 0~7). For more detail of PCA9685, Please visit http://www.nxp.com/products/interfaces/ic-busportfolio/ic-led-controllers/16-channel-12-bit-pwm-fm-plus-ic-bus-led-controller:PCA9685 Analog Ports (0-4) There's an Atmega328 in PiSmart Box as an ADC chip providing 5-channel 10-bit ADC on analog port.
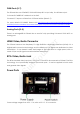
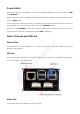
Power Switch The power switch is controlled by the MCU Atmega328. Basically, there are 2 states: SLEEP and RUNNING. When the power cable is plugged in, the red LED indicator will light up and the MCU will turn into the SLEEP mode. When the button is pressed, the MCU is wakened from sleep and switches on the power of the Raspberry Pi, so RPi is booted up too. This is the RUNNING mode. When it's in the RUNNING mode, you can press again and hold the power switch for more than 2 seconds.
GPIO5 and 6 on Raspberry Pi controls the rotate directions of Motor A and B. Two pins of both channels are combined using a transistor, for less GPIO using. So, motors only have clockwise and counter-clockwise controls, with 0/1. And stops uses PWM value 0 PWM 10, 11 on PCA9685 controls the speed of Motor A and B. Set Value to 0 to stop the motor.
Preparing Burn the image Take the following steps before inserting the TF card into the Raspberry Pi: 1) Prepare the tool of image burning. Such as win32DiskImager 2) Download the complete image on the official website at this link: https://www.raspberrypi.org/downloads/raspbian/. Both the RASPBIAN STRETCH WITH DESKTOP and RASPBIAN STRETCH LITE are available, but RASPBIAN STRETCH WITH DESKTOP would be a better choice if you have no special requirements.
ssid= "(name of the Wi-Fi)" psk= "(your Wi-Fi password)" Log into Raspberry Pi For Linux or Mac OS X Users er For Linux and Mac OS X users, you can only open the Bash shell via ssh. Su nF o un d Go to Applications->Utilities, find the Terminal, and open it.
Type in ssh pi@ip_address – ssh is the tool for remote login, pi, the user name, and ip_address, as the name suggests, your Pi's IP address. For example: ssh pi@192.168.0.101 Press Enter to confirm. If you get a prompt that no ssh is found, you need to install an ssh tool like Ubuntu and Debian by yourself: sudo apt-get install ssh For other Linux platforms, please contact your supplier. For Windows Users If your computer runs on Windows, you need to pen the Bash shell with the help of some software.
Note: When you're typing the password in, the window shows nothing just null, but you're in fact is typing things in. So just focus on typing it right and press Enter. After you log in the RPi successfully, the window will display as follows. Su nF o un d er This window is just like the Command Line window in Linux.
Using PiSmart With Dragit You can use the Python code to programme on PiSmart Box, more details please refer to the last chapter Using PiSmart Box with Python. Dragit can also be used to programing on Pismart Box, which is a visual programming language software. The later chapter will introduce Dragit at full length. It is a very good choice for those who are not willing to learn program language or who don't know much about program.
Of course you need to select Dragit; meanwhile we need to use it on PiSmart, so select it too. Then press Enter to confirm. er Then the program will process the installation. You need to wait for a while, and pay attention not Su nF o un d to disconnect the network during the process. When the prompt appears as shown above, it means the installation is done.
Then you're in the Dragit window. Introduction to Dragit Dragit is a visual programming language software developed based on Snap! (check http://snap.berkeley.edu/ for more). What's good about Dragit is that, the programming process is visible with graphics. So you can just drag and drop the blocks (unit in the software) to make the code to control the port, needing no knowledge of any programming er languages or syntaxes.
On the Toolbar at top, besides file saving, settings and zoom in/out, there are also Execute, Pause and Stop buttons. Stage er On Stage at the top right corner, the icon you added and the data set will be displayed here. un d Scripting Area There can be one or more scripts for a project in Dragit. The scripts are shown in the scripting area and constructed by blocks in the palette. Palette Su nF o On the scripting area, you can drag the blocks there and make and combine larger chunks.
modules and control of the display module. RaspberryPi The RaspberryPi category includes and , , blocks, for GPIO port control and data collection of the Raspberry Pi. PiCar_V, PiCar_S , and PiPlus The PiCar_V, PiCar_S and PiPlus categories include blocks for control of these three robot and learning kits.
and drag it into the scripting area: er 1. Click 2. So now in the scripting area there's already a block to control the PiSmart to speak. Let's Su nF o un d check how it is done with the block! In the block, you can click the slot and enter what you want the PiSmart to say. By default it's "Hello!". Click the block and you'll hear what's said by the speaker of the PiSmart, and that's exactly what's been entered in the slot. It's, Hello! Now try your own words! Multiple words are supported.
Before using the hearing function, we need to set a dictionary first. What it does is to "tell" the PiSmart to recognize the words xxx as the xxx command. For example, when you say turn on (as called words), the PiSmart can understand it means on (as deemed command); when you say turn off (words), it knows it's off (commands); when you say light flashing (words), it knows it's twinkle (commands). Use these two blocks to set a dictionary: & .
4. Click this combined block. Then in the back-end system a file will be generated recording the mapping between the words and the command. Call the .sps file. When the file is created, the dictionary is done. Now we're ready for the hearing function. Use Hear Blocks: For the hearing function, blocks , , and are available.
be returned. - It returns what the PiSmart heard. Only when the words heard are included in the .sps file, the corresponding result will be returned. For example, previously only the commands on and off have been recorded, so only when you speak "turn on" to the PiSmart, on will be returned; say "turn off", off will be returned. - It verifies whether the command just entered has been heard. If yes, it will return true , otherwise false.
3. Click this combined block and say "turn on" to the PiSmart. Wow, the LEDs on the PiSmart just light up! To understand: When the PiSmart receives the command for the words "turn on", block block er above will return true and the program will run the brightness setting in ; If no command is received, nothing will happen. Therefore, after un d the LEDs light up, you need to click the led off block to turn them off. 4. Click the combined block again and the program will stop running.
PiSmart and observe how the LEDs act. Interesting control, isn't it? So when you say "turn on" to the robot, the LEDs will light up accordingly. If you say "turn off", LEDs will dim then. If you say "light flashing ", LEDs will flashing 10 times. But if you say other things, since no more is written in the combined block, it won't do anything and just stay the status. In this code, comparing to the time for lighting up and out the LED light, the time for flashing it is too long.
Su nF o un d er You will see a new pop-up window as shown in the below figure Step 3: Drag the code which flashes the LED light into the new block and combine them together and then click OK. Click the PiSmart again and you will see a new block named as Led Flash shown under that category.
er much simpler with the same function. un d Voice Conversation Now let us use it to recognize our speech and reply to it Step1: Set up the dictionary and , and then combine them together as below. Su nF o Drag You can edit sentences that you would like to say to PiSmart AI Box. Step 2: Write the judgement and loop When the PiSmart hears the command “Name”, it says PiSmart; when it hears “color”, it says “green”.
Click the green flag on the top right corner, so the program will be running on the PiSmart. You can click to pause the program and click er Digital Port to terminate it. un d The digital port on the PiSmart can control the high and low electrical levels though digital values (1 and 0). It can also judge the high and low of the input voltage and transfer it to digital value (1, 0).
er You can also click the drop-down list to choose a digital port and set it as a high or low level. In this experiment, we will connect the LED light to the Digital1 and by controlling the Digital1 Su nF o figure. un d to output "1" and "0" signals to turn on and off the LED light. Details are shown in the below The complete code is shown as below. Click the green flag or click the program block to run the program.
Analog Port The analog port on the PiSmart can convert analog values input to digital ones and output them. Generally speaking, data like temperature, humidity, etc. in our daily life are all analog values in the first place. We get the digital value for the temperature and humidity though AD conversion. In the following part, we will use the Sound Sensor to do a Noise Monitoring experiment, from which you can better learn how the analog port in PiSmart works.
un d er Click the Operators and drag out the block for value comparison. Su nF o The complete program is shown as below: If the sound exceeds 150db, PiSmart will remind you “Too noisy! Please keep quiet!” PWM Port The PWM Port in the PiSmart comes with the PWM control function. PWM, or pulse width modulation, is to control the analog circuits with the digital output of the microcontroller (MCU), namely a method for digital encoding the analog signal level.
between 0-4096 in the slot in the red frame. Driving Servo In the following we will drive the servo by the PWM port. You may notice that the block is used instead of - well, both work by PWM control, er but the former is easier to understand for servo control in complex program. First define two variables. The angle variable is to set the rotational degrees of a servo, when Su nF o un d the number is to specify the number of the servo to drive.
Here we use two variables to control the angle the servo rotates to and the port it connects to. Add a repeat until block to make a loop assign values for the angle of the 8 servos (or less) connected to pwm0-pwm7 ports. This program will run the code in the block in a loop till the er condition is met (that is, the requirement in the red frame below is met). Here it is when the Su nF o un d value of the number variable is larger than 7.
Su nF o un d er The complete program is shown as below: Click the green flag or the block itself to run the program. Then you can see the 8 (or less) servos rotate from 0°to 180°and then in the opposite direction from 180°to 0°. Motor Port There are two ports for motor drive in the PiSmart for PWM control. Now let’s see how to do in Dragit.
Driving Motor 1. In the palette area, click to select the PiSmart category. into the scripting area. Su nF o 3. Enter values in the slot: un d er 2. Then click and drag In this block, there are two parameters for control: channel and speed. For the left one, channel is to set the motor you want to control. Click the input of direction by the triangle sign and select a value at the drop-down list. Click A, meaning you'll control the motor at MotorA.
60 to both motor A and motor B. Click the block then and the two motors turn at 60 speed. 5. Set different values to motor A and motor B, click the block and the two motors will rotate in different speeds. un d er 6. To stop the motors, just set the speed of both motors as 0: 7. Set the speed value of the two motors to negative and the motor will turn in the opposite Su nF o direction:: Future Learning: There are still many expansion ports on the PiSmart like spi, I2C , UART, USB etc.
Using PiSmart Box with Python After you log in the Rpi, Type in the command to download the python code: git clone https://github.com/sunfounder/SunFounder_PiSmart.git cd ~/ SunFounder_PiSmart/ ls pismart stores Python modules examples includes some examples for use cd ~/ SunFounder_PiSmart/pismart Import package: import pismart In the pismart package, the following python modules are included: er ├── pismart.py ├── adc.py ├── led.py un d ├── motor.py ├── servo.py ├── pwm.py ├── stt.
my_pismart.servo_switch(PiSmart.OFF) # servo port off motor_switch(on_off) Switch on and off of the motor output. Parameters: 1(PiSmart.ON), 0(PiSmart.OFF) my_pismart.motor_switch(PiSmart.ON) # motor port on my_pismart.motor_switch(PiSmart.OFF) # motor port off speaker_switch(on_off) er Switch on and off of the speaker output. Parameters: 1(PiSmart.ON), 0(PiSmart.OFF) # speaker on my_pismart.speaker_switch(PiSmart.OFF) # speaker off power_voltage un d my_pismart.speaker_switch(PiSmart.
cap_vol = my_pismart.capture_volume # get capture volume my_pismart.capture_volume = 100 # set capture volume cpu_temperature CHeck the temperature of the Raspberry Pi's CPU, returning a float value. cpu_temp = my_pismart.cpu_temperature # get cpu temperature cpu_usage CHeck the usage of the Raspberry Pi's CPU, returning a float value. cpu_usage = my_pismart.cpu_usage # get cpu usage er adc.py un d Read the value of ADC from the PiSmart bottom plate.
led.py Control the LED ring on top of the PiSmart box. The ring consists of 2 groups of LEDs. Create an instance, to which a parameter ['led1', 'led2'] can be transferred; the two objects control the two groups of LEDs respectively. Or with no parameters, then it controls the whole ring of LEDs. from pismart.
motorB = Motor("MotorB") p.motor_switch(1) # motor switch on forward_direction Check and set the forward direction of the motor. Return 0 or 1, also can be set as 0 and 1. direc = motorA.forward_direction # get motor forward direction motorA.forward_direction = 0 # set motor forward direction forward(speed) Drive the motor to go forward in the speed of "speed". # drive motor forward as speed er motorA.forward(60) un d backward(speed) Drive the motor to go backward in the speed of "speed".
motorA.end() # motor end servo.py Control the servo connected to PiSmart to spin to a designated angle. Create an instance, with 2 parameters: channel: integer ranging between [0~7], for pwm0~pwm7 on PiSmart respetively. offset: integer ranging between [0~180], offset value of accuracy of the servo spinning. from pismart.servo import Servo from pismart.pismart import PiSmart # creat servo with0 ch.0 un d servo1 = Servo(0) er p = PiSmart() p.
Check and set the channel. channel = servo1.channel servo1.channel = 1 # get channel # set channel angle Check and set the angle the servo spins to. angle = servo1.angle servo1.angle = 90 # get angle # set angle offset servo1.offset = 120 # get servo offset un d offset = servo1.offset er Offset value for the servo spinning. It is the pwm pulse width, ranging between [-4096, 4096]. # set servo offset turn(angle) Su nF o Drive the servo to spin to a designated angle.
Check and set the channel, ranging between [0-7]. chn = pwm.channel # get channel pwm.channel = 1 # set channel frequency Check and set the frequency. freq = pwm.frequency # get pwm frequency pwm.frequency = 60 # set pwm frequency set_PWM(on, off=0) # set pwm on_time value un d pwm.set_PWM = 2048 er Set the time period for high and low levels of PWM, ranging between [0, 4095]. Set and acquire the time of high and low levels of PWM. pwm.value = 2048 tts.
Make the PiSmart broadcast the speech set. Assign strings. tts.say = "Hello, world!" # say words engine Check and set the speech engine. Values available: ['festival', 'espeak', 'pico']. engine = tts.engine # get tts engine tts.engine = "espeak" # set tts engine er **engine_pa rams(amp=None, speed=None, gap=None, pitch=None)** un d Set the parameters of the engine. Available only when the espeak engine is selected.
from pismart.pismart import PiSmart p = PiSmart() stt = STT('dictionary', name_calling=True, timeout=10.0, dictionary_update=True) p.speaker_volume(100) is_awake Whether to be awakened. If it's awakened by its name, return True. Need to open name_calling when the object is created. if stt.is_awake: # need name_calling True xxxx er heard un d If some speech is heard, return True. if stt.heard: # if heard do something recognize() Su nF o xxxx Enter the process of speech recognition.
from pismart.stt import STT from pismart.tts import TTS p = PiSmart() sr = STT('dictionary', name_calling=True, timeout=10.0, dictionary_update=True) p.speaker_switch(1) pico = TTS('pico') while True: sr.recognize() er print "heard :%s"%sr.heard result = sr.result un d if sr.heard: print "==============================" Su nF o print result print "==============================" if result == '__NAME__': pico.say = 'Hello there' else: pico.say = result amateur.py Integration module.
my_pismart.ADC_init() my_pismart.Motor_init() my_pismart.PWM_init() my_pismart.Servo_init() my_pismart.LED_init() my_pismart.TTS_init() my_pismart.STT_init() my_pismart.All_init() xxx_end() er End the processing of the resources on PiSmart. No parameters. my_pismart.Motor_end() my_pismart.PWM_end() Su nF o my_pismart.Servo_end() un d my_pismart.ADC_end() my_pismart.LED_end() my_pismart.TTS_end() my_pismart.STT_end() my_pismart.
Set the sound volume of the speaker, assignable with value in [0 ~ 100]. my_pismart.speaker_volume = 60 capture_volume Boost of microphone, assignable with value in [0 ~ 100]. my_pismart.capture_volume = 100 cpu_temperature Temperature of the Raspberry Pi's CPU, returning a float value. cpu_temp = my_pismart.cpu_temperature er A0 ~ A4 A0_val = my_pismart.A0 A1_val = my_pismart.A1 Su nF o Servo0 ~ Servo7 un d Values returned from analog pins A0~A4. Return integer values, unassignable.
MotorA and MotorB Rotating speed of the MotorA and MotorB, assignable with value in [0 ~ 100]. my_pismart.MotorA = 30 my_pismart.MotorB = 90 MotorA_reversed and MotorB_reversed Rotating direction of the MotorA and MotorB, assignable with value in [True, False]. my_pismart.MotorA_reversed = False my_pismart.MotorB_reversed = True er Say my_pismart.Say = "Hello, world!" listen un d Speech of the PiSmart, assigned with texts which the PiSmart will say.
Su nF o un d er if my_pismart.result == "forward": # if heard forward # PiSmart Car move forward my_pismart.MotorA = 60 my_pismart.MotorB = 60 my_pismart.