Symphonic Reference High Fidelity Control Center and Preamplifier
SAFETY Safety Instructions 1. Read Instructions -– All the safety and operation instructions should be read before the SunÞre Component is operated. 2. Retain Instructions — The safety and operating instructions should be kept for future reference. 3. Heed Warnings — All warnings on the Component and in these operating instructions should be followed. 4. Follow Instructions — All operating and other instructions should be followed. 5.
SAFETY 15. To prevent electric shock, do not use this polarized plug with an extension cord, receptacle or other outlet unless the blades can be fully inserted to prevent blade exposure. Pour préevenir les chocs électriques ne pas utiliser cette Þche polariseé avec un prolongateur, un prise de courant ou une autre sortie de courant, sauf si les lames peuvent être insérées à fond sans laisser aucune parIIIe à découvert. 16.
CHAPTER 1 Introduction Unpacking Your SunÞre PreampliÞer should reach you in perfect condition. If you do notice any shipping damage, please contact your SunÞre Dealer immediately. Dear Friend, Thank you for purchasing my SunÞre Symphonic Reference PreampliÞer. I hope that you enjoy it and the music it makes as much as I have enjoyed creating it for you. Gently lift out the unit and remove all the packing material and accessories.
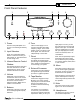
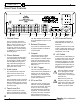
CHAPTER 1 Front Panel Features 1 12 2 11 10 1. Power This turns the preampliÞer on or off. It is a non-latching momentary button. 2. Input Selectors Press one of these illuminated buttons to select the source you want to listen to. The selected button will change color. 3. Infrared Remote Control Window This window should be clean and free from obstruction. The LED will light when a remote control infrared command is received. 4. Volume Rotate this control clockwise to increase the volume.
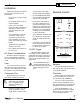
CHAPTER 1 Rear Panel Features 1 2 3 1. Ground Screw This is commonly used for the ground connection wire of a turntable, to prevent any hum in your speakers. It is tied to the chassis ground, and may be used as needed. Note: It is not necessary or desirable to connect this to an electrical ground. 2. Phono Selector If you are using a turntable with a low output Moving Coil cartridge, set this switch to the MC position. Use the MM position if it has a high output Moving Magnet cartridge.
CHAPTER 1 Installation Observe the following precautions when choosing a location for your preampliÞer: • Do not cover any of the ventilation slots. • Do not place directly on top of a power ampliÞer. • • to prevent any hum or interference heard in the speakers. • Choose reliable hookup cables. They should be fully shielded and as short as possible. • Some patch cords can be a very tight Þt and there is usually a preferred method of getting them off. Some have to be removed with a twisting action.
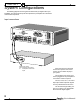
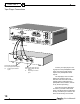
CHAPTER 2 System ConÞgurations The following pages show some typical connections that you might make in your installation. They show how the inputs and outputs of the preampliÞer are connected to various audio components. Input connections Analog audio signals From: CD Player audio outputs To: PreampliÞer CD L/R audio inputs When the CD input is selected from the front panel or the remote control, the CD’s audio will play in your system.
CHAPTER 2 Turntable Connections Ground wire From: Turntable chassis ground To: PreampliÞer chassis ground connector Phono-level audio signals From: Turntable L/R audio outputs To: PreampliÞer Phono L/R audio inputs Only connect a Turntable to the PHONO input. In most cases, you should also connect the ground wire to reduce any hum through your speakers. The Phono input is designed for Moving Magnet (MM) cartridges and Moving Coil (MC) cartridges.
CHAPTER 2 Tape Player Connections Play Record Analog audio signals (play) From: Tape player audio outputs To: Preamp Tape L/R audio inputs Analog audio signals (record) From: Preamp Tape L/R audio outputs To: Tape Player L/R audio input Connect your Tape player’s analog outputs to the preampliÞer's TAPE inputs. Connect the Tape player's inputs to the preampliÞer's TAPE outputs. The Tape player can record the audio from whichever source is selected.
CHAPTER 2 External Processor Connections Analog audio signals From: External Processor's audio outputs To: Preamp External Processor L/R audio inputs Analog audio signals From: Preamp's External Processor L/R audio outputs To: External Processor's L/R audio input The preampliÞer audio signals can be passed through an external processor or graphic equalizer. The signals going into your external processor are not affected by the preampliÞer's volume, balance or Tone controls.
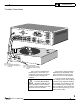
CHAPTER 2 Output Connections Line-level audio signals From: PreampliÞer main outputs To: AmpliÞer line-level inputs 12 VDC Trigger voltage From: PreampliÞer 12 VDC trigger outputs To: AmpliÞer 12 VDC trigger inputs The preampliÞer's line-level Main audio outputs can be connected to a power ampliÞer as shown. This example shows the matching SunÞre Symphonic Reference power ampliÞer. The 12 VDC connection can be used to turn the ampliÞer on when the preamp turns on.
APPENDIX Troubleshooting Guide Make sure that they are disconnected where they Þrst enter the room, so they are making no connection to the preampliÞer or the TV, or any other component. If the hum is caused by the cable TV line, then you will need a “ground loop isolator.” This is an inexpensive device Þtted in line with the coaxial cable feed. Contact your cable company or your SunÞre Dealer for assistance.
APPENDIX SpeciÞcations Line input to Main output Line Gain: 17.7 dB +/- 0.5 dB Max level out: 7.2 Vrms at 1 KHz Max level in: 10 Vrms at 1 KHz Separation: Trigger Outputs 12 VDC Trigger, current less than 500 mA total Infrared ports > 70 dB at 1 KHz Optically Isolated > 50 dB at 10 KHz Standard 1/8” mini jacks Frequency Response: 20-20 KHz +/- 0.2 dB Standard 12 V signal level THD:(2 V out) <0.
APPENDIX Limited Warranty SunÞre Corporation is proud of its products which have been built with care using advanced technology and premium component parts. Your unit has been crafted to perform properly for many years. SunÞre Corporation offers the following Warranty to you, the owner of a new SunÞre product: The SunÞre Corporation Warranty for the Symphonic Reference PreampliÞer is in effect for TWO years from the date of original retail purchase.
Symphonic Reference High Fidelity Control Center and Preamplifier Manual part number : 913-046-00 Rev A