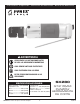
Operating Instructions • Warning Information • Parts Breakdown WARNING ALWAYS READ INSTRUCTIONS BEFORE USING POWER TOOLS ALWAYS WEAR SAFETY GOGGLES WEAR HEARING PROTECTION AVOID PROLONGED EXPOSURE TO VIBRATION SPECIFICATIONS Punch Hole...................3/16" (9.525mm) Cutting Capacity: Steel..................................0.05" (1.2mm) Aluminum..........................0.08" (2.0mm) Weight........................... 2.9 Lbs. (1.3 kg) Length..............................9.
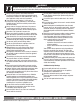
WARNING To reduce the risk of injury, anyone using, repairing, maintaining, or changing accessories on this tool must read and understand these instructions before performing any of these tasks. Always inspect, operate, and maintain this tool in accordance with American National Standards Institute Safety Code of Portable Air Tools (ANSI B186.1) and any other applicable safety codes and regulations. These tools are rated at 90 psi / 6.
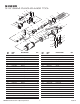
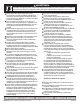
SX280 3/16" (5mm) PUNCH/FLANGE TOOL 34 44 36 17 35 15 39 38 37 16 43 12 42 41 12 13 11 32 1 40 14 8 9 7 6 5 3 4 19 2 10 33 20 22 15 14 21 20 24 23 29 18 45 25 31 27 28 26 30 REF. NO. 1 2 3 4 5 6 7 8 9 10 11 12 13 14 15 16 17 18 19 20 21 22 23 PART DESCRIPTION NO.
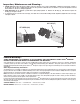
FIGURE 1 Air Supply... 5. Squeeze the Throttle Lever (32), and the Punch (34) will pierce the workpiece. 6. Align the tool with the next mark on the workpiece, and repeat step 5 until the job is finished. 7. Disconnect the air supply. 8. WARNING: After disconnecting the Air Punch/Flange Tool from the air supply, there could still be enough air pressure to fire the Punch/Flange Tool.
Inspection, Maintenance and Cleaning... 1. BEFORE EACH USE, inspect the general condition of the tool. Check for loose screws, misalignment or binding of moving parts, cracked or broken parts, and any other condition that may affect its safe operation. If abnormal noise or vibration occurs, have the problem corrected before further use. Do not use damaged equipment. 2. WHEN NECESSARY, fill the hydraulic system with a high quality hydraulic oil.
• Instrucciones de Operación • Información de Advertencia • Revisión de Refacciones ADVERTENCIA LEER SIEMPRE LAS INSTRUCCIONES ANTES DE USAR LAS HERRAMIENTAS NUEMÁTICAS USAR SIEMPRE ANTEOJOS PROTECTORES USAR PROTECCIÓN PARA LOS OÍDOS EVITAR EXPOSICIÓN PROLONGADA A LAS VIBRACIONES ESPECIFICACIONES Agujero de punzón.......3/16" (9.525mm) Capacidad de corte: Acero.................................0.05" (1.2mm) Aluminio............................0.08" (2.0mm) Peso.............................. 2.9 Lbs. (1.
ADVERTENCIA Para reducir el riesgo de lesiones, cualquier persona quien usa, repara, da servicio o cambia los accesorios en esta herramienta debe leer y comprender estas instrucciones, antes de realizar cualquiera de estas tareas. Siempre inspeccione, opere y realice servicio a esta herramienta de acuerdo con el Código de Seguridad de las herramientas neumáticas portátiles del Instituto de Normas Nacionales Americanas (ANSI B186.1) y cualquier otro código y norma de seguridad aplicable.
FIGURA 1 Alimentación de aire... 4. Inserte el borde de la pieza de trabajo el punzón de troquel (38) y el punzón (34). Asegúrese que sus marcas estén alineadas con su punzón de troquel (38). 5. Apriete la palanca estranguladora (32) y el punzón (34) perfora la pieza de trabajo. 6. Alinee la herramienta con la siguiente marca en la pieza de trabajo y repita el paso 5 hasta que se termine el trabajo. 7. Desconecte el suministro de aire. 8.
Inspección, mantenimiento y limpieza... 1. ANTES DE CADA USO, inspeccione la condición general de la herramienta. Revise por tornillos flojos, la mala alineación o colado de piezas móviles, partes agrietadas o rotas o cualquier otra d condición que podría afectar su operación segura. Si se da cualquier ruido o vibración anormal, corrija el problema antes de continuar el uso. No use ningún equipo dañado. 2. CUANDO SEA NECESARIO, rellene el sistema hidráulico con un aceite hidráulico de alta calidad.
• Instructions de fonctionnement • Avertissement • Pièces AVERTISSEMENT LISEZ TOUJOURS LES INSTRUCTIONS AVANT D’UTILISER LES OUTILS MOTORISÉS. PORTEZ TOUJOURS DES LUNETTES DE SÉCURITÉ. PORTEZ UNE PROTECTION POUR LES OREILLES. ÉVITEZ L’EXPOSITION PROLONGÉE AUX VIBRATIONS. SPÉCIFICATIONS Diamètre du trou.....3/16 po (9,525 mm) Capacité de coupe : Acier.............................0.05 po (1,2 mm) Aluminium....................0.08 po (2, 0mm) Poids.............................. 2,9 Lbs. (1,3 kg) Longueur....
AVERTISSEMENT Pour réduire les risques de blessure, toute personne chargée de la réparation, de l’entretien ou du remplacement des accessoires de cet outil doit au préalable lire et comprendre ces instructions avant d’effectuer l’une de ces tâches. Ne pas étirer ou tendre le bras trop loin lors de l’utilisation du matériel. Si l’outil ne fonctionne pas convenablement, mettez-le hors service immédiatement et prenez des mesures pour sa réparation.
FIGURE 1 Entrée D'air... 4. Insérez le bord de la pièce de travail entre la matrice de perforation (38) et le poinçon (34). Assurez-vous que vos marques sont alignées avec la matrice de perforation (38). 5. Serrez la manette de puissance (32), et le poinçon (34) percera la pièce de travail. 6. Alignez l’outil avec la marque suivante sur la pièce de travail et répétez l’étape 5 jusqu’à ce que le travail soit terminé. 7. Débranchez l’alimentation d’air. 8.
Inspection, entretien et nettoyage... 1. AVANT CHAQUE UTILISATION, inspectez la condition générale de l’outil. Vérifiez s’il y a des vis lâches, la déviation de l'alignement ou le collage de pièces mobiles, les pièces fendues ou cassées et toute autre condition qui peut affecter son fonctionnement sécuritaire. Si un bruit ou une vibration anormaux se produit, veuillez faire corriger le problème avant d’utiliser l’outil. N'utilisez jamais un équipement endommagé. 2.