User Guide VS7850
® www.FoodSaver.
Important Safeguards 2 Product Features 4 “How To” 6 Make a FoodSaver ® Bag Vacuum Seal a FoodSaver ® Bag Vacuum Seal with FoodSaver ® Accessories Care & Cleaning 10 Storage Guide 11 Guidelines 12 Vacuum Sealing and Food Safety Food Preparation and Reheating Tips Sealing Non-Food Items Troubleshooting 18 Warranty 21
Important Safeguards Read the instructions carefully. For your own safety, always follow these precautions when using this FoodSaver ® appliance. Sunbeam is very safety conscious when designing and manufacturing consumer products, but it is essential that the product user also exercise care when using an electrical appliance.
• • • For additional protection, Sunbeam recommend the use of a residual current device (RCD) with a tripping current not exceeding 30mA in the electrical circuit supplying power to your appliances. Do not immerse the appliance in water or any other liquid unless recommended. Appliances are not intended to be operated by means of an external timer or separate remote control system.
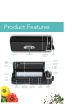
Product Features Bag Cutter Control Panel Retractable Accessory Adaptor Appliance Lid Cutter Stabilizer Profile Upper Seal Profile Bag Cutter Upper Foam Gasket Accessory Button Roll Storage Lower Foam Gasket Roll Cutter Bar 4 Latch Extra-Wide Sealing Strip Removable Drip Tray Vacuum Channel Marinate Button
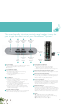
The user-friendly, intuitive control panel makes it easy for you to get the most out of your FoodSaver® System: 1 Power Indicator Light 2 Ac Accessory Button Latch 8 10 Vacuum & Seal Button Moist Food Setting Button Marinate Button 3 5 7 9 Power Light 2 Seal Indicator Light 4 6 Moist Food Indicator Light Seal Button 1 3 4 Seal Vacuum/Seal Indicator Indicator Light Light Illuminates when Latch is in On position. Shuts off automatically when Latch is not in On position.
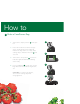
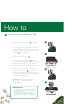
How to 1 Make a FoodSaver® Bag 1. Turn Latch to Open position lid. A and open A On Store Open 2. 3. 4. Place roll inside unit’s internal storage space as indicated. Pull enough bag material to edge until it is on top of the sealing strip to make the first seal B and close lid. B Turn Latch to On position C . Power On Indicator Light will illuminate indicating unit is ready. Press Seal Button D to seal open end of bag. Wait until Seal Indicator Light turns off.
5. 6. 7. Turn Latch to Open position E , open lid and pull enough bag material out to desired length for whatever you intend to vacuum seal F and close lid. Turn Latch to On position G . Power On Indicator Light will illuminate, indicating unit is ready. E On Store Open F Press Seal Button H to make seal for next bag. While sealing, you can slide bag cutter across I to remove bag.
How to 2 Vacuum Seal a FoodSaver® Bag 1. Turn Latch to Open position lid. A and open A On Store Open 2. Place item(s) in bag, allowing at least 7.5cm of space between contents and open end of bag. Place open end of bag into Vacuum Channel B and close lid. 3. Turn Latch to On position 4. Press Vacuum / Seal Button D to begin vacuum and sealing process of open end of bag. Motor will continue to run until bag is fully vacuumed, then will automatically seal. 5. C B .
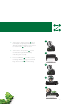
3 Vacuum Seal with FoodSaver® Accessories Your new FoodSaver ® Appliance includes a Retractable Accessory Adaptor for accessories. For Zipper Bags & Containers: 1. Turn Latch to On position and pull Accessory Adaptor A from appliance. A Power Seal Vac/Seal Moist On Accessory Marinate 2. 3. Place Retractable Accessory Adaptor on zipper bag B or container C valve. Press Accessory Button D Store Open B to vaccum. For Containers & Bottle Stoppers 1.
Care & Cleaning of your Vacuum Sealer To Clean Appliance: A CAUTION: Remove Power Cord from electrical outlet. Do not immerse in liquid. Check Gaskets and around Drip Tray to make sure they are free from food materials. Wipe off Gasket with warm soapy cloth if needed A . Upper and Lower Gaskets may be removed for cleaning. Clean with warm, soapy water and allow gaskets to dry before reinserting in machine.
Storage Guide of your Vacuum Sealer A To Store Appliance: Clean unit thoroughly “Care & Cleaning” section. as detailed in After unit has been cleaned and allowed to fully dry, close lid and push Latch into Store (middle) position A . This setting will keep lid closed but prevents any undue pressure from being applied to internal sealing Gaskets of unit. Always leave Latch in Store position when not in use. Never store Lid in On position as Gaskets may become compressed and unit will not vacuum bag.
Guidelines Vacuum Sealing and Food Safety The vacuum sealing process extends the life of foods by removing most of the air from the sealed container, thereby reducing oxidation, which affects nutritional value, flavor and overall quality. Removing air can also inhibit growth of microorganisms, which can cause problems under certain conditions: Mold – Easily identified by its fuzzy characteristic. Mold cannot grow in a low oxygen environment, therefore vacuum sealing can slow the growth of mold.
Food Preparation & Reheating Tips Thawing and Reheating Vacuum-Sealed Foods Always thaw foods in either refrigerator or microwave — do not thaw perishable foods at room temperature. To reheat foods in a microwave in a FoodSaver ® Bag, always cut corner of the bag before placing it on a microwave-safe dish. However, to avoid hot spots, do not reheat bone-in meat or greasy foods in microwave within a FoodSaver ® Bag.
Guidelines Food Preparation & Reheating Tips It is recommended that vegetables are blanched before vacuum sealing. This process stops the enzyme action that could lead to loss of flavor, color and texture. To blanch vegetables, place them in boiling water or in the microwave until they are cooked, but still crisp. Blanching times range from 1 to 2 minutes for leafy greens and peas; 3 to 4 minutes for snap peas, sliced zucchini or broccoli; 5 minutes for carrots; and 7 to 11 minutes for corn on the cob.
Food Preparation & Reheating Tips Preparation Guidelines for Fruits: For best results, vacuum seal fruit in a FoodSaver ® Container which protects the shape of berries and soft fruits. Alternatively pre-freeze fruit for 1-2 hours before vacuum sealing to help maintain the shape and flavour of food. If storing in the refrigerator, we recommend using a FoodSaver ® Container.
Guidelines Food Preparation & Reheating Tips Preparation Guidelines for Liquids: Using a FoodSaver ® Container is the easiest way to vacuum seal liquids. Pouring liquids into a FoodSaver ® bag, then using Seal only is a quick way to prepare liquids for storage. Alternately pre-freeze liquids until solid, remove from freezer and vacuum packaging in FoodSaver ® Bags. Then return to the freezer.
Vacuum Sealing Non-Food Items The FoodSaver® Vacuum Sealing System also protects non-food items from oxidation, corrosion and moisture. Simply follow directions to vacuum seal items using FoodSaver ® Bags, Containers and Accessories. Silverware To vacuum seal silver, wrap fork tines in soft cushioning material, such as a paper towel, to avoid puncturing bag, and seal as normal. Your silver will be clean, fresh and untarnished right when you need it for your next dinner gathering.
Troubleshooting Problem 18 Solution Red Seal LED flashing • Unit is overheated. Always allow 20 seconds between seals. Under heavy usage, appliance will shut off automatically and Red Light will flash. Wait for 20 min. for unit to cool off. • Always wait 20 seconds between seals. • Latch has been left in On position: Gaskets may be compressed. Turn Latch to Open or Store position and allow 10 to 20 minutes for Gaskets to expand. • Vacuum pump running more than 120 seconds.
Problem Solution No lights on the control panel • Make sure unit is plugged in. • Make sure wall outlet is functional. • Make sure lid is all the way down, and the Latch is in the On position. Nothing happens when Latch is closed and Button is pressed • Make sure unit is plugged in. • Make sure wall outlet is functional. • Open Latch, make sure lid is all the way down, re-latch lid. Cannot insert bag into machine • Make sure there is enough bag material to reach center of drip tray. Always allow 7.
Notes 20
21
Need help with your appliance? Contact our customer service team or visit our website for information and tips on getting the most from your appliance. Australia | visit phone mail New Zealand | visit phone mail www.sunbeam.com.au 1300 881 861 Units 5 & 6, 13 Lord Street, Botany NSW 2019 Australia. www.sunbeam.co.nz 0800 786 232 Level 6, Building 5, Central Park, 660–670 Great South Road, Greenlane, Auckland. © 2017 Sunbeam Products, Inc. doing business as Jarden Consumer Solutions. All rights reserved.