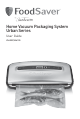
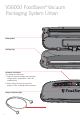
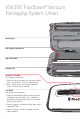
Home Vacuum Packaging System Urban Series User Guide VS6000/VS6100
Contents Important Safeguards 4 Vacuum Packaging Tips 5 Features of your FoodSaver VS6000 Vacuum Packaging System ® Features of your FoodSaver® VS6100 Vacuum Packaging System 6 8 Using your FoodSaver® Urban 10 Vacuum Packaging with Canisters 13 Food Preparation & Safety Tips 14 Care and Cleaning Instructions 15 Guidelines for Vacuum Packaging 16 Preservation Guidelines 19 Vacuum Packaging Non-Food Items 21 Troubleshooting 22
Important Safeguards Read the Instructions Carefully. For Your Own Safety, Always Follow These Basic Precautions When Using the FoodSaver® Appliance: • • • • • • • • Sunbeam is very safety conscious when designing and manufacturing consumer products, but it is essential that the product user also exercise care when using an electrical appliance.
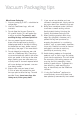
Vacuum Packaging tips When Vacuum Packaging: 1. Vacuum packaging is NOT a substitute for refrigeration. 7. If you are not sure whether you have achieved a complete seal, simply seal the bag again about 1cm above the first seal. 2. Use only FoodSaver® bags, rolls and canisters. 8. Bulky items sometimes make it difficult to achieve a smooth sealing surface. Gently stretch the bag flat along the Sealing Strip before closing the lid. 3. Do not allow the Vacuum Channel to fill up with liquids.
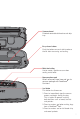
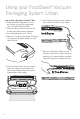
VS6000 FoodSaver® Vacuum Packaging System Urban Foam gasket Sealing strip Vacuum & Seal button This button has two uses: 1. Press to vacuum package and seal food airtight with a single touch. Shuts off automatically. 2. Press during vacuum to pause the process. Press a second time to resume.
Vacuum channel Patented removable dishwasher-safe drip tray. Easy release buttons Push the buttons on each side to release the lid after vacuuming and sealing. Moist food setting Use to create a gentler vacuum when sealing moist foods. Accessory hose port Attach accessory hose here and use to vacuum package with FoodSaver® Canisters. Seal button This button has three uses: 1. Press to immediately stop the vacuum process and begin sealing the bag.
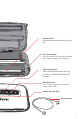
VS6100 FoodSaver® Vacuum Packaging System Urban Foam gasket Roll storage compartment Bag & roll cutter Sealing strip Vacuum & Seal button This button has two uses: 1. Press to vacuum package and seal food airtight with a single touch. Shuts off automatically. 2. Press during vacuum to pause the process. Press a second time to resume. Seal button This button has three uses: 1. Press to immediately stop the vacuum process and begin sealing the bag.
Vacuum channel Patented removable dishwasher-safe drip tray. Easy release buttons Push the buttons on each side to release the lid after vacuuming and sealing. Accessory hose port Attach accessory hose here and use to vacuum package with FoodSaver® Canisters. Moist food setting Use to create a gentler vacuum when sealing moist foods.
Using your FoodSaver® Vacuum Packaging System Urban How to make a Bag from a FoodSaver® Roll 1. Place FoodSaver® appliance on a flat, dry surface and plug the supply cord into a standard electrical outlet. 6. Lock lid by pushing the silver arrows on each side of the lid until fully closed. 2. Pull out enough material from your roll, to hold item to be vacuum packaged 3. Cut to desired length, plus 7.5cm. 4. Open lid. The lid may be locked.
Using your FoodSaver® Vacuum Packaging System continued How to Vacuum Package with FoodSaver® Bags 1. Place FoodSaver® appliance on a flat, dry surface and plug the supply cord into a standard electrical outlet. 5. Press On/Vac button. 2. Place item(s) in bag, allowing at least 7.5cm of space between bag contents and top of bag. 3. Open lid and place open end of bag into the Vacuum Channel. 6.
Using your FoodSaver® Vacuum Packaging System continued Tips on sealing & vacuuming a bag Make sure you've securely locked the FoodSaver® appliance lid. When making a bag from a roll, place bag material on the sealing strip, close and lock the lid. Prevent moisture or liquid from being pulled into the Vacuum Channel or trapped in the seal. Pre-freeze moist food such as raw meat for 1-2 hours before vacuum packaging, or place a folded paper towel between food and end of bag to absorb excess liquids.
Vacuum Packaging with Canisters 1. Always leave 2.5cm of space between contents and rim. 2. Wipe rim of canister to ensure it's clean and dry. 3. Place the appliance on a flat, dry surface and plug the supply cord into a standard electrical outlet. How to Open the FoodSaver® Canister To open, press and hold down the grey rubber button in the centre of the lid. This will release the vacuum – a hissing sound can be heard as the air rushes in. 4.
Food Preparation & Safety Tips Guidelines for Vacuum Packaging Food Vacuum packaging is not a substitute for canning nor can it reverse deteriorating quality; it can only slow down changes in quality. It is impossible to predict how long a specific food will have top-quality flavour, appearance and texture, because it depends on the age and condition of the food on the day it was vacuum packaged. Foods that are extremely fresh will last longer than foods that are already deteriorating.
Care and Cleaning Instructions The FoodSaver® Appliance 1. Always unplug the appliance before cleaning. 2. Clean using a mild dishwashing soap and a warm, damp cloth. Do not immerse the appliance in water. Dry thoroughly before using. 3. Do not use abrasive products or materials to clean any of the appliance components. Drip Tray Remove from appliance for easy clean. Clean drip tray in warm soapy water. FoodSaver® Bags IMPORTANT: Do not reuse bags after storing meats, fish or greasy foods. 1.
Guidelines for Vacuum Packaging Vacuum Packaging and Food Safety The vacuum packaging process extends the life of foods by removing most of the air from the sealed container. This reduces oxidation, which affects nutritional value, flavour and overall quality. Removing air can also inhibit growth of micro organisms, which can cause problems under certain conditions such as mould, yeast and bacteria.
Guidelines for Vacuum Packaging continued Vacuum Packaging Vegetables: It is recommended that vegetables are blanched before vacuum packaging. This process stops the enzyme action that could lead to loss of flavour, colour and texture. To blanch vegetables, place them in boiling water or in the microwave until they are cooked, but still crisp.
Guidelines for Vacuum Packaging continued Vacuum Packaging Coffee and Powdery Foods: To prevent food particles from being drawn into vacuum pump, place a coffee filter or paper towel inside the bag, above the coffee and below the top of the bag, before vacuum packaging. Vacuum Packaging Non-Food Items The FoodSaver® vacuum packaging system also protects non-food items from oxidation, corrosion and moisture. Simply follow the directions to vacuum package items using FoodSaver® Bags & Canisters.
Preservation Guidelines Foods Where to Store Recommended FoodSaver® Container Storage Life with FoodSaver® Vacuum Packaging System Normal Storage Life Meat Beef, Pork, Lamb Freezer FoodSaver® Bag ® 2-3 years 6 months Ground Meat Freezer FoodSaver Bag 1 year 4 months Poultry Freezer FoodSaver® Bag 2-3 years 6 months 2 years 6 months Fish Freezer ® FoodSaver Bag Hard Cheeses Cheddar, Swiss Refrigerator FoodSaver® Bag, Canister 4-8 months 1-2 weeks Parmesan Refrigerator FoodSaver
Preservation Guidelines continued Foods Where to Store Recommended FoodSaver® Container Storage Life with FoodSaver® Vacuum Packaging System Normal Storage Life Baked Goods Freezer FoodSaver® Bag Almonds, Peanuts Pantry FoodSaver® Bag, Canister 2 years 6 months Sunflower Seeds Pantry FoodSaver® Bag, Canister 2 years 6 months Freezer FoodSaver® Bag 6 months Bagels, Bread, Pastries 1-3 years 6-12 months Nuts Coffee Coffee Beans 2-3 years ® Coffee Beans Pantry FoodSaver Bag, Caniste
Vacuum Packaging Non-Food Items Your FoodSaver® appliance also protects non-food items from oxidation, corrosion and moisture. Just follow the directions for vacuum packaging using the FoodSaver® Bags, Canisters and Accessories. • Camping and hiking gear stays dry and compact. Vacuum packaging your clothes and equipment will help save space in your bag. Vacuum package matches, maps and anything you want to stay dry. • For picnics, fill a FoodSaver® Bag with ice and seal.
Troubleshooting Nothing happens when the on button is pressed: • Check to see that the appliance is plugged in. Test electrical outlet by plugging in another appliance. • Check the bag for a puncture or hole, which may have released the vacuum. Cushion sharp edges in the contents of the bag with paper towels. • The appliance will shut off automatically if overheated. Allow to cool down for 20 minutes and try again. • Check supply cord and plug for damage. If damaged, do not use the appliance.
Australia www.sunbeam.com.au 1300 881 861 Units 5 & 6, 13 Lord Street, Botany NSW 2019 Australia New Zealand www.sunbeam.co.
Need help with your appliance? Contact our customer service team or visit our website for information and tips on getting the most from your appliance. Australia | visit phone mail New Zealand | visit phone mail www.sunbeam.com.au 1300 881 861 Units 5 & 6, 13 Lord Street, Botany NSW 2019 Australia. www.sunbeam.co.nz 0800 786 232 Level 6, Building 5, Central Park, 660–670 Great South Road, Greenlane, Auckland.