Home Vacuum Packaging System Lock & Seal User Guide VS4500
Contents Important Safeguards 1 Vacuum Packaging Tips 2 ® VS4500 FoodSaver Lock & Seal 3 Using your FoodSaver® 5 Make a bag with FoodSaver® rolls Vacuum seal with FoodSaver® bags Vacuum seal with FoodSaver® accessories Food Preparation & Safety Tips 9 Care and Cleaning Instructions 10 Guidelines for Vacuum Packaging 11 Preservation Guidelines 14 Troubleshooting 16
Important Safeguards Read the Instructions Carefully. For Your Own Safety, Always Follow These Basic Precautions When Using the FoodSaver® Appliance: • • • • • • • • Sunbeam is very safety conscious when designing and manufacturing consumer products, but it is essential that the product user also exercise care when using an electrical appliance.
Vacuum Packaging tips When Vacuum Packaging: 1. Vacuum packaging is NOT a substitute for refrigeration. 2. Use only FoodSaver® bags, rolls and containers. 3. During the vacuum packaging process, small amounts of liquids, crumbs or food particles can be inadvertently pulled into the Vacuum Channel. Empty the Drip Tray after each use. 4. You can prevent liquids from being drawn into the appliance by placing a folded paper towel at the top of the bag, but below the seal area, before vacuum packaging. 5.
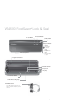
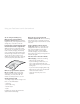
VS4500 FoodSaver® Lock & Seal A. Seal Button B. Vac/Seal Button C. Power On/Off D. Easy Lock Latch: Operate Adjust Back to Operate Store Adjust Center to Store E. Accessory Port Open Adjust Forward to Open F. Upper Foam Gasket G. Vacuum Channel H. Easy-clean Drip Tray I. Lower Foam Gasket J. Extra-wide Sealing Strip K. Handheld Sealer Use with zipper bags and containers, ideal for fresh food and snacks.
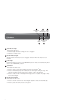
1 2 3 Seal Indicator Vacuum Power Light Indicator Light Light Seal Vacuum & Seal Button Button 4 4 5 1 Seal Indicator Light This light has two uses: 1. Constant light indicates Sealing process is engaged. 2. Flashes to indicate error. 2 Vacuum Indicator Light Shows Vacuum and Seal process is engaged. Shuts off when the full process is finished. 3 Power Light Illuminates when the unit is in the OPERATE position. Shuts off automatically when latch is not in OPERATE position.
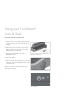
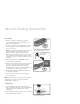
Using your FoodSaver® Lock & Seal How to make a Bag from a FoodSaver® Roll 1. Using scissors, cut enough bag material from roll to hold item, plus 7.5cm. Be sure to cut straight. 2. Move Easy Lock Latch to the open position. Open appliance lid. Insert one end of bag material across Sealing Strip. 3. Close lid and turn Easy Lock Latch to OPERATE position. OP EN END LE SEA DE ND Place Bag on Sealing Strip 4. Press Seal button. 5. When Seal Indicator Light turns off, sealing is complete.
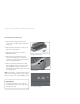
Using your FoodSaver® Lock & Seal continued How to Vacuum Seal FoodSaver® Bags 1. Place item(s) in bag, allowing at least 7.5cm of space between bag contents and top of bag. 2. Open appliance lid and place open end of bag into Vacuum Channel. 3. Close lid and turn Easy Lock Latch to OPERATE position. OP EN LE SEA Close and Latch Lid NOTE: Let appliance cool down for 20 seconds after each use. Always store appliance with the Easy Lock Latch in the center STORE position.
Using your FoodSaver® Lock & Seal continued Tips on sealing & vacuuming a bag Make sure you've securely locked the FoodSaver® appliance lid. When making a bag from a roll, place bag material on the sealing strip, close and lock the lid. Make sure you've securely locked the FoodSaver® appliance lid. 'When vacuuming and sealing a bag or container ensure the lid has been fully closed and lid has locked into place. Prevent moisture or liquid from being pulled into the Vacuum Channel or trapped in the seal.
Vacuum Sealing Accessories For Containers 1. Prepare container according to FoodSaver® Accessory Guidelines (see manual that comes with your Accessory Kit). 2. Insert one end of Accessory Hose into Accessory Port on appliance. Press the Handheld Sealer over the accessory. NOTE: For Containers and Bottle stoppers without green oval buttons on lid, remove the clear bottom portion of Handheld Sealer from top handle. Insert the green tip into the hole on top of the container lid or into the bottle stopper.
Food Preparation & Safety Tips Guidelines for Vacuum Packaging Food Vacuum packaging is not a substitute for canning nor can it reverse deteriorating quality; it can only slow down changes in quality. It is impossible to predict how long a specific food will have top-quality flavour, appearance and texture, because it depends on the age and condition of the food on the day it was vacuum packaged. Foods that are extremely fresh will last longer than foods that are already deteriorating.
Care and Cleaning Instructions The FoodSaver® Appliance 1. Always unplug the appliance before cleaning. 2. Clean using a mild dishwashing soap and a warm, damp cloth. Do not immerse the appliance in water. Dry thoroughly before using. 3. Do not use abrasive products or materials to clean any of the appliance components. Drip Tray Remove from appliance for easy clean. Clean drip tray in warm soapy water. FoodSaver® Bags IMPORTANT: Do not reuse bags after storing meats, fish or greasy foods. 1.
Guidelines for Vacuum Packaging Vacuum Packaging and Food Safety The vacuum packaging process extends the life of foods by removing most of the air from the sealed container. This reduces oxidation, which affects nutritional value, flavour and overall quality. Removing air can also inhibit growth of micro organisms, which can cause problems under certain conditions such as mould, yeast and bacteria.
Guidelines for Vacuum Packaging continued Vacuum Packaging Vegetables: It is recommended that vegetables are blanched before vacuum packaging. This process stops the enzyme action that could lead to loss of flavour, colour and texture. Vacuum Packaging Leafy Vegetables: For best results, use a container to store leafy vegetables. First wash the vegetables, and then dry with a towel or salad spinner. After they are dried, put them in a container and vacuum package. Store in refrigerator.
Guidelines for Vacuum Packaging continued Vacuum Packaging Coffee and Powdery Foods: To prevent food particles from being drawn into vacuum pump, place a coffee filter or paper towel inside the bag, above the coffee and below the top of the bag, before vacuum packaging. You can also place the food in its original bag inside a FoodSaver® Bag. Vacuum Packaging Liquids: Using a FoodSaver® Container is the easiest way to vacuum seal liquids.
Preservation Guidelines Foods Where to Store Recommended FoodSaver® Accessory Storage Life with FoodSaver® Vacuum Packaging System Normal Storage Life Meat Beef, Pork, Lamb Freezer FoodSaver® Bag ® 2-3 years 6 months Ground Meat Freezer FoodSaver Bag 1 year 4 months Poultry Freezer FoodSaver® Bag 2-3 years 6 months 2 years 6 months Fish Freezer ® FoodSaver Bag Hard Cheeses Cheddar, Swiss Refrigerator FoodSaver® Bag, Container 4-8 months 1-2 weeks Parmesan Refrigerator FoodSave
Preservation Guidelines continued Foods Where to Store Recommended FoodSaver® Accessory Storage Life with FoodSaver® Vacuum Packaging System Normal Storage Life Baked Goods Freezer FoodSaver® Bag Almonds, Peanuts Pantry FoodSaver® Bag, Container 2 years 6 months Sunflower Seeds Pantry FoodSaver® Bag, Container 2 years 6 months Freezer FoodSaver® Bag 6 months Bagels, Bread, Pastries 1-3 years 6-12 months Nuts Coffee Coffee Beans 2-3 years ® Coffee Beans Pantry FoodSaver Bag, Conta
Troubleshooting Problem Red Seal LED flashing Solution • Always wait 20 seconds between seals. • Unit is overheated, wait for 20 minutes for unit to cool down • If trying to seal an end of a roll to make a bag, make sure the bag is on the seal strip • If storing unit, make sure that latch is in Store position and not Closed position. If in Closed position for extended period of time the gaskets become compressed.
Problem Air was removed from the bag, but has come back into the bag Solution • Leaks along the seal can be caused by wrinkles, crumbs, grease or liquids. Reopen bag, wipe the top inside of the bag and smooth it out along the sealing strip before resealing. • The release of natural gases or fermentation from foods, (such as fresh fruits and vegetables) may have occurred. Most vegetables require blanching prior to vacuum packing. See page 14 for more details.
Notes 18
Notes 19
Notes 20
Australia www.sunbeam.com.au 1300 881 861 Units 5 & 6, 13 Lord Street, Botany NSW 2019 Australia New Zealand www.sunbeam.co.
Need help with your appliance? Contact our customer service team or visit our website for information and tips on getting the most from your appliance. Australia | visit phone mail New Zealand | visit phone mail www.sunbeam.com.au 1300 881 861 Units 5 & 6, 13 Lord Street, Botany NSW 2019 Australia. www.sunbeam.co.nz 0800 786 232 Level 6, Building 5, Central Park, 660–670 Great South Road, Greenlane, Auckland. Distributed by: Sunbeam Corporation Pty Ltd ACN 000 006 771 is a registered trade mark.