Oskar™ Professional Direct drive food processor Instruction Booklet LC7600 Please read these instructions carefully and retain for future reference.
Contents Sunbeam’s Safety Precautions 4 Features of Your Sunbeam Oskar™ Professional 6 Attachments for your Sunbeam Oskar™ Professional Using your Sunbeam Oskar™ 8 9 Professional 9 Fitting/using the tools on your Oskar™ Professional 11 Storing your Sunbeam Oskar™ Professional 13 Handy hints for Processing 15 Care and cleaning 17 Recipes 18 Important instructions – retain for future use.
Sunbeam’s Safety Precautions • • • • • • • • Sunbeam are very safety conscious when designing and manufacturing consumer products, but it is essential that the product user also exercise care when using an electrical appliance. Listed below are precautions which are essential for the safe use of an electrical appliance: Read carefully and save all the instructions provided with an appliance. Always turn the power off at the power outlet before you insert or remove a plug.
Sunbeam’s Safety Precautions SAFETY PRECAUTIONS FOR YOUR SUNBEAM FOOD PROCESSOR. • Always use extreme care when handling processing blades and cutting discs. These are extremely sharp and may cause injury if handled incorrectly. Always store processing blades and cutting discs in their respective covers or processing containers. • Unplug from power outlet when not in use, before putting on or taking off attachments, and before cleaning. • Do not put hot liquids into the food processor bowl or blender.
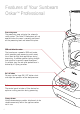
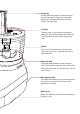
Features of Your Sunbeam Oskar™ Professional Processing cover The processing cover activates the automatic safety system. The Oskar™ Professional will not operate unless the cover is correctly positioned on the processing bowl and locked into place. 900 watt induction motor The base houses a powerful 900 watt motor, which provides great processing results every time. Ideal for high load applications during processing. It provides greater starting strength and maintains a constant speed throughout.
Food pusher Guides food evenly down the feed tube and can also be used to close the chute while processing to prevent food from escaping through the feed tube. Feed tube The feed tube is used to guide ingredients down into the selected blades and allows you to add ingredients during other processing tasks. Spindle Drives all the food processing attachments. The spindle must be in place to operate the food processor.
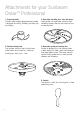
Attachments for your Sunbeam Oskar™ Professional 1. Processing blade Stainless steel smooth edged processing blade is designed for cutting, kneading, whisking and emulsifying. 3. Reversible shredding disc - fine and coarse Ideal control, the reversible stainless steel shredding blades allow for the choice of fine or coarse results. 2. Variable slicing blade The variable stainless steel slicing blade allows foods to be sliced to a variety of thicknesses, from 0mm - 7mm. 4.
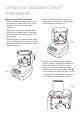
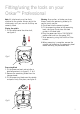
Using your Sunbeam Oskar™ Professional Before using your Oskar™ Professional • Wash the processing bowl, cover and all attachments in warm water using a mild detergent. Dry each part thoroughly before use. • Before you assemble the food processor, ensure that the power cord is unplugged. 1. Place the motor base facing you on a dry, level surface. 2. Place the processing bowl onto the motor base, the bowl will only sit correctly on the base when the handle is positioned to the right, see figure 1. 3.
Using your Sunbeam Oskar™ Professional continued Important: If the processing bowl and cover are not correctly assembled, the Oskar™ Professional will not function. Using your Oskar™ Professional 1. Plug the power cord into a 230-240V AC power outlet and turn the power ‘ON’. 2. Using the On/Off button on the control panel, press once to start processing. The Pulse function remains on as long as the Pulse button is pressed down.
Fitting/using the tools on your Oskar™ Professional Note: All attachments must be firmly attached to the spindle. Always adjust the attachments until you are sure that they are correctly fitted. Placing the spindle 1. Fit the spindle onto the drive shaft, see figure 4. Warning: Use caution, as blades are sharp. Always handle the processing blade by its central plastic section. 4. Place food into the processing bowl. 5.
Fitting/using the tools on your Oskar™ Professional continued Reversible grating, shaving and shredding blades 1. Fit the processor bowl and spindle as detailed previously, in figures 1, 2 and 4. 2. Select the 'Reversible' disc of your choice - Shredding (fine or coarse), Grating or Shaving. 3. Fit the disc over the spindle and press firmly into place, see figure 6. Warning: Use caution as the blades are sharp. Variable slicing blades 1.
Storing your Sunbeam Oskar™ Heading Professional The Sunbeam Oskar™ Professional was designed so that all attachments can be stored within the unit itself, see figure 8. 3. Place one of the 'Reversible discs' in storage darwer as indicated in figure 10. Fig 10 4.Lie spatula on top of 'Reversible Disc' in the storage drawer as indicated in figure 11.
Heading Storing your Sunbeam Oskar™ Professional continued Processing bowl storage, see figure 14. 1. Place the processing bowl onto the base of the food processor. 2. Fit the spindle over the drive shaft. 3. Place the 'Variable Slicing' blade over the spindle and then fit the processing cover to the processing bowl. Cord storage The power cord can be stored by pushing it into the back of the motor base, see figure 15.
Heading Handy hints for Processing Chopping For the best, most consistent results, you should try to process pieces of food that are approximately equal in size. When you break, cut or tear food into uniform pieces before you begin processing, the finished results will be more uniform. More consistent processing results are achieved if the container is not overloaded. Mincing Pre-cut meat into cubes approximately 2cm square.
Heading Handy hints for Processing continued Preparing shorter slices Pack the food items vertically in the feed tube, see figure 17. For best results when shredding and grating Remember that softer foods such as cheese (cheddar, mozzarella or swiss) should be well chilled before processing. Harder foods such as parmesan or Romano cheese should be at room temperature before processing. Note: When grating parmesan cheese do not apply a lot of pressure to the food pusher.
Heading Care and cleaning When you have finished processing, unplug the Oskar™ Professional from the power outlet. All accessories and processor tools can be washed in hot soapy water except for the processor body. Clean the processor body by wiping with a damp cloth. Warning: Care must be taken when handling the metal blades as these items are extremely sharp. Note: Always unplug the Oskar™ Professional before cleaning.
Recipes Guacamole Baba Ghanoush 2 ripe avocados, peeled, seeds removed 2 large eggplants 1 clove garlic 3 cloves garlic 1 tablespoon lemon juice 2 tablespoons tahini dash Tabasco sauce ¼ cup lemon juice 1 jalapeno chili, sliced (optional) ¼ teaspoon sweet paprika ¼ cup fresh coriander leaves sea salt and freshly ground black pepper 1 small red onion, quartered 1. Pierce eggplants all over with a fork. Cook eggplants under a griller until the skin blackens and the flesh is soft.
Recipes continued 3. Heat butter in a frying pan over a medium heat. Cook onion and mushrooms until soft, cool. 4. Using the processing bowl fitted with the processing blade, place mushroom mixture into processor bowl with remaining ingredients and process until smooth. 5. Pour into serving bowl and refrigerate for at least 2 hours before serving. Serve with Melba toasts.
Recipes continued Roast Pumpkin Soup Serves 4 Potato and Leek Soup Serves 4 1.5kg pumpkin 3 medium leeks, whites only 2 tablespoons olive oil 1 tablespoon olive oil Sea salt & freshly ground black pepper 2 small rashers bacon, chopped 20g butter 1 kg potatoes, peeled and chopped roughly 1 onion, chopped 2 litres chicken or vegetable stock 1 litre chicken stock Freshly ground black pepper ¹/³ cup cream or sour cream to serve (optional) ½ cup grated Parmesan 1. Preheat oven to 200 °C. 2.
Recipes continued Mexican style Tomato Soup Serves 6 Lamb Meatballs 2 onions, quartered 3 cloves garlic, peeled 2 cloves garlic, peeled 2 tablespoons finely grated lemon rind 1 tablespoon olive oil ¼ cup mixed fresh herbs 2 teaspoons cumin powder ¼ cup lemon juice 1 teaspoon chili powder sea salt flakes and black pepper to taste 3 x 400g can chopped tomatoes 1kg lamb meat roughly cut into large pieces (no bones) 500ml water 1 teaspoon brown sugar 1 tablespoon vinegar 2 x 400g cans red kidney
Recipes continued Thai Fish Cakes Quiche Lorraine 500g firm white fish fillets (ie. Ling, Gemfish, Redfish) 180g tasty cheese 1 teaspoon fish sauce 1/3 cup packaged breadcrumbs 2 tablespoons mild red curry paste 50g green beans, chopped finely 6 bacon rashers, rind removed, roughly chopped Oil for deep frying 4 eggs Sweet chilli dipping sauce 1 cup milk Coriander leaves ½ cup cream Sea salt flakes ½ cup self raising flour 2 limes, cut into wedges pepper to taste 1.
Recipes continued Zucchini tossed in Angel Hair Pasta Serves 4 Pesto Serves 4 2 small green zucchini 125g fresh basil leaves 2 small yellow zucchini 3 cloves garlic 3 cloves garlic, crushed 2 teaspoons lemon juice ½ cup (125ml) extra virgin olive oil sea salt 1 large onion, chopped freshly ground black pepper 500g angel hair pasta 1 cup extra virgin olive oil 1 ½ tablespoons chopped fresh thyme ½ pine nuts, roasted ¼ cup (60ml) freshly squeezed lemon juice 60g pecorino or parmesan, grate
Recipes continued Basic White Loaf Wholemeal Bread 15g compressed yeast 15g compressed yeast 1 tablespoon sugar 2 teaspoons sugar ¼ cup warm water 1¼ cups warm water ½ cup warm milk 30g butter or margarine, melted 60g butter or margarine, melted 1 cup plain flour 1 ¾ cups plain flour ¾ cups wholemeal flour 1 teaspoon salt 1 teaspoon salt 1. Cream yeast and sugar together in a small bowl.
Recipes continued Pizza Dough 30g compressed yeast 1 teaspoon sugar 80ml lukewarm milk 2 cups plain flour 1 ¾ teaspoon salt 1 egg 60g butter or margarine, melted 1. Cream yeast and sugar together in a small bowl. Add milk and allow to stand in a warm place until mixture begins to froth. 2. Using the processing bowl fitted with processing blade, process flour, salt, egg and butter or margarine until combined (approximately 5-10 seconds). 3.
Recipes continued Banana Cake with Cream Cheese Frosting Cream Cheese Frosting 2 ¼ cups self raising flour 250g softened cream cheese ½ teaspoon salt ¼ cup butter 1 teaspoon cinnamon 1 teaspoon vanilla ½ teaspoon nutmeg 3 cups icing sugar mixture 2 eggs ¼ cup passionfruit pulp 180g butter, room temperature, chopped 1 teaspoon white vinegar Combine cream cheese, butter and vanilla in a small bowl. Using an electric mixer, beat until smooth. Add the icing sugar mixture and beat until smooth.
Recipes continued cheese while processing until mixture is smooth. Pour filling into crust and bake in oven at 160° for approximately 50 minutes or until firm. Cool in oven with door ajar. Refrigerate for several hours before serving. Chocolate Cake 1 ½ cups self-raising flour ½ cup cocoa 1 ½ cups caster sugar pinch of salt 150g butter or margarine, at room temperature 2 eggs 1 cup milk 1. Preheat oven to 180 °C, grease and line a 23cm cake tin.
Recipes continued Ganache 300g rich, dark chocolate lid on and allow the mixture to stand for 5 minutes. 200ml cream 3. Add oil and sugar and pulse 3 times. 1. Using the processing bowl fitted with the processing blade, process the chocolate until roughly chopped. 4. Add remaining ingredients and pulse mixture until just combined. Scrape down sides of bowl if necessary. Do not over process. 2. Remove the processing blade and place chocolate into a clean, dry, heatproof glass bowl. 3.
Recipes continued 2. Knead pastry until smooth then shape into a disk. Wrap pastry in plastic wrap and refrigerate for 30 minutes. 3. Grease a 24cm round loose-based flan tin. Roll pastry, between two sheets of baking paper, large enough to line tin. Lift pastry into tin and press into sides; trim edges. Cover and refrigerate for 40 minutes. 4. Preheat oven to 200°c. Place tin on oven tray; line tin with baking paper then fill with dried beans.
Recipes continued Crepes with apple and sultana filling Serves 4-6 Peanut Butter Biscuits ½ cup unsalted peanuts Crepes 1 teaspoon grated lemon rind 3 eggs 1 teaspoon oil 1 tablespoon vegetable oil 125g butter or margarine, at room temperature 1 ¹/³ cups milk ¾ cup plain flour 1 tablespoon lemon juice Filling ¹/³ cup sugar 3 Granny Smith apples ¹/³ cup brown sugar 1 ½ teaspoons cinnamon 1½ cups plain flour 1 ½ tablespoons brown sugar 1 teaspoon bicarbonate soda ¾ cup water 1.
Recipes continued Chocolate Chip Cookies 125g butter or margarine, at room temperature ½ cup brown sugar, lightly packed ½ cup caster sugar ½ teaspoon vanilla 1 egg 1¾ cups self-raising flour ¼ teaspoon salt 1 cup chocolate chips 1. Preheat oven to 180°C and grease oven trays. 2. Using the processing bowl fitted with the processing blade, process butter or margarine, sugars and vanilla until well combined. 3. Remove the processing bowl cover and scrape the sides of the bowl. 4. Replace the cover.
Recipes continued Scones 3 cups self-raising flour ¼ teaspoon salt 60g butter cubed 1¾ cups buttermilk 1. Preheat oven to 220 °C and grease a 19cm cake tin. 2. Using the processing bowl fitted with the processing blade, process flour, salt and butter until combined. 3. Remove the food pusher and pour buttermilk through the feed tube and continue to process until just combined. 4. Remove processing blade and turn mixture out onto a floured surface. Knead lightly and press out to approximately 2cm thickness.
Recipes continued Fresh Pineapple and Mint Sorbet Makes approx. 1 litre Quick Mango Sorbet Makes approx. 1 litre You will need 1 pineapple for this recipe. 1 cup (250ml) water 1 cup (250ml) water 1 cup (220g) caster sugar 1 cup (220g) caster sugar 600g frozen mango cheeks, roughly chopped 2 ½ cups freshly juiced pineapple juice 1 ½ tablespoons lime juice, cold 1 tablespoon finely shredded mint 1. Heat the water and sugar in a small saucepan over a low heat until the sugar has dissolved.
‘Sunbeam’, is a registered trademark of Sunbeam Corporation. ‘Oskar’, is a trademark of Sunbeam Corporation. Made in China. Due to minor changes in design or otherwise, the product may differ from the one shown in this leaflet. Backed by Sunbeam's 12 Month Replacement Guarantee and National Service Network. © Copyright. SUNBEAM CORPORATION LIMITED 2004. (INCORPORATED IN N.S.W.) A.C.N. 000 006 771 Sunbeam Corporation is a division of GUD Holdings Ltd.
Consumer Hotline Australia 1800 025 059 New Zealand 0800 786 232 www.sunbeam.com.au is a registered Trademark of Sunbeam Corporation Limited. ACN 000 006 771. © Sunbeam Corporation Limited 2004.