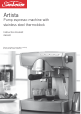
Artista Pump espresso machine with stainless steel thermoblock Instruction Booklet EM5900 Please read these instructions carefully and retain for future reference.
Contents Sunbeam’s Safety Precautions 2 About espresso coffee 3 Features of your Sunbeam Artista 4 Using the control panel 7 Reference guide to using your espresso machine 10 Preparing your espresso machine before use 15 Guide to the perfect espresso 16 Guide to milk texturing 18 Using the hot water function 19 Espresso Recipes 20 Care and Cleaning 22 Descaling 24 Advanced programming options 26 Trouble shooting guide 30 Important instructions – retain for future us
Sunbeam’s Safety Precautions SAFETY PRECAUTIONS FOR YOUR SUNBEAM ESPRESSO MACHINE. • Always place the unit on a flat, level surface. • Do not operate without water in reservoir. Fill reservoir with only clean and cold water. Observe the maximum filling volume is 2.5 litres. • Do not remove the filter handle during the espresso pour or water flow as the unit is under pressure. Removing the filter handle during either of these operations can lead to a scalding or injury.
About espresso coffee Congratulations on the purchase of your Sunbeam Artista espresso machine. The mastery of coffee making demands a machine that you can trust to perform time and time again. Powered by a one-piece stainless steel lined thermoblock and an Italian designed and manufactured 15 BAR pump, the espresso machine will deliver the performance a true artist and coffee connoisseur has come to expect.
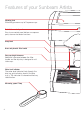
Features of your Sunbeam Artista Warming plate Effectively pre-warms up to 9 espresso cups Push button control panel Easy to use control panel delivers an espresso pour, steam or hot water functions. Group head Brass and phenolic filter handle Extra cup height clearance Additional clearance between the filter handle and the drip tray is designed to suit taller cups. Water level indicator The water level indicator floats through the drip tray grid indicating how full the drip tray is.
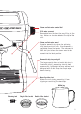
Steam and hot water control dial 2.5L water reservoir Removable from the front for easy filling at the tap. Water can also be added at the top of the unit. Steam and hot water wand Supplies powerful dry steam for achieving silky, dense and rich milk. Also dispenses a controlled flow of hot water. The commercial 3600 ball joint allows the steam wand to be moved into the ideal position.
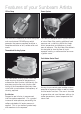
Features of your Sunbeam Artista 15 Bar Pump Crema System The machine is fitted with an Italian designed and manufactured 15 BAR pump which generates the pressure required to deliver a complete extraction of oils, coffee solids and aroma. The specially designed crema system consists of a dual-floor filter creating additional back pressure and a stabilising baffle that helps retain temperature and produces a steady pour of espresso.
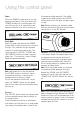
Using the control panel Power Press the ‘POWER’ button once to turn the espresso machine on. The light behind the ‘POWER’ button will illuminate green and start flashing; this is to indicate that your espresso machine is on and is heating up. the espresso coffee operation. The coffee maker simply needs to press the ‘COFFEE’ button once to start the pour and press again to stop. Note: Before activating the espresso coffee function ensure that the steam and hot water control dial is in the OFF position.
Heading Using the control panel (continued) Steam The steam function allows the coffee maker to produce steam out of the steam wand for texturing milk. To activate the steam function, the coffee maker simply needs to press the ‘STEAM’ button. By design the temperature of the espresso machine will adjust as necessary. There may be a short delay while you wait.
Using the control panel (continued) Hot Water The hot water function allows the coffee maker to release a controlled flow of hot water for making long blacks, hot chocolates, pre-heating cups and glasses and brewing teas. To activate the hot water function, the coffee maker simply needs to press the ‘HOT WATER’ button.
Reference guide to using your espresso machine The diagrams below and on the following pages are to assist you in operating your Sunbeam Artista espresso machine. Each of the diagrams is numbered. Throughout this instruction booklet reference will be made to these diagrams, so each of them has been numbered for convenience and ease of use. For example: Fill the water reservoir (1) (2) (3) (4) (5) with cold tap water... Each time you see these numbers please refer back to the diagrams.
Reference guide to using your espresso machine (continued) 10 Place group handle onto group head. 11 Turn group handle to the right, so it is firmly locked into position. 12 Place large container under both pouring spouts. Making the espresso 13 Press the ‘COFFEE’ button and allow the water to run through. Press button again to stop. 16 Place finely ground coffee into filter basket. 14 Select appropriate filter and place into group handle.
Reference guide to using your espresso machine (continued) 19 Place group handle onto group head. 20 Turn group handle to the right, so it is firmly locked into position. 22 Press the ‘COFFEE’ button for a continuous pour. Press button again to stop pour. 23 Remove group handle by turning to the left. 24 Discard the used coffee grinds. Texturing milk 25 Press the 'STEAM' button to activate steam mode. 12 21 Place glasses/cups below pouring spouts.
Reference guide to using your espresso machine (continued) 28 Swing steam wand to the side of espresso machine. 29 Place steam wand into milk, approx. 1cm below surface and activate the steam function. 31 Close the steam by turning dial clockwise. 32 Wipe steam nozzle and wand with damp cloth and purge a small amount of steam. 30 Angle jug to rest steam wand on spout and place nozzle just below surface of the milk. Hot water 33 Press the 'HOT WATER' button to activate hot water mode.
Reference guide to using your espresso machine (continued) Cleaning 37 Remove the drip tray. 38 Remove drip tray grill. 40 41 Insert thinner end of cleaning pin into the single hole in the base of the filter. Wrap steam wand with damp cloth and turn steam on for 10 seconds. 14 39 Remove the cleaning pin from under the top lid of the water reservoir. 42 Insert thicker end of cleaning pin into the hole in the base of the steam wand.
Preparing your espresso machine before use 1. Place the espresso machine onto a dry, stable benchtop. 2. Ensure the drip tray and grill are in place. 3. Fill the espresso machine with water. There are a couple of ways in which the water reservoir can be filled; a) Simply lift the lid of the water reservoir at the top of the espresso machine (1) and using a jug, fill with fresh cold water or filtered water (2), then close the lid.
Guide to the perfect espresso Preheat Glasses 1. Preheat the glasses/cups by filling them with hot water as this will assist to preserve the crema of the espresso. Set the glasses/ cups aside. Caution: The hot water will be close to boiling temperature. Take care so as not to crack the glasses or burn yourself. Preheat Group Handle and Filter Basket 2. Select the appropriate filter basket and place it into group handle (14).
Guide to the perfect espresso (continued) Pre-Infusion 11. Once the espresso operation has been activated, before the espresso pour starts, the progressive pre-infusion feature will release three short bursts of gradually increasing water pressure onto the coffee cake. After this, the full water pressure is applied to the coffee cake and the espresso will pour freely. 12. Check the espresso pour. The ideal pour starts out dark and then soon after becomes caramel with reddish reflections.
Guide to milk texturing Milk texturing is the steaming of milk. The steam does two things, heats the milk and also the steam mixes air with the milk to form an ‘emulsion’ of tiny bubbles that gives a silky velvet texture. Similar to making an espresso, perfecting the art of milk texturing takes time and practice. Tip: Remember espresso is the foundation for all espresso-coffee drinks and the milk is the variable.
Guide to milk texturing (continued) the correct temperature. It's important to remember that if the milk is not heated long enough the drink will be too cool and if heated for too long it will start to boil at around 72°C and all texture will be lost. Tip: If you don’t have a thermometer a good indication that the correct temperature has been reached is when the jug becomes too hot to leave your fingers in contact. Important: Do not boil the milk as the texture and taste will be affected. 9.
Espresso Recipes ESPRESSO (SHORT BLACK) MACCHIATO Espresso is a concentrated, full bodied coffee with a stable layer of cream on top – known as ‘crema’. An espresso is the foundation of all café coffee. Variations are achieved by adding different amounts of milk and froth. Macchiato, Italian for ‘to stain or mark’. Traditionally served as a standard espresso with a dash of milk and a small dollop of froth into the middle of the ‘crema’.
Espresso Recipes (continued) CAFFE LATTE CAFFE MOCHA An espresso with steamed milk, typically served in a glass. The layer of frothed milk on top should be 10mm to seal the coffee. • 220mL glass or cup Made in a similar way to a cappuccino but with the addition of drinking chocolate. Simply stir the chocolate into the espresso prior to adding the steamed milk and froth.
Care and Cleaning The coffee making process involves extracting oils out of coffee grinds to make espresso coffee. Deposits of these oils build up over time and affect the taste of the coffee and operation of the espresso machine. Regular cleaning to remove these oils is essential and will maintain the quality of the coffee the espresso machine produces and result in less maintenance being required.
Care and Cleaning (continued) Cup warming plate and exterior Wipe over the unit with a damp cloth and wipe dry. Do not use abrasives or metal scourers as these will scratch the exterior surface. Steam wand Keeping the steam arm clean is essential to ensure maximum efficiency of the steam function. A build up of caramelised/dried milk on the steam wand will impair the steaming and texturing ability of the espresso machine. The steam nozzle has been specially designed to be perfectly smooth.
Descaling Scale is a surface build up of minerals that naturally occur over time in all appliances that are involved with the heating of water. Therefore the espresso machine will require occasional descaling. It is recommended that the espresso machine is decaled every 4-6 months, this will vary depending on the frequency of use and water hardness.
Descaling (continued) 10. Leave the machine off for 10-15 minutes to allow the descaling solution to take affect. 11. Press the ‘POWER’ button once to turn the espresso machine on. 12. Press the 'COFFEE' button and allow the remaining solution to cycle through the group head. Press button again to stop. 13. Remove the water reservoir from the machine and rinse thoroughly under running water, ensuring that all traces of the descaling solution are removed. Fill with clean water and replace the reservoir.
Advanced Programming Options Espresso Thermoblock Temperature The water temperature of this espresso machine has been calibrated to the precise temperature of 92ºC at the group head. The temperature of the water at the group head can be modified in increments of 2ºC up and down should it be desired. To do this you need to follow the instructions below: 1.
Advanced Programming Options (continued) Steam Thermoblock Temperature The steam temperature of this espresso machine has been calibrated to deliver a powerful and dry steam for texturing milk. The temperature of the steam can be modified in increments of 3ºC up and down should it be desired. To do this you need to follow the instructions below: 1.
Advanced Programming Options (continued) Steam Wetness or Steam Pump Rate The steam pump rate of this espresso machine has been pre-set. Modifying the steam pump rate enables you to make the steam wetter or dryer and aids in the delivery of a powerful, dry steam – ideal for texturing milk. The steam pump rate can be modified in flow rate increments up or down should it be desired. To do this you need to follow the instructions below: 1.
Advanced Programming Options (continued) Factory Reset To undo any changes made to the program you can revert back to the original factory settings. To do this you need to follow the instructions below: 1. Insert the power cord into a 230-240V AC power outlet and switch the power ‘ON’ at the mains only, so that no lights are illuminated on the espresso machine control panel (ie. the power outlet should be 'ON' but the espresso machine will be 'OFF'). 2. Press and hold down the ‘POWER’ button for 3 seconds.
Trouble shooting guide Problem Possible cause What to do Coffee runs down the side of Group handle is not attached correctly, Ensure the handle is firmly positioned the group handle. or has not been tightened sufficiently. onto the group head. See “Guide to the perfect espresso” pg 16. Edge of filter basket is not free Clean around the top edge of the of coffee grinds. filter and wipe the group head clean of coffee. The group head is dirty. Wipe group head with a damp cloth.
Trouble shooting guide (continued) Espresso does not have any Not enough coffee in filter. crema. See "Guide to the perfect espresso" pg16. Handle comes off during group. Coffee tamped too hard. Tamp the coffee grounds lighter. Coffee grind is too fine. Change to a coarser grind of coffee. Filter handle is not attached correctly, Ensure the handle is firmly positioned or has not been tightened sufficiently. onto the group head. See "Guide to the perfect espresso" pg16.
Trouble shooting guide (continued) Uneven cup filling. Uneven tamping or obsruction in the pouring spouts. Ensure coffee is tamped evenly and check that there is nothing obstructing the pouring spouts. Contact a Sunbeam Service Centre. Defective baffle in filter handle. Bench surface is uneven Reposition the machine on a level, even surface. Espresso tastes burnt. Type of coffee being used. Experiment with different brands of coffee.
12 Month Replacement Guarantee We are so confident of the quality of our product, should this appliance develop any malfunction within 12 months of purchase (3 months commercial use) due to faulty materials or manufacture, we will replace it for you absolutely free. Should you experience any difficulties with your appliance, please phone our customer service line for advice on 1300 881 861 in Australia, or 0800 786 232 in New Zealand.
Consumer Hotline In Australia Visit www.sunbeam.com.au Or call 1300 881 861 In New Zealand Visit www.sunbeam.co.nz Or call 0800 786 232 is a registered trademark. 'Artista' is a trademark of Sunbeam Corporation. Designed and Engineered in Australia. Made in China to Sunbeam's specification. Due to minor changes in design or otherwise, the product you buy may differ from the one shown in this leaflet. © Copyright. Sunbeam Corporation Limited 2008.