
Installation Guide
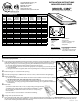

SIZE INFORMATION Fastener Schedule
Size
Code
Roof
Opening
Finished
Opening
(Drywall
Dimension)
Model CMG
Only
Curb Outside
Dimension
Fits on
Center
Spacing
Fastener
Per Top &
Bottom
Fastener
Per Side
1414 11½” x 11½” 10½” x 10½” 14½” x 14½” 16” 3 3
1422 11½” x 19½” 10½” x 18½” 14½” x 22½” 16” 3 3
1430 11½” x 27½” 10½” x 26½” 14½” x 30½” 16” 3 3
1446 11½” x 43½” 10½” x 42½” 14½” x 46½” 16” 3 4
1725 14½” x 22½” 13½” x 21½” 17½” x 25½” 16” 3 3
1733 14½” x 30½” 13½” x 29½” 17½” x 33½” 16” 3 3
1749 14½” x 46½” 13½” x 45½” 17½” x 49½” 16” 3 4
2222 19½” x 19½” 18½” x 18½” 22½” x 22½” 24” 3 3
2230 19½” x 27½” 18½” x 26½” 22½” x 30½” 24” 3 3
2246 19½” x 43½” 18½” x 42½” 22½” x 46½” 24” 3 4
2525 22½” x 22½” 21½” x 21½” 25½” x 25½” 24” 3 3
2533 22½” x 30½” 21½” x 29½” 25½” x 33½” 24” 3 3
2549
22½” x 46½” 21½” x 45½” 25½” x 49½” 24” 3 4
3030 27½” x 27½” 26½” x 26½” 30½” x 30½” 16” or 32” 3 3
3046 27½” x 43½” 26½” x 42½” 30½” x 46½” 16” or 32” 3 4
3333 30½” x 30½” 29½” x 29½” 33½” x 33½” 16” or 32” 3 3
3349 30½” x 46½” 29½” x 45½” 33½” x 49½” 16” or 32” 3 4
4646 43½” x 43½” 42½” x 42½” 46½” x 46½” 16” or 24” or 48” 4 4
4949 46½” x 46½” 45½” x 45½” 49½” x 49½” 16” or 24” or 48” 4 4
5
Build curb:
a) Construct curb with 2 x 4’s, 2 x 6’s, etc. (depending on height desired
or building code requirements). Curb should be minimum 3 ½” high.
Be sure inside measurement of curb is the same as roof opening
measurement.
b) Secure curb to roof. See fastener schedule and drawing.
6
Shingle roof up to bottom of curb.
7
Flash curb (sizes 2525, 2549, 3333, 3349, 4949 can be used with Sun-Tek’s preformed, pre-cut Step Flash Kit with one-piece head and
sill). Use galvanized sheet metal, aluminum, or copper. Metal should extend a minimum of 4” over shingles (on bottom side), then up
sides of curb. Flashing should be ush with curb top.
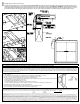
MODEL CMG
II
Use on any type roof (curb required)
1283.C2 - 3/14
CURB O.D.
Roof
Opening
Finished
Opening
Sun-Tek Manufacturing, Inc.
10303 General Drive
Orlando, FL 32824
(407) 859-2117
www.Sun-Tek.com
CustomerService@sun-tek.com
You will need:
• hammer • sealant/mastic
• keyhole saw • tape measure
• skill saw • chalkline or straight edge
• nails • trowel or caulk gun
• drill • utility knife
• 2 x 4’s
For Light Tunnel:
• 8 or 10 penny nails
• plywood or drywall
RECOMMENDED SEALANTS:
• 100% Silicone
• STS1000 (Sun-Tek exclusive)
Butyl rubber sealant/caulk
FAILURE TO FOLLOW RECOMMENDED INSTALLATION PROCEDURES MAY VOID WARRANTY
1
To properly position skylight between trusses/rafters, locate the roof opening from the underside
of the decking. (If this area is not accessible, locate the ceiling joists from inside the house, mark
opening in ceiling (a-c), and cut ceiling opening. Then follow steps below for roof opening.)
a) measure distance between trusses/rafters and mark center point.
b) to center skylight, measure one-half of appropriate roof opening to each side of center
point and mark.
c) using the side marks as a guide, mark corners by drilling holes or driving nails through roof.
2
Remove shingles 6 - 8” out from roof opening.
3
Cut roof opening (snap a chalkline from corner to corner, or draw line with a straightedge.)
4
Frame roof opening:
a) cut two 2 x 4’s to t the actual distance between trusses/rafters and nail into place. NOTE:
Size 2525, 2549, 3333, 3349, 4949 Skip step “b” proceed to “c”.
b) cut two 2 x 4’s to the exact length of the roof opening and nail to the trusses/rafters.
c) if applicable, cut ceiling opening and build tunnel framing. (See “Light Tunnel Installation
Instructions.”)
INSTALLATION INSTRUCTIONS
INSULATED GLASS SERIES
Check local building codes for glass requirements. • Please read instructions completely before beginning. • Deck and roong felt
should already by installed.