
Server Module Installation Guide


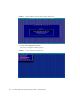
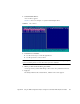
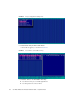
Table Of Contents
- Sun Blade™ X6450 Server Module Installation Guide
- Contents
- Preface
- Introduction
- Installing and Configuring the Server Module
- Installation Worksheet
- Using the BIOS Configuration Utility to Configure the Sun Blade RAID 5 Expansion Module
- Introduction to the BIOS RAID Configuration Utility
- Understanding Hot-Plug Limitations and Conditions Within the BIOS RAID Configuration Utility
- Running the BIOS RAID Configuration Utility
- Using the ACU to Create and Manage Arrays
- Using the -Select Utility to Modify REM Settings
- Using the Disk Utilities to Manage Disk Drives
- Initializing a RAID Array
- Index

Appendix B Using the BIOS Configuration Utility to Configure the Sun Blade RAID 5 Expansion Module 51
▼ To Manage Existing Arrays With the ACU
1. Select Manage Arrays from the main ACU menu.
2. From the Manage Arrays menu, do any of the following:
■ View the properties of an array.
Note – Failed drives are displayed in a different text color.
■ Make an array bootable. See “To Make an Array Bootable With the ACU” on
page 51.
■ Assign or remove hot-spares.
■ Delete an array.
Caution – Before deleting an array, back up the data to avoid permanently losing it.
▼ To Make an Array Bootable With the ACU
Note – You might need to change the system BIOS to modify the boot order. For
more information, refer to your computer documentation.
1. Select Manage Arrays from the main ACU menu.
2. Select the array that you want to make bootable, then press Ctrl-B.
Note – You cannot make an array bootable while it is building, verifying, or
rebuilding.
The array number changes to Array 00, which makes the array the boot array.
3. Restart the computer.
▼ To Initialize Disk Drives With the ACU
If a disk drive is displayed grayed-out (unavailable for use in a new array), it might
need to be initialized.
● Select Initialize Drives from the main ACU menu.