
Server Module Installation Guide
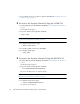
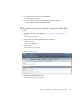


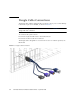

Table Of Contents
- Sun Blade™ X6450 Server Module Installation Guide
- Contents
- Preface
- Introduction
- Installing and Configuring the Server Module
- Installation Worksheet
- Using the BIOS Configuration Utility to Configure the Sun Blade RAID 5 Expansion Module
- Introduction to the BIOS RAID Configuration Utility
- Understanding Hot-Plug Limitations and Conditions Within the BIOS RAID Configuration Utility
- Running the BIOS RAID Configuration Utility
- Using the ACU to Create and Manage Arrays
- Using the -Select Utility to Modify REM Settings
- Using the Disk Utilities to Manage Disk Drives
- Initializing a RAID Array
- Index

Chapter 2 Installing and Configuring the Server Module 31
■ To specify a static Ethernet configuration, type:
where xxx.xxx.xx.xx, yyy.yyy.yyy.y and zzz.zzz.zz.zzz are the IP address,
netmask, and gateway for your ELOM and network configuration.
■ To specify a dynamic Ethernet configuration, type:
set pendingipdiscovery=dhcp
set commitpending=true
Note – Typing set commitpending=true commits your changes.
Accessing the System Console
This section describes how to connect to the system console.
You can access the console in three ways:
■ Directly, using the dongle
■ Using the ILOM CLI
■ Using the ELOM CLI
■ Using the ILOM GUI and an RKVM session
■ Using the ELOM GUI and an RKVM session
After you can view the system console, refer to the documentation for your
operating system. See the Sun Blade X6450 Server Module Operating System
Installation Guide, or the Sun Blade X6450 Server Module Windows Operating
System Installation Guide.
▼ To Access the System Console Directly
1. Connect a keyboard, monitor, and mouse to the dongle cable on the server
module front panel. See “Dongle Cable Connections” on page 38.
set pendingipaddress=xxx.xxx.xx.xx
set pendingipnetmask=yyy.yyy.yyy.y
set pendingipgateway=zzz.zzz.zz.zzz
set pendingipdiscovery=static
set commitpending=true