
Server Module Installation Guide
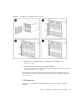
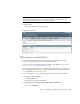
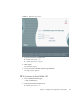
Table Of Contents
- Sun Blade™ X6450 Server Module Installation Guide
- Contents
- Preface
- Introduction
- Installing and Configuring the Server Module
- Installation Worksheet
- Using the BIOS Configuration Utility to Configure the Sun Blade RAID 5 Expansion Module
- Introduction to the BIOS RAID Configuration Utility
- Understanding Hot-Plug Limitations and Conditions Within the BIOS RAID Configuration Utility
- Running the BIOS RAID Configuration Utility
- Using the ACU to Create and Manage Arrays
- Using the -Select Utility to Modify REM Settings
- Using the Disk Utilities to Manage Disk Drives
- Initializing a RAID Array
- Index

Chapter 2 Installing and Configuring the Server Module 21
FIGURE 2-1 Inserting the Server Module Into the Chassis
4. Push the server module into the slot until the server module stops.
See
FIGURE 2-1 [2].
5. Rotate the ejectors down until they snap into place.
The server module is now flush with the chassis, and the ejectors are locked. See
boxes 3 and 4 in
FIGURE 2-1 [3,4].
If the chassis is powered on, the server module comes up to standby power. The
green OK LED on the front panel flashes and the blue OK to Remove LED remains
on. See
FIGURE 1-1.
LED Behavior
When the server module is inserted in the chassis, the LEDs blink in a specific
sequence.