
Server Module Installation Guide


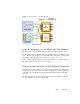
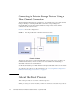
Table Of Contents
- Sun Blade™ X6450 Server Module Installation Guide
- Contents
- Preface
- Introduction
- Installing and Configuring the Server Module
- Installation Worksheet
- Using the BIOS Configuration Utility to Configure the Sun Blade RAID 5 Expansion Module
- Introduction to the BIOS RAID Configuration Utility
- Understanding Hot-Plug Limitations and Conditions Within the BIOS RAID Configuration Utility
- Running the BIOS RAID Configuration Utility
- Using the ACU to Create and Manage Arrays
- Using the -Select Utility to Modify REM Settings
- Using the Disk Utilities to Manage Disk Drives
- Initializing a RAID Array
- Index

Chapter 1 Introduction 9
FIGURE 1-2 Connections to a SAS NEM Module
Internal Connection to a Sun Blade 6000 Disk Module
Inside the chassis, the Sun Blade 6000 Disk Module provides eight SAS drives.
The Sun Blade 6000 Disk Module and the Sun Blade X6450 Server Module work in
pairs, with the server module in an even-numbered slot, directly to the left of the
disk module. Thus, the pairs can be in slots 0+1, 2+3, 4+5, 6+7, or 8+9.
In this configuration, the eight disks on the disk module are available to the server
module, and appear in the boot list as local drives.
External Connecton to the 10 GbE Ethernet Connections
In addition to the four external SAS connectors, the Sun Blade 6000 10GbE Multi-
Fabric Network Express Module provides ten 10GbE ports. To use the 10GbE ports,
you must have a Sun Blade 6000 10GbE Multi-Fabric Network Express Module
installed.
For more information, see the Sun Blade 6000 Disk Module Installation Guide, and
the documentation for the SAS NEM module.