
User's Guide SBus Adapter SunSwiftTM


2-2 SunSwift SBus Adapter Installation and User’s Guide—January 1996
2
2.2 Verifying the Installation
After the SunSwift SBus Adapter is installed, and before booting the system,
verify installation by performing the following tasks. Refer to the Solaris 2.x
Handbook for SMCC Peripherals manual or your Solaris documentation for the
detailed instructions.
1. Power on the system, and when the banner appears, press the Stop-A keys
to interrupt the boot process and to get to the ok prompt.
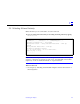
2. Use the show-devs command to list the system devices.
You should see a line (similar to the one in the example below) in the
display, specific to the SunSwift SBus Adapter:
• fas@0 identifies the adapter’s SCSI-2 device.
• hme@0 identifies the adapter’s Ethernet device.
Note – In the above example, the number 0 following fas@ and hme@
corresponds to the SBus slot in which the SunSwift SBus Adapter resides.
If you do not see these devices listed, check that the adapter is properly seated
and reinstall the adapter, if necessary.
Diagnostics Testing
• For SunSwift SBus Adapter diagnostics testing on systems running Solaris
2.4, see Appendix A, “Running Diagnostics for Solaris 2.4.”
• For SunSwift SBus Adapter diagnostics testing on systems running Solaris
2.5, refer to the SunVTS 1.0 User’s Guide.
ok show-devs
...
/iommu@f,e0000000/sbus@f,e0001000/SUNW,fas@0,8800000
/iommu@f,e0000000/sbus@f,e0001000/SUNW,hme@0,8c00000
...