SunSwift™ SBus Adapter Installation and User’s Guide The Network Is the Computer™ Sun Microsystems Computer Company 2550 Garcia Avenue Mountain View, CA 94043 USA 415 960-1300 fax 415 969-9131 Part No.
Copyright 1995 Sun Microsystems, Inc. 2550 Garcia Avenue, Mountain View, California 94043-1100 U.S.A. All rights reserved. This product or document is protected by copyright and distributed under licenses restricting its use, copying, distribution, and decompilation. No part of this product or document may be reproduced in any form by any means without prior written authorization of Sun and its licensors, if any. Portions of this product may be derived from the UNIX® system and from the Berkeley 4.
Contents Preface . . . . . . . . . . . . . . . . . . . . . . . . . . . . . . . . . . . . . . . . . . . . . . . v 1. Preparing for Installation . . . . . . . . . . . . . . . . . . . . . . . . . . . . . . 1-1 1.1 Requirements for Using the SBus Adapter . . . . . . . . . . . . 1-2 1.2 If Solaris 2.5 is Not Installed on Your System . . . . . . . . . . 1-3 1.3 If Solaris 2.5 is Installed on Your System . . . . . . . . . . . . . . 1-3 1.3.
2.5.2 Running Diagnostics. . . . . . . . . . . . . . . . . . . . . . . . . . 2-5 2.5.3 Auto-Negotiation . . . . . . . . . . . . . . . . . . . . . . . . . . . . 2-6 2.5.4 Configuring Driver Parameters. . . . . . . . . . . . . . . . . 2-6 A. Interface Signals . . . . . . . . . . . . . . . . . . . . . . . . . . . . . . . . . . . . . . A-1 B. Specifications . . . . . . . . . . . . . . . . . . . . . . . . . . . . . . . . . . . . . . . . .
Preface This manual describes how to install and use your SBus card. The procedures in this manual assume that you are a system or network administrator experienced in installing similar hardware and that you are familiar with Solaris administration. UNIX Commands This document may not include specific software commands or procedures. Instead, it may name software tasks and refer you to operating system documentation or the handbook that was shipped with your new hardware.
Typographic Conventions The following table describes the typographic changes used in this book. Typeface or Symbol Meaning Example AaBbCc123 The names of commands, files, and directories; on-screen computer output Edit your.login file. Use ls -a to list all files. machine_name% You have mail. AaBbCc123 What you type, contrasted with on-screen computer output AaBbCc123 Command-line placeholder: replace with a real name or value To delete a file, type rm filename.
Related Documents The following documents contain topics that relate to the information in the SunSwift SBus Adapter Installation and User’s Guide. Title Part Number Your system installation or service manual Solaris 2.5 Handbook for SMCC Peripherals 802-3725 SMCC Open Issues Supplement Solaris 2.5 802-3708 Solaris 2.5 on Sun Hardware AnswerBook SunVTS 1.
! FCC Class B Notice—United States This device complies with Part 15 of the FCC Rules. Operation is subject to the following two conditions: 1. This device may not cause harmful interference, and 2. This device must accept any interference received, including interference that may cause undesired operation. Note - This equipment has been tested and found to comply with the limits for a Class B digital device pursuant to Part 15 of the FCC Rules.
Preface ix
x SunSwift SBus Adapter Installation and User’s Guide—December 1995
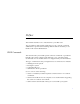
1 Preparing for Installation The SunSwift™ SBus Adapter offers fast Ethernet and FastWide SCSI-2 capabilities on the same SBus card. SBus connector SCSI-2 connector Ethernet connector This SBus card offers the following features: • Switchable 10BASE-T/100BASE-TX Ethernet. Automatically sets 10/100 Mbps speed. Conforms to IEEE 802.3u Ethernet standard. • 20 Mbytes/s, 16-bit, single-ended SCSI-2 controller. Conforms to ANSI X3T9.2 SCSI-2 standard. • SBus interface to host system.
1 1.1 Requirements for Using the SBus Adapter Before installing the adapter, make sure your system meets the following hardware and software requirements: Systems Sun™ Ultra™ 140, Sun Ultra Creator 170E, SPARCstation™ 4, SPARCstation 5, SPARCstation 10 models, SPARCstation 20 models, SPARCserver™ 600MP series, SPARCserver 1000 or SPARCcenter™ 2000 Firmware OpenBoot™ PROM Version 2.9 or greater Operating System Solaris™ 2.
1 Ethernet Cabling An additional Ethernet cable is required if you want to use your system’s existing Ethernet interface and the SunSwift SBus Adapter Ethernet interface. Disabling Your Current Ethernet Device If you remove your system’s existing Ethernet cable (either from its on-board Ethernet device or from an existing Ethernet card) and insert it into the SunSwift SBus Adapter Ethernet connection, you must disable your current card’s Ethernet device.
1 1.3.1 Using the SunSwift SBus Adapter as Your Only Ethernet Interface You will be installing software from the Solaris 2.5 CD-ROM. Make sure the Solaris 2.5 CD-ROM is properly placed in the CD-ROM drive before performing the following tasks. 1. As superuser, add the SUNWhmd and SUNWhmdu packages to your system: # pkgadd -a none -d /cdrom/solaris_2_5_sparc/s0/Solaris_2.5 SUNWhmd SUNWhmdu 2.
1 9. Power off your system, using standard shutdown procedures described in Solaris 2.5 Handbook for SMCC Peripherals. 10. Install the SunSwift SBus Adapter as described in Chapter 2. 1.3.2 Using the SunSwift SBus Adapter and Existing Ethernet Interface You will be installing software from the Solaris 2.5 CD-ROM. Make sure the Solaris 2.5 CD-ROM is properly placed in the CD-ROM drive before performing the following tasks.
1 5. Create a /etc/hostname.hme file for the Ethernet channel you are planning to use for the SunSwift SBus Adapter. • hostname is literal. Type hostname. • num is the instance number of the SBus card installation. Use 0 for the first SunSwift SBus Adapter installation, 1 for the second instance, and so on. 6. In this file, add a line containing just the host name that you assigned for the SunSwift SBus Adapter. For example, if your host name is zardoz, enter just this word. 7.
Installing the Adapter 2 This chapter tells you how to install the adapter in your system, verify that the adapter is correctly installed, and boot your system. 2.1 Performing the Installation Note – Refer to your system installation or service manual (and the SCSI device installation manual, as necessary) for detailed instructions for the following tasks. 1. Power off your system, using the standard shutdown procedures described in Solaris 2.5 Handbook for SMCC Peripherals. 2.
2 2.2 Verifying the Installation Refer to the Solaris 2.5 Handbook for SMCC Peripherals manual or your Solaris documentation for detailed instructions for the following tasks. 1. Power on the system, and when the banner appears, press the Stop-A keys to interrupt the boot process and get to the ok prompt. 2. Use the show-devs command to list the devices in the system. You should see two lines (similar to the example below) in the display, specific to the SunSwift SBus Adapter: ok show-devs ...
2 2.3 Booting the System Refer to the Solaris 2.5 Handbook for SMCC Peripherals manual for detailed instructions for the following tasks. • • To boot the system from the default boot device, use the boot -r command.
2 2.4 Installing the Solaris 2.5 Software You will be installing software from the Solaris 2.5 CD-ROM. Make sure the Solaris 2.5 CD-ROM is properly placed in the CD-ROM drive before performing the following tasks. ♦ Install the Solaris 2.5 software. Installing the software will automatically add the SUNWhmd and SUNWhmdu packages. The installation process will also create the necessary /etc/hostname.
2 2.5 Post-Installation Procedures (Optional) Perform the following tasks to verify and customize the performance of the SunSwift SBus Adapter. 2.5.1 Watching Network Activity Make sure that you are connected to an active network. ♦ You can watch network activity or incoming network packets by typing the following: ok watch-net-all /iommu@f,e0000000/sbus@f,e0001000/SUNW,hme@0,8c00000 hme register test -- succeeded. Internal loopback test -- succeeded.
2 2.5.3 Auto-Negotiation A key feature of the SunSwift SBus Adapter is auto-negotiation. The autonegotiation protocol, as specified by the 100BASE-TX standard, automatically selects the operation mode (half-duplex or full-duplex) and speed (10 Mbps or 100 Mbps) for the adapter. The hme device driver operates the SUNW,hme device by default in halfduplex mode only.
A Interface Signals A.1 SunSwift SBus Adapter Connectors 1 8 RJ-45 Connector 1 34 35 68 68-pin SCSI-2 Connector A.
A A.
B Specifications B.1 Physical Characteristics Length Width Weight 5.78 in. (147.70 mm) 3.3 in. (83.82 mm) 4.0 oz. (113.40 g) B.2 Power Requirements Maximum Power Dissipation Voltage Tolerance Ripple Operational Current 9.5 Watt 5V +/- 5% Maximum 100 mV 1.9A B.3 Performance Specifications Maximum Ethernet Transfer Rate 10/100 Mbps Network Interface 100BASE-TX using Category 5 (data-grade) cable; 10BASE-T using Category 3 (voice-grade) cable or better Ethernet Version Conforms to IEEE 802.
B B-2 SunSwift SBus Adapter Installation and User’s Guide—December 1995
Reader Comments We welcome your comments and suggestions to help improve this manual. Please let us know what you think about the SunSwift SBus Adapter Installation and User’s Guide, part number 802-4535-10. ■ The procedures were well documented.
NO POSTAGE NECESSARY IF MAILED IN THE UNITED STATES BUSINESS REPLY MAIL FIRST CLASS MAIL PERMIT NO. 1 MOUNTAIN VIEW, CA POSTAGE WILL BE PAID BY ADDRESSEE SUN MICROSYSTEMS, INC. Attn: Manager, Hardware Publications MS MPK 14-101 2550 Garcia Avenue Mt.