SUN SEEBEYOND eWAY™ ADAPTER FOR VSAM USER’S GUIDE Release 5.1.
Copyright © 2007 Sun Microsystems, Inc., 4150 Network Circle, Santa Clara, California 95054, U.S.A. All rights reserved. Sun Microsystems, Inc. has intellectual property rights relating to technology embodied in the product that is described in this document. In particular, and without limitation, these intellectual property rights may include one or more of the U.S. patents listed at http://www.sun.com/patents and one or more additional patents or pending patent applications in the U.S.
Contents Contents Chapter 1 Introducing the VSAM eWay 7 About VSAM 7 About the VSAM eWay 8 eWay Operation 8 What’s New in This Release 8 About This Document 9 VSAM eWay Javadoc Scope Intended Audience Text Conventions 9 10 10 10 Related Documents 10 Sun Microsystems, Inc.
Contents Chapter 3 Setting Properties of the VSAM eWay 20 Creating and Configuring a VSAM eWay 20 Configuring the eWay Connectivity Map Properties 20 Transaction Support Levels Between Different Versions 22 Configuring the eWay Environment Properties 23 eWay Connectivity Map Properties 24 Connectivity Map (Outbound) CP eWay Properties Connectivity Map Outbound non-Transactional eWay Properties eWay Environment Properties 25 25 26 Inbound VSAM eWay Properties (Outbound) VSAM CP eWay Propert
Contents Delete Operations 51 Using Views 52 Using Prepared Statements 52 Chapter 6 Using VSAM Operations 53 VSAM eWay Database Operations (BPEL) 53 Activity Input and Output 53 VSAM eWay Database Operations (JCD) 55 The Table The Query (Select) Operation The Insert Operation The Update Operation The Delete Operation Prepared Statement Batch Operations 55 56 57 58 58 59 59 Chapter 7 Implementing the VSAM eWay Sample Projects About the VSAM eWay Sample Projects 61 61 Operations Used in t
Contents Configuring the Integration Server Creating the Deployment Profile Creating and Starting the Domain Building and Deploying the Project Running the Sample Project 89 89 90 91 91 Building and Deploying the prjVSAM_JCD Sample Project Creating a Project Creating the OTDs Creating a Connectivity Map Populating the Connectivity Map Creating the Collaboration Definitions (Java) jcdDelete Collaboration jcdInsert Collaboration jcdPsSelect Collaboration jcdTableSelect Collaboration jcdUpdate Collaboration
Chapter 1 Introducing the VSAM eWay Welcome to the Sun SeeBeyond eWay™ Adapter for VSAM User’s Guide. This document includes information about installing, configuring, and using the Sun Java Composite Application Platform Suite VSAM eWay™ Adapter, referred to as the VSAM eWay throughout this guide. This chapter provides a brief overview of operations, components, general features, and system requirements of the VSAM eWay.
Chapter 1 Introducing the VSAM eWay Section 1.2 About the VSAM eWay Maintains information about this data, which is stored or referenced in a catalog (catalog management). Supports Entry-sequenced Data Set (ESDS) and Key-sequenced Data Set (KSDS) files. The VSAM eWay allows you to utilize and extend all of these features. For more information on VSAM, see IBM’s Web site. 1.2 About the VSAM eWay The VSAM eWay enables eGate™ Integrator to exchange data with external IBM VSAM mainframe file systems.
Chapter 1 Introducing the VSAM eWay Section 1.4 About This Document Support for Runtime LDAP Configuration: eWay configuration properties now support LDAP key values. Connection Retry Support: Allows you to specify the number of attempts to reconnect, and the interval between retry attempts, in the event of a connection failure. Relaunchable OTD Support: An OTD can be rebuilt and saved (under the same name) then relaunched back to the same Java Collaboration or BPEL.
Chapter 1 Introducing the VSAM eWay Section 1.5 Related Documents Composite Application Platform Suite Installer. To access the full Javadoc, extract the Javadoc to an easily accessible folder, and double-click the index.html file. 1.4.1 Scope This user’s guide provides a description of the VSAM eWay Adapter. It includes directions for installing the eWay, configuring the eWay properties, and implementing the eWay’s sample Projects.
Chapter 1 Introducing the VSAM eWay 1.6 Section 1.6 Sun Microsystems, Inc. Web Site Sun Microsystems, Inc. Web Site The Sun Microsystems web site is your best source for up-to-the-minute product news and technical support information. The site’s URL is: http://www.sun.com 1.7 Documentation Feedback We appreciate your feedback. Please send any comments or suggestions regarding this document to: CAPS_docsfeedback@sun.com VSAM eWay Adapter User’s Guide 11 Sun Microsystems, Inc.
Chapter 2 Installing the VSAM eWay This chapter explains how to install the VSAM eWay. What’s in This Chapter Installing the VSAM eWay on page 12 ICAN 5.0 Project Migration Procedures on page 15 Installing Enterprise Manager eWay Plug-Ins on page 16 2.
Chapter 2 Installing the VSAM eWay 2.1.1 Section 2.1 Installing the VSAM eWay Installing the VSAM eWay on an eGate supported system Follow the directions for installing the Sun Java Composite Application Platform Suite in the Sun Java Composite Application Platform Suite Installation Guide.
Chapter 2 Installing the VSAM eWay Section 2.1 Installing the VSAM eWay 7 When prompted, restart the IDE (Integrated Development Environment) to complete the installation. Copying JAR files to the eDesigner Library The VSAM eWay SAR file no longer includes the WebSphere Information Integrator Classic Federation JDBC Driver for VSAM databases. You are required to copy the product’s JDBC JAR file (cacjdbc30.
Chapter 2 Installing the VSAM eWay Section 2.2 ICAN 5.0 Project Migration Procedures Steps to extract the Sample Projects include: 1 Click the Documentation tab of the Sun Java Composite Application Platform Suite Installer, then click the Add-ons tab. 2 Click the VSAM eWay Adapter link. Documentation for the VSAM eWay appears in the right pane. 3 Click the icon next to Sample Projects and extract the ZIP file. Note that the VSAM_eWay_Sample.
Chapter 2 Installing the VSAM eWay Section 2.3 Installing Enterprise Manager eWay Plug-Ins 2 Browse to and select your exported Project file. 3 Click Import. A warning message, “Missing APIs from Target Repository,” may appear at this time. This occurs because various product APIs were installed on the ICAN 5.0 Repository when the Project was created, that are not installed on the Java CAPS 5.1.3 Repository. These APIs may or may not apply to your Projects.
Chapter 2 Installing the VSAM eWay Section 2.3 Installing Enterprise Manager eWay Plug-Ins Enterprise Manager requires an eWay specific “plug-in” for each eWay you install. These plug-ins enable the Enterprise Manager to target specific alert codes for each eWay type, as well as start and stop the inbound eWays. The Sun Java Composite Application Platform Suite Installation Guide describes how to install Enterprise Manager.
Chapter 2 Installing the VSAM eWay Section 2.3 Installing Enterprise Manager eWay Plug-Ins A From the Install New Alert Codes section, browse to and select the eWay alert properties file for the application plug-in that you added. The alert properties files are located in the alertcodes folder of your Sun Java Composite Application Platform Suite installation directory. B Click Deploy. The available alert codes for your application are displayed under Results.
Chapter 2 Installing the VSAM eWay Alert Code\Description Section 2.3 Installing Enterprise Manager eWay Plug-Ins Description Details User Actions DBCOMMON-XAENDFAILED000001=XAEnd failed. Reason: [{0}] Error occurred during commit on XA connection. Look for the detailed error mentioned in the alert for the appropriate action. DBCOMMON-CANNOT-GETISOLATION-LEVEL=Unable to get isolationLevel for the transaction. Reason: [{0}] Could not read transaction isolation information of the connection.
Chapter 3 Setting Properties of the VSAM eWay This chapter explains how to set the properties of the VSAM eWay. What’s in This Chapter Creating and Configuring a VSAM eWay on page 20 Configuring the eWay Connectivity Map Properties on page 20 Configuring the eWay Environment Properties on page 23 eWay Connectivity Map Properties on page 24 eWay Environment Properties on page 26 3.1 Creating and Configuring a VSAM eWay All eWays contain a unique set of default configuration parameters.
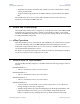
Chapter 3 Setting Properties of the VSAM eWay Section 3.2 Configuring the eWay Connectivity Map Properties VSAM CP eWay Outbound VSAM non-Transactional eWay To configure the eWay properties: 1 On the Enterprise Designer’s Connectivity Map, double-click the VSAM eWay icon. The eWay Connections window appears. Figure 1 Connectivity Map with Components VSAM eWay 2 Select a parameter from the list and click OK.
Chapter 3 Setting Properties of the VSAM eWay Section 3.2 Configuring the eWay Connectivity Map Properties Figure 3 Outbound eWay Properties 3.2.1 Transaction Support Levels Between Different Versions The types of transaction support levels used in Java CAPS 5.1.0 may be different from the support levels used in Java CAPS 5.1.3. Projects that are imported from a Java CAPS 5.1.0 version can potentially display different results, depending on whether the 5.1.
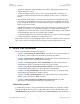
Chapter 3 Setting Properties of the VSAM eWay 3.3 Section 3.3 Configuring the eWay Environment Properties Configuring the eWay Environment Properties The eWay Environment Configuration properties contain parameters that define how the eWay connects to and interacts with other eGate components within the Environment. When you create a new VSAM External System, you may configure the type of External System required.
Chapter 3 Setting Properties of the VSAM eWay Section 3.4 eWay Connectivity Map Properties Figure 4 VSAM eWay Environment Configuration 4 Click on any folder to display the default configuration properties for that section. 5 Click on any property field to make it editable. After modifying the configuration properties, click OK to save the changes. 3.4 eWay Connectivity Map Properties The eWay Connectivity Map consists of the following properties categories.
Chapter 3 Setting Properties of the VSAM eWay 3.4.1 Section 3.4 eWay Connectivity Map Properties Connectivity Map (Outbound) CP eWay Properties The Outbound eWay Properties include outbound parameters used by the external database. Table 3 Outbound eWay—JDBC Connector Settings Name Description Required Value Description VSAM Connection Pool Datasource. A valid string. ClassName Displays the Java class in the JDBC driver that is used to implement the ConnectionPoolDataSource interface.
Chapter 3 Setting Properties of the VSAM eWay 3.5 Section 3.5 eWay Environment Properties eWay Environment Properties eWay External System properties must be configured from within the Environment. Until you have successfully configured all eWays for your Java CAPS project, your project cannot be properly executed or deployed. The following list identifies the VSAM eWay properties. There are two Environment Configuration categories that the VSAM eWay implements.
Chapter 3 Setting Properties of the VSAM eWay Section 3.5 eWay Environment Properties JDBC Connector Settings Details for the VSAM CP eWay JDBC Connector Settings used by the external database are detailed in Table 6. Table 6 VSAM CP eWay—JDBC Connector Settings Name Description Required Value Description The description of the database. A valid string. The configured default is VSAM Connection Pool Datasource. ServerName This setting specifies the host name of the external database server.
Chapter 3 Setting Properties of the VSAM eWay Section 3.5 eWay Environment Properties Table 6 VSAM CP eWay—JDBC Connector Settings (Continued) Name Description Required Value DriverProperties The Connection Pool DataSource implementation may need to execute additional methods to assure a successful run. The additional methods will need to be identified in the Driver Properties. You must ensure that the driver is installed on both the Logical Host machine and the Enterprise Designer machine.
Chapter 3 Setting Properties of the VSAM eWay Section 3.5 eWay Environment Properties Table 6 VSAM CP eWay—JDBC Connector Settings (Continued) Name MinPoolSize Description Required Value Specifies the minimum number of physical connections the pool should keep available at all times. 0 (zero) indicates that there should be no physical connections in the pool and the new connections should be created as needed. A valid numeric value. The default is 0.
Chapter 3 Setting Properties of the VSAM eWay Section 3.5 eWay Environment Properties Table 7 VSAM CP eWay—Connection Retry Settings (Continued) Name Description ConnectionRetryInterval Required Value Specifies the milliseconds of pause before each attempt to reaccess the database. This setting is used in conjunction with the 'Connection Retries' setting. A valid numeric value. The default is 1000.
Chapter 3 Setting Properties of the VSAM eWay Section 3.5 eWay Environment Properties Table 8 VSAM non-Transactional eWay—JDBC Connector Settings (Continued) Name Description Required Value DriverProperties The Connection Pool DataSource implementation may need to execute additional methods to assure a successful run. The additional methods will need to be identified in the Driver Properties.
Chapter 3 Setting Properties of the VSAM eWay Section 3.5 eWay Environment Properties Table 8 VSAM non-Transactional eWay—JDBC Connector Settings (Continued) Name MinPoolSize Description Required Value Specifies the minimum number of physical connections the pool should keep available at all times. 0 (zero) indicates that there should be no physical connections in the pool and the new connections should be created as needed. A valid numeric value. The default is 0.
Chapter 3 Setting Properties of the VSAM eWay Section 3.5 eWay Environment Properties Table 9 VSAM non-Transactional eWay—Connection Retry Settings (Continued) Name ConnectionRetryInterval Description Specifies the milliseconds of pause before each attempt to reaccess the database. This setting is used in conjunction with the 'Connection Retries' setting. Required Value A valid numeric value. The default is 1000.
Chapter 4 Using the VSAM eWay Database Wizard This chapter describes how to use the VSAM eWay Database wizard to build Object Type Definitions (OTDs). What’s in This Chapter About the Database OTD Wizard on page 34 Creating a New VSAM OTD on page 34 Resulting OTD on page 46 Steps to Edit an Existing VSAM OTD on page 47 4.1 About the Database OTD Wizard The Database OTD Wizard generates OTDs by connecting to external data sources and creating corresponding Object Type Definitions.
Chapter 4 Using the VSAM eWay Database Wizard Section 4.2 Creating a New VSAM OTD Select Database Objects on page 36 Select Tables/Views/Aliases on page 37 Add Prepared Statement on page 41 Specify the OTD Name on page 44 Review Selections on page 45 4.2.1 Select Wizard Type Select the type of wizard required to build an OTD in the New Object Type Definition Wizard.
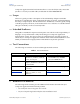
Chapter 4 Using the VSAM eWay Database Wizard Section 4.2 Creating a New VSAM OTD Required Database Connection Fields include: Host name – the database service host name. Port ID – the database service connection port ID/number. Database name – the name of the VSAM database. User name – a valid VSAM database username. Password – a password for the user name noted above. Figure 6 Database Connection Information 4.2.
Chapter 4 Using the VSAM eWay Database Wizard Section 4.2 Creating a New VSAM OTD Figure 7 Select Database Objects 4.2.4 Select Tables/Views/Aliases Select the types of tables or views required in the OTD. Note: Aliases are not supported in the current release of the VSAM eWay. Steps Required to Select Table and Views Include: 1 In the Select Tables/Views/Aliases window, click Add. See Figure 8. VSAM eWay Adapter User’s Guide 37 Sun Microsystems, Inc.
Chapter 4 Using the VSAM eWay Database Wizard Section 4.2 Creating a New VSAM OTD Figure 8 Select Tables/Views/Aliases 2 In the Add Tables window, select if your selection criteria will include table data, view only data, both, and/or system tables. 3 From the Table/View Name drop down list, select the location of your database table and click Search. See Figure 9. VSAM eWay Adapter User’s Guide 38 Sun Microsystems, Inc.
Chapter 4 Using the VSAM eWay Database Wizard Section 4.2 Creating a New VSAM OTD Figure 9 Database Wizard - All Schemes 4 Select the table of choice and click OK. The table selected is added to the Selected Tables/Views/Aliases section. See Figure 10. VSAM eWay Adapter User’s Guide 39 Sun Microsystems, Inc.
Chapter 4 Using the VSAM eWay Database Wizard Section 4.2 Creating a New VSAM OTD Figure 10 Selected Tables/Views/Aliases window with a table selected 5 In the Selected Tables/Views/Aliases section, review the table(s) you have selected. To make changes to the selected Table or View, click Change. If you do not wish to make any additional changes, click Next to continue. 6 In the Table/View Columns window, you can select or deselect your table columns.
Chapter 4 Using the VSAM eWay Database Wizard Section 4.2 Creating a New VSAM OTD Figure 11 Table/View Columns 7 Click Advanced to change the data type, percision/length, or scale. Once you have finished your table choices, click OK. In general, you will not need to make any changes. See Figure 12. Figure 12 Table/View Columns — Advanced 4.2.5 Add Prepared Statement Add a Prepared Statement object to your OTD. VSAM eWay Adapter User’s Guide 41 Sun Microsystems, Inc.
Chapter 4 Using the VSAM eWay Database Wizard Section 4.2 Creating a New VSAM OTD Steps Required to Add Prepared Statements Include: Note: When using a Prepared Statement, the ‘ResultsAvailable()’ method will always return true. Although this method is available, you should not use it with a ‘while’ loop. Doing so would result in an infinite loop at runtime and will stop all of the system’s CPU. If it is used, it should only be used with the ‘if’ statement.
Chapter 4 Using the VSAM eWay Database Wizard Section 4.2 Creating a New VSAM OTD Figure 14 Prepared SQL Statement 3 On the Add Prepared Statement window, the name you assigned to the Prepared Statement appears. To edit the parameters, click Edit Parameters. You can change the datatype by clicking in the Type field and selecting a different type from the list. 4 Click Add if you want to add additional parameters to the Statement or highlight a row and click Remove to remove it. Click OK. Figure 15.
Chapter 4 Using the VSAM eWay Database Wizard Section 4.2 Creating a New VSAM OTD Figure 16 ResultSet Columns 6 Click Add to add a new ResultSet column. Both the Name and Type are editable. 7 Click OK to return to the Add Prepared Statements window. 4.2.6 Specify the OTD Name Specify the name that your OTD will display in the Enterprise Designer Project Explorer. Steps Required to Specify the OTD Name: 1 Enter a name for the OTD.
Chapter 4 Using the VSAM eWay Database Wizard Section 4.2 Creating a New VSAM OTD Figure 17 Naming an OTD 2 Click Next. 4.2.7 Review Selections Review the selections made for the new OTD. Steps Required to Review Your OTD Selections: 1 View the summary of the OTD. If you find you have made a mistake, click Back and correct the information. 2 If you are satisfied with the OTD information, click Finish to begin generating the OTD. See Figure 18.
Chapter 4 Using the VSAM eWay Database Wizard Section 4.3 Resulting OTD Figure 18 Database Wizard - Summary 4.3 Resulting OTD The resulting VSAM OTD appears on the Enterprise Designer’s canvas, in the OTD Editor window. See Figure 19. In the example, a node in the OTD has been expanded, allowing you to view some of its structure. VSAM eWay Adapter User’s Guide 46 Sun Microsystems, Inc.
Chapter 4 Using the VSAM eWay Database Wizard Section 4.4 Steps to Edit an Existing VSAM OTD Figure 19 OTD Editor in Enterprise Designer 4.4 Steps to Edit an Existing VSAM OTD You can edit any database OTD you create directly from the Enterprise Designer Project Explorer. Steps to Edit the OTD from the Enterprise Designer Include: 1 Unlock the OTD. To do this, right-click the OTD in the Project Explorer and select Version Control > Check Out from the menu. The Version Control - Check Out window appears.
Chapter 4 Using the VSAM eWay Database Wizard Section 4.4 Steps to Edit an Existing VSAM OTD 5 Step through each of the wizard steps and click Finish to save your changes. Note: You must verify during project activation or at runtime that no errors are generated after editing an OTD. Errors could occur if you delete a database object such as a table or column that is included in a Collaboration. VSAM eWay Adapter User’s Guide 48 Sun Microsystems, Inc.
Chapter 5 Using VSAM OTDs This chapter describes operations you can perform using VSAM Object Type Definitions (OTDs) in eGate. What’s in This Chapter Overview on page 49 Using Tables on page 49 Using Views on page 52 Using Prepared Statements on page 52 5.1 Overview This section explains the types of VSAM OTDs used with the eWay within the Collaboration Editor (Java), including the OTD’s methods.
Chapter 5 Using VSAM OTDs 5.2.1 Section 5.2 Using Tables Using the select Method The select method returns result sets according to a group of predefined defaults. However, you can change these defaults, if desired.
Chapter 5 Using VSAM OTDs 5.2.2 Section 5.2 Using Tables Select Operations To perform a select operation on a table 1 From the Collaboration Editor (Java), call the select method with the where clause specified, if necessary. The text from the Text node instructs the Business Process exactly which data needs to be selected. For example, the content of the input text could be EMPID>100. 2 Loop through the result set using the next method. 3 For each loop, process the return record. 5.2.
Chapter 5 Using VSAM OTDs 5.3 Section 5.3 Using Views Using Views Views are used to look at data from selected columns within selected tables. View OTDs are read-only. For select operations, see “Select Operations” on page 51. 5.4 Using Prepared Statements You can perform table operations with prepared statements with the same method nodes you use for the regular table operations, that is, select, update, insert, and delete SQL operations.
Chapter 6 Using VSAM Operations The database operations used in the VSAM eWay are used to access the VSAM database. Database operations are either accessed through Activities in BPEL, or through methods called from a JCD Collaboration. What’s in This Chapter VSAM eWay Database Operations (BPEL) on page 53 VSAM eWay Database Operations (JCD) on page 55 6.1 VSAM eWay Database Operations (BPEL) The VSAM eWay uses a number operations to query the VSAM database.
Chapter 6 Using VSAM Operations Section 6.1 VSAM eWay Database Operations (BPEL) Figure 20 Input and Output Between Activities The following table lists the expected Input and Output of each database operation Activity. Table 10 VSAM Operations eInsight Operation Activity Input Activity Output SelectAll where() clause (optional) Returns all rows that fit the condition of the where() clause.
Chapter 6 Using VSAM Operations Section 6.2 VSAM eWay Database Operations (JCD) Table 10 VSAM Operations (Continued) eInsight Operation 6.2 Activity Input Activity Output SelectOne where() clause (optional) Returns the first row that fits the condition of the where() clause. Insert definition of new item to be inserted Returns status. Update where() clause Returns status. Delete where() clause Returns status.
Chapter 6 Using VSAM Operations Section 6.2 VSAM eWay Database Operations (JCD) SetScrollTypetoScrollSensitive SetScrollTypetoInsensitive The Query (Select) Operation To perform a query operation on a table: 1 Execute the select() method with the “where” clause specified if necessary. 2 Loop through the ResultSet using the next() method. 3 Process the return record within a while() loop. For example: package prjVSAM_JCDjcdALL; public class jcdTableSelect { public com.stc.codegen.logger.
Chapter 6 Using VSAM Operations Section 6.2 VSAM eWay Database Operations (JCD) } } The Insert Operation To perform an insert operation on a table: 1 Execute the insert() method. Assign a field. 2 Insert the row by calling insertRow() This example inserts an employee record: package prjVSAM_JCDjcdALL; public class jcdInsert { public com.stc.codegen.logger.Logger logger; public com.stc.codegen.alerter.Alerter alerter; public com.stc.codegen.util.CollaborationContext collabContext; public com.stc.codegen.
Chapter 6 Using VSAM Operations Section 6.2 VSAM eWay Database Operations (JCD) FileClient_1.setText( "Done Insert." ); FileClient_1.write(); } } The Update Operation To perform an update operation on a table: 1 Execute the update() method. 2 Using a while loop together with next(), move to the row that you want to update. 3 Assign updating value(s) to the fields of the table OTD 4 Update the row by calling updateRow(). package prjVSAM_JCDjcdALL; public class jcdUpdate { public com.stc.codegen.logger.
Chapter 6 Using VSAM Operations Section 6.2 VSAM eWay Database Operations (JCD) public com.stc.codegen.logger.Logger logger; public com.stc.codegen.alerter.Alerter alerter; public com.stc.codegen.util.CollaborationContext collabContext; public com.stc.codegen.util.TypeConverter typeConverter; public void receive( com.stc.connector.appconn.file.FileTextMessage input, otdVSAM.OtdVSAMOTD otdVSAM_1, dtd.otdOutputDTD_1935483687.Emp otdOutputDTD_Emp_1, com.stc.connector.appconn.file.
Chapter 6 Using VSAM Operations Section 6.2 VSAM eWay Database Operations (JCD) getPrepStatement().getPreparedStatementTest().addBatch(); getPrepStatement().getPreparedStatementTest().executeBatch(); VSAM eWay Adapter User’s Guide 60 Sun Microsytems, Inc.
Chapter 7 Implementing the VSAM eWay Sample Projects This chapter provides an introduction to the VSAM eWay components, and information on how these components are created and implemented in a Sun Java Composite Application Platform Suite Project. Sample Projects are designed to provide an overview of the basic functionality of the VSAM eWay by identifying how information is passed between eGate and supported external databases.
Chapter 7 Implementing the VSAM eWay Sample Projects Section 7.1 About the VSAM eWay Sample Projects Insert employee records data into the CICSEMP table. Update an employee record in the CICSEMP table. Delete an employee record from the CICSEMP table. In addition to sample Projects, the VSAM510_SAMPLE_projects.zip file also includes six sample input trigger files and ten sample output files (five per sample). Sample input files include: TriggerDelete.in.~in TriggerInsert.in.
Chapter 7 Implementing the VSAM eWay Sample Projects Section 7.1 About the VSAM eWay Sample Projects Assigning Operations in JCD Database operations are listed as methods in the JCD. Perform the following steps to access these methods: 1 Create a Collaboration that contains a database OTD created from the VSAM database. 2 Right-click the OTD listed in your Collaboration and then select Select Method to Call from the shortcut menu. 3 Browse to and select a method to call.
Chapter 7 Implementing the VSAM eWay Sample Projects 7.2 Section 7.2 Running the Sample Projects Running the Sample Projects The following steps are required to run the sample projects that are contained in the VSAMeWayDocs.sar file. 1 Run the SQL script. This creates the tables and records required by the sample Project. 2 Import the sample Projects. 3 Build, deploy, and run the sample Projects.
Chapter 7 Implementing the VSAM eWay Sample Projects 7.4 Section 7.4 Importing a Sample Project Importing a Sample Project Sample eWay Projects are included as part of the installation CD-ROM package. To import a sample eWay Project to the Enterprise Designer do the following: 1 Extract the samples from the Sun Java Composite Application Platform Suite Installer to a local file. Sample files are uploaded with the eWay’s documentation SAR file, and then downloaded from the Installer’s Documentation tab.
Chapter 7 Implementing the VSAM eWay Sample Projects 7.5.1 Section 7.5 Building and Deploying the prjVSAM_BPEL Sample Project Creating a Project The first step is to create a new Project in the Enterprise Designer. 1 Start the Enterprise Designer. 2 From the Project Explorer tree, right-click the Repository and select New Project. A new Project (Project1) appears on the Project Explorer tree. 3 Right-click Project1 and select rename from the shortcut menu.
Chapter 7 Implementing the VSAM eWay Sample Projects Section 7.5 Building and Deploying the prjVSAM_BPEL Sample Project 8 Click Add, the Add Prepared Statement window appears. Enter the following: Prepared Statement Name: Select_ps SQL Statement: select * from CICSEMP where EMPID > ? order by EMPID Note: In our example, the SQL statement includes the ? placeholder for input. This placeholder represents the value for the Where Clause.
Chapter 7 Implementing the VSAM eWay Sample Projects Section 7.5 Building and Deploying the prjVSAM_BPEL Sample Project 2 Create four additional business processes and rename them as follows: bpUpdate bpDelete bpPsSelect bpTableSelect 3 Add the following activities to the Business Process Designer canvas. Table 11 Business Process Activities Business Process Activity bpInsert FileClient.Receive FileClient.Write otdVSAM.CICSEMPInsert (inside a Scope) otdInputDTD_Emp.unmarshal FileClient.
Chapter 7 Implementing the VSAM eWay Sample Projects Section 7.5 Building and Deploying the prjVSAM_BPEL Sample Project Note: Review the eInsight Business Process Manager User’s Guide for a more detailed description of the steps required to connect and add business rules to a modeling elements in a business process. Figure 21 bpInsert Business Process Steps required to configure the bpInsert business process: 1 Configure the business rule between FileClient.receive and FileClient.
Chapter 7 Implementing the VSAM eWay Sample Projects Section 7.5 Building and Deploying the prjVSAM_BPEL Sample Project Figure 23 bpInsert Business Rule # 2 3 Configure the business rule between otdInputDTD_Emp.unmarshal Activity and the Insert (Scope element), as seen in Figure 24. Figure 24 bpInsert Business Rule # 3 4 Configure the business rule in the While statement that connects to the otdVSAM.CICSEMPInsert Activity, as seen in Figure 25. VSAM eWay Adapter User’s Guide 70 Sun Microsystems, Inc.
Chapter 7 Implementing the VSAM eWay Sample Projects Section 7.5 Building and Deploying the prjVSAM_BPEL Sample Project Figure 25 bpInsert Business Rule # 4 5 Configure the business rule in the While statement that connects from the otdVSAM.CICSEMPInsert Activity, as seen in Figure 26. VSAM eWay Adapter User’s Guide 71 Sun Microsystems, Inc.
Chapter 7 Implementing the VSAM eWay Sample Projects Section 7.5 Building and Deploying the prjVSAM_BPEL Sample Project Figure 26 bpInsert Business Rule # 5 6 Configure the business rule from the Insert (Scope element) to the FileClient.write Activity, as seen in Figure 27. Figure 27 bpInsert Business Rule # 6 Configuring the bpUpdate Modeling Elements The bpUpdate business process describes how to update a record in the VSAM database using the Business Process Designer.
Chapter 7 Implementing the VSAM eWay Sample Projects Section 7.5 Building and Deploying the prjVSAM_BPEL Sample Project Note: The where clause in the business rule reads the trigger value as a placeholder for input. This permits you to modify the query to select a specific record. Also note that all records are selected from the database when the TriggerUpdate.in file is empty.
Chapter 7 Implementing the VSAM eWay Sample Projects Section 7.5 Building and Deploying the prjVSAM_BPEL Sample Project Figure 30 bpUpdate Business Rule # 2 3 Configure the business rule between the otdVSAM.CICSEMPUpdate Activity and the FileClient.write Activity, as seen in Figure 31. Figure 31 bpUpdate Business Rule # 3 Configuring the bpDelete Modeling Elements The bpDelete business process describes how to delete a record in the VSAM database using the Business Process Designer.
Chapter 7 Implementing the VSAM eWay Sample Projects Section 7.5 Building and Deploying the prjVSAM_BPEL Sample Project Note: Review the eInsight Business Process Manager User’s Guide for a more detailed description of the steps required to connect and add business rules to a modeling elements in a business process. Figure 32 bpDelete Business Process Steps required to configure the bpDelete business process: 1 Configure the business rule between FileClient.receive and FileCleint.
Chapter 7 Implementing the VSAM eWay Sample Projects Section 7.5 Building and Deploying the prjVSAM_BPEL Sample Project 3 Configure the business rule between the otdVSAM.CICSEMPDelete Activity and the FileClient.write Activity, as seen in Figure 35. Figure 35 bpDelete Business Rule # 3 Configuring the bpTableSelect Modeling Elements The bpTableSelect business process is describes how to select all records the VSAM database using the Business Process Designer.
Chapter 7 Implementing the VSAM eWay Sample Projects Section 7.5 Building and Deploying the prjVSAM_BPEL Sample Project Figure 37 bpTableSelect Business Rule # 1 2 Configure the business rule between the FileClient.write Activity and otdVSAM.CICSEMPSelectAll Activity as seen in Figure 38. Figure 38 bpTableSelect Business Rule # 2 3 Configure the business rule between the otdVSAM.CICSEMPSelectAll Activity and the otdInputDTD_Emp.marshal Activity as seen in Figure 39.
Chapter 7 Implementing the VSAM eWay Sample Projects Section 7.5 Building and Deploying the prjVSAM_BPEL Sample Project Figure 39 bpSelectTable Business Rule # 3 4 Configure the business rule between the otdInputDTD_Emp.marshal Activity and the FileClient.write Activity as seen in Figure 40. Figure 40 bpTableSelect Business Rule # 4 VSAM eWay Adapter User’s Guide 78 Sun Microsystems, Inc.
Chapter 7 Implementing the VSAM eWay Sample Projects Section 7.5 Building and Deploying the prjVSAM_BPEL Sample Project 5 Configure the business rule between the FileClient.write Activity and the FileClient.write Activity as seen in Figure 41. Figure 41 bpTableSelect Business Rule # 5 Configuring the bpPsSelect Modeling Elements The bpPsSelect business process describes how to use a Prepared Statement query to select all records in the VSAM database via the Business Process Designer.
Chapter 7 Implementing the VSAM eWay Sample Projects Section 7.5 Building and Deploying the prjVSAM_BPEL Sample Project Figure 43 bpPsSelect Business Rule # 1 2 Configure the business rule between FileClient.write Activity and otdVSAM.Select_psPSSelectAll Activity as seen in Figure 44. Figure 44 bpPsSelect Business Rule # 2 3 Configure Case 1 of the Decision branching activity. This requires adding business rules between the otdInputDTD_Emp.marshal and the FileClient.
Chapter 7 Implementing the VSAM eWay Sample Projects Section 7.5 Building and Deploying the prjVSAM_BPEL Sample Project Figure 46 Case 1 Scope Business Rule # 3 5 Configure the business rule between otdInputDTD_Emp.marshal Activity and FileClient.write Activity in the Scope element, as seen in Figure 47. Figure 47 Case 1 Scope Business Rule # 4 VSAM eWay Adapter User’s Guide 81 Sun Microsystems, Inc.
Chapter 7 Implementing the VSAM eWay Sample Projects Section 7.5 Building and Deploying the prjVSAM_BPEL Sample Project 6 Configure Case 2 of the Decision branching activity. This requires adding business rules between the otdInputDTD_Emp.marshal and the FileClient.write Activities within the Scope element. Figure 48 Activities within Case 2 Scope 7 Configure the business rule between the start of the Scope element in Case 2 and the FileClient.Write Activity, as seen in Figure 49.
Chapter 7 Implementing the VSAM eWay Sample Projects Section 7.5 Building and Deploying the prjVSAM_BPEL Sample Project Figure 50 bpSelectTable Business Rule # 6 7.5.4 Creating the Connectivity Map The Connectivity Map provides a canvas for assembling and configuring a Project’s components. Steps required to create the Connectivity Map: 1 From the Project Explorer tree, right-click the new prjVSAM_BPEL Project and select New > Connectivity Map from the shortcut menu.
Chapter 7 Implementing the VSAM eWay Sample Projects Section 7.5 Building and Deploying the prjVSAM_BPEL Sample Project Each Connectivity Map in the prjVSAM_BPEL sample Project requires the following components: File External Application (2) VSAM External Application Business Process Any eWay added to the Connectivity Map is associated with an External System. To establish a connection to VSAM, first select VSAM as an External System to use in your Connectivity Map.
Chapter 7 Implementing the VSAM eWay Sample Projects Section 7.5 Building and Deploying the prjVSAM_BPEL Sample Project Figure 51 Connectivity Map - Associating (Binding) the Project’s Components 5 Minimize the bpDelete Binding dialog box by clicking the chevrons in the upperright corner. 6 Save your current changes to the Repository, and then repeat this process for each of the other Connectivity Maps. 7.5.
Chapter 7 Implementing the VSAM eWay Sample Projects Section 7.5 Building and Deploying the prjVSAM_BPEL Sample Project 5 Right-click envVSAMProj and select New > File External System. Name the External System esFileClient. Click OK. esFileClient is added to the Environment Editor. 6 Right-click envVSAMProj and select New > Logical Host. The LogicalHost1 box is added to the Environment, and LogicalHost1 is added to the Environment Editor tree.
Chapter 7 Implementing the VSAM eWay Sample Projects Section 7.5 Building and Deploying the prjVSAM_BPEL Sample Project Figure 53 eWays in the cmDelete Connectivity Map FileClientOUT eWay FileClientIN eWay eaVSAMOUT eWay Configuring the eWay Properties Steps required to configure the eWay properties: 1 Double-click the FileClientIN eWay on each of the Connectivity Maps and modify the properties for your system, as seen in Table 12. Click OK to close the Properties Editor.
Chapter 7 Implementing the VSAM eWay Sample Projects Section 7.5 Building and Deploying the prjVSAM_BPEL Sample Project Configuring the Environment Explorer Properties Steps required to configure the Environment Explorer properties: 1 From the Environment Explorer tree, right-click the VSAM External System (esVSAM in this sample), and select Properties. The Properties Editor opens to the VSAM eWay Environment configuration.
Chapter 7 Implementing the VSAM eWay Sample Projects Section 7.5 Building and Deploying the prjVSAM_BPEL Sample Project Configuring the Integration Server You must set your SeeBeyond Integration Server Password property before deploying your Project. 1 From the Environment Explorer, right-click IntegrationSvr1 under your Logical Host, and select Properties from the shortcut menu. The Integration Server Properties Editor appears.
Chapter 7 Implementing the VSAM eWay Sample Projects Section 7.5 Building and Deploying the prjVSAM_BPEL Sample Project Figure 54 Deployment Profile 7.5.8 Creating and Starting the Domain To build and deploy your Project, you must first create a domain. A domain is an instance of a Logical Host. After the domain is created, the Project is built and then deployed.
Chapter 7 Implementing the VSAM eWay Sample Projects Section 7.5 Building and Deploying the prjVSAM_BPEL Sample Project 5 Make any necessary changes to the Create Domain dialog box and click Create. The new domain is added to the Domain Manager. Select the domain and click the Start an Existing Domain button. Once your domain is started, a green check mark indicates that the domain is running.
Chapter 7 Implementing the VSAM eWay Sample Projects Section 7.6 Building and Deploying the prjVSAM_JCD Sample Project Having no content in these files causes the operation to read all records. 2 Verify the output data by viewing the sample output files. See “About the VSAM eWay Sample Projects” on page 61 for more details on the types of output files used in this sample Project.
Chapter 7 Implementing the VSAM eWay Sample Projects Section 7.6 Building and Deploying the prjVSAM_JCD Sample Project VSAM Database OTD Inbound DTD OTD Outbound DTD OTD Steps required to create a VSAM Database OTD: 1 Right-click your new Project in the Enterprise Designer’s Project Explorer, and select New > Object Type Definition. The New Object Type Definition Wizard window appears. 2 Select the VSAM Database OTD Wizard from the list of OTD Wizards and click Next.
Chapter 7 Implementing the VSAM eWay Sample Projects Section 7.6 Building and Deploying the prjVSAM_JCD Sample Project Steps required to create inbound and outbound DTD OTDs include: 1 Right-click your new Project in the Enterprise Designer’s Project Explorer, and select New > Object Type Definition. The New Object Type Definition Wizard window appears. 2 Select DTD from the list of OTD Wizards and click Next. 3 Browse to and then select a DTD file.
Chapter 7 Implementing the VSAM eWay Sample Projects Section 7.6 Building and Deploying the prjVSAM_JCD Sample Project VSAM External Application Service Any eWay added to the Connectivity Map is associated with an External System. To establish a connection to VSAM, first select VSAM as an External System to use in your Connectivity Map. Steps required to select a VSAM External System: 1 Click the External Application icon on the Connectivity Map toolbar.
Chapter 7 Implementing the VSAM eWay Sample Projects Section 7.6 Building and Deploying the prjVSAM_JCD Sample Project jcdDelete Collaboration Steps required to create the jcdDelete Collaboration: 1 From the Project Explorer, right-click the sample Project and select New > Collaboration Definition (Java) from the shortcut menu. The Collaboration Definition Wizard (Java) appears. 2 Enter a Collaboration Definition name (for this sample jcdDelete) and click Next.
Chapter 7 Implementing the VSAM eWay Sample Projects Section 7.6 Building and Deploying the prjVSAM_JCD Sample Project jcdPsSelect Collaboration Steps required to create the jcdPsSelect Collaboration: 1 From the Project Explorer, right-click the sample Project and select New > Collaboration Definition (Java) from the shortcut menu. The Collaboration Definition Wizard (Java) appears. 2 Enter a Collaboration Definition name (for this sample jcdPsSelect) and click Next.
Chapter 7 Implementing the VSAM eWay Sample Projects Section 7.6 Building and Deploying the prjVSAM_JCD Sample Project 6 Click the Up One Level button twice to return to the Repository. Double-click Sun SeeBeyond > eWays > File > FileClient. The Selected OTDs field now lists the FileClient OTD. 7 Click Finish. The Collaboration Editor with the new jcdTableSelect Collaboration appears in the right pane of the Enterprise Designer.
Chapter 7 Implementing the VSAM eWay Sample Projects Section 7.6 Building and Deploying the prjVSAM_JCD Sample Project Figure 55 jcdDelete Business Rules Creating the jcdInsert Business Rules The jcdInsert Collaboration implements the Input Web Service Operation to read the TriggerInsert.in. file. It then unmarshals data from the input data into the otdInputDTD_CICSEMP OTD, calls the otdVSAM OTD, and inserts records into the database via a For Loop.
Chapter 7 Implementing the VSAM eWay Sample Projects Section 7.6 Building and Deploying the prjVSAM_JCD Sample Project public com.stc.codegen.util.TypeConverter typeConverter; public void receive( com.stc.connector.appconn.file.FileTextMessage input, dtd.otdInputDTD_622919076.Emp otdInputDTD_Emp_1, otdVSAM.OtdVSAMOTD otdVSAM_1, com.stc.connector.appconn.file.FileApplication FileClient_1 ) throws Throwable { \\ Writes out a message stating records are being inserted. FileClient_1.
Chapter 7 Implementing the VSAM eWay Sample Projects Section 7.6 Building and Deploying the prjVSAM_JCD Sample Project statement query) into the otdInputDTD_CICSEMP OTD and selects all available records from the database. The Collaboration also writes a message to JCD_PsSelect_output0.dat to confirm when records are selected, or when no records are available. The jcdPsSelect Collaboration contains the Business Rules displayed in Figure 57.
Chapter 7 Implementing the VSAM eWay Sample Projects Section 7.6 Building and Deploying the prjVSAM_JCD Sample Project FileClient_1.setText( "Selecting record(s) from CICSEMP table via Prepared Statement select .." ); \\ Copies the database resultset into the otdInputDTD_DBEmployee OTD and selects all available records from the database. The executeQuery() method executes the prepared statement query, while the resultsAvailable() method ensures all rows are retrieved in the while loop. FileClient_1.
Chapter 7 Implementing the VSAM eWay Sample Projects Section 7.6 Building and Deploying the prjVSAM_JCD Sample Project meet the criteria EMPID=49. The Collaboration also writes a message to JCD_TableSelect_output0.dat to confirm when records are selected, or when no records are available. Note: The where clause in the business rule reads the trigger value as a placeholder for input. This permits you to modify the query to select a specific record.
Chapter 7 Implementing the VSAM eWay Sample Projects Section 7.6 Building and Deploying the prjVSAM_JCD Sample Project \\ Copies the database resultset into the otdInputDTD_CICSEMP (XML OTD) and selects all available records from the database that meet the criteria EMPID=49. Checking the next() method ensures all rows are retrieved in the while loop. otdVSAM_1.getCICSEMP().select( input.getText() ); while (otdVSAM_1.getCICSEMP().next()) { otdOutputDTD_Emp_1.setENAME( otdVSAM_1.getCICSEMP().
Chapter 7 Implementing the VSAM eWay Sample Projects Section 7.6 Building and Deploying the prjVSAM_JCD Sample Project Figure 59 jcdUpdate 7.6.6 Binding the eWay Components The final step in creating a Connectivity Map is binding the eWay components together. Steps required to bind eWay components together: 1 Double-click a Connectivity Map—in this example cmDelete—in the Project Explorer tree. The cmDelete Connectivity Map appears in the Enterprise Designers canvas.
Chapter 7 Implementing the VSAM eWay Sample Projects Section 7.6 Building and Deploying the prjVSAM_JCD Sample Project Figure 60 Connectivity Map - Associating (Binding) the Project’s Components 7 Minimize the jcdDelete Binding dialog box by clicking the chevrons in the upperright corner. 8 Save your current changes to the Repository, and then repeat this process for each of the other Connectivity Maps. 7.6.
Chapter 7 Implementing the VSAM eWay Sample Projects Section 7.6 Building and Deploying the prjVSAM_JCD Sample Project 5 Right-click envVSAMProj and select New > File External System. Name the External System esFileClient. Click OK. esFileClient is added to the Environment Editor. 6 Right-click envVSAMProj and select New > Logical Host. The LogicalHost1 box is added to the Environment and LogicalHost1 is added to the Environment Editor tree.
Chapter 7 Implementing the VSAM eWay Sample Projects Section 7.6 Building and Deploying the prjVSAM_JCD Sample Project Figure 62 eWays in the cmDelete Connectivity Map FileClientOUT eWay FileClientIN eWay eaVSAMOUT eWay Configuring the eWay Properties Steps required to configure the eWay properties: 1 Double-click the FileClientIN eWay on each of the Connectivity Maps and modify the properties for your system, as seen in Table 15. Click OK to close the Properties Editor.
Chapter 7 Implementing the VSAM eWay Sample Projects Section 7.6 Building and Deploying the prjVSAM_JCD Sample Project Configuring the Environment Explorer Properties Steps required to configure the Environment Explorer properties: 1 From the Environment Explorer tree, right-click the VSAM External System (esVSAM in this sample), and select Properties. The Properties Editor opens to the VSAM eWay Environment configuration.
Chapter 7 Implementing the VSAM eWay Sample Projects Section 7.6 Building and Deploying the prjVSAM_JCD Sample Project Configuring the Integration Server You must set your SeeBeyond Integration Server Password property before deploying your Project. 1 From the Environment Explorer, right-click IntegrationSvr1 under your Logical Host, and select Properties from the shortcut menu. The Integration Server Properties Editor appears.
Chapter 7 Implementing the VSAM eWay Sample Projects Section 7.6 Building and Deploying the prjVSAM_JCD Sample Project Figure 63 Deployment Profile 7.6.10 Creating and Starting the Domain To build and deploy your Project, you must first create a domain. A domain is an instance of a Logical Host. After the domain is created, the Project is built and then deployed. Note: You are only required to create a domain once when you install the Sun Java Composite Application Platform Suite.
Chapter 7 Implementing the VSAM eWay Sample Projects Section 7.6 Building and Deploying the prjVSAM_JCD Sample Project 5 Make any necessary changes to the Create Domain dialog box and click Create. The new domain is added to the Domain Manager. Select the domain and click the Start an Existing Domain button. Once your domain is started, a green check mark indicates that the domain is running. For more information about creating and managing domains see the eGate Integrator System Administration Guide. 7.
Chapter 7 Implementing the VSAM eWay Sample Projects Section 7.6 Building and Deploying the prjVSAM_JCD Sample Project 2 Verify the output data by viewing the sample output files. See About the VSAM eWay Sample Projects on page 61 for more details on the types of output files used in this sample Project. The output files may change depending on the number of times you execute the sample Project, the input file, and also the content of your database table.
Index insertRow() 55 select(String where) 55 update(String sWhere) 55 updateRow() 55 database OTD wizard about 34 add prepared statement 41 editing existing OTDs 47 review selections 45 select database objects 36 select tables/views 37 select wizard type 35 Deployment Profile Automap 89, 110 Index A activity input and output 53 Add Prepared Statements 42 alert codes, viewing 17 Automap 89, 110 E B eWay Connectivity Map 20, 24 eWay environment properties 23 eWay operation, general 8 eWay plug-ins, insta
Index O SQL operations, Delete 58 SQL operations, Insert 57 SQL operations, Select 56 SQL operations, Update 58 text conventions 10 Transaction Support Levels 22 operations 53 OTD, editing existing 47 outbound eWay properties 25 P U prepared statement batch operations 59 executing 59 prepared statements, using 52 Project importing 65 properties ConnectionRetries 29, 32 ConnectionRetryInterval 30, 33 DatabaseName 27, 30 Delimiter 28, 31 Description 26, 27, 30 DriverProperties 28, 31 MaxIdleTime 29, 32 M