
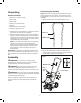
Replacement Part List


9
1. Connect the electric tiller + cultivator to a working 120 V
outlet using a heavy-duty outdoor extension power cord,
such as the Snow Joe
®
+ Sun Joe
®
Power Joe SJTW-A
14-gauge 50-foot extension cord with lighted end (Model
PJEXT50-B). Visit snowjoe.com to order online or call
1-866-SNOWJOE (1-866-766-9563) to order by phone.
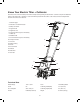
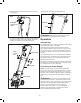
2. Push a loop of the extension cord through the slot on the
extension cord restraint holder from the opposite side of
the restraint holder (Fig. 6). Insert the appliance cord into a
proper outdoor extension cord (see Extension Cord Chart
on page 4).
mWARNING! Check the voltage to ensure it complies
with the information on the rating label.
Wheel Adjustment
mWARNING! Always switch the product o and
disconnect it from the power supply before making any
adjustments.
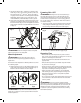
The wheels can be adjusted to 3 dierent positions to control
the cultivating depth.
1. Pull the wheel and move it to the desired position; let go
of the wheel and make sure it locks into position (Fig. 7).
Be sure to set both wheels to the same height.
mWARNING! Always ensure the wheels are securely
locked. Do not attempt to use the product with the wheels in
unlocked positions.
Powering ON + OFF
mWARNING! Rotating tines may cause serious injury.
The tines will continue to turn for a few seconds after the
tool has been switched OFF. Do not touch the rotating tines.
Contact with hot components (i.e. motor housing, gear box,
etc.) on the machine may cause burns. Allow the machine to
cool before handling.
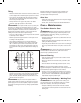
1. To turn the tool ON, press and hold the safety lock button
while pulling the ON/OFF trigger toward you. Once the
tool is running, release the safety lock button (Fig. 8).
2. To switch OFF, release the ON/OFF trigger (Fig. 8).
Operating Tips
• Before each use, check the product, its power cord and
plug, and any other accessories for damage. Do not use the
product if it is damaged or shows wear.
• Double check that the accessories and attachments are
properly tted.
• Always hold the product by its handles. Keep the handles
dry to ensure a secure grip.
• Ensure that the air vents are always unobstructed and clear.
Clean them if necessary with a soft brush. Blocked air vents
may lead to overheating and damage the product.
• Switch the product o immediately if you are disturbed
while working by other people entering the working area.
Always let the product come to a complete stop before
averting your attention.
• Do not overwork yourself. Take regular breaks to ensure you
can concentrate on the task at hand and have full control
over the product.
mWARNING! In some countries, regulations dene
restrictions for use of such products, including the times and
days when operation is permissible. Ask your community for
detailed information and observe these regulations in order
to preserve a peaceful neighborhood and avoid committing
administrative oences.
Fig. 6
Extension
cord restraint
holder
Extension
cord
Fig. 7
Transport
position
Wheel
adjustment
Wheel
Work position
(low)
Work position
(high)
Fig. 8
Safety lock
button
ON/OFF trigger