
Replacement Part List
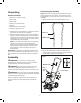


11
• All nuts and bolts must be checked periodically for
tightness before operation. After prolonged use, especially
in sandy soil conditions, the working tool will become worn
and lose some of its original shape. Tilling eciency will be
reduced and the working tool should be replaced.
• Have worn or damaged working parts replaced with new
ones of the same type by a qualied technician.
• To prolong the life span of the working tool and the product,
lubricate the tines after each use.
Maintenance
m
WARNING! Unexpected tine movement may cause
personal injury. Before servicing, repairing, or inspecting
the unit, turn the motor OFF and disconnect the extension
cord. Wait for the tines to completely stop rotating before
conducting inspection, cleaning, or maintenance.
Before and after each use, check the product and accessories
(or attachments) for wear and damage. When necessary, only
use identical replacement parts that are approved by the
manufacturer.
mWARNING! Contact with hot components (e.g. motor
housing, gear box, etc.) on the machine may cause burns.
Allow the machine to cool o before handling.
IMPORTANT!
• Wear protective gloves when cleaning or maintaining the
machine.
• Do not use cleaning uids or solvents or spray the
machine down with water (especially water under
pressure) when cleaning the machine.
NOTE: After each use, follow these steps to properly clean the
unit:
1. Remove soil, dirt, and foliage stuck in the tines, drive
shaft, tool surface, and vents with a brush or dry cloth.
2. Spray or rub biodegradable oil onto the tines.
3. Clean soiled grips with a damp cloth.
Always inspect the machine for damaged and worn parts after
each use. Check that safety features (i.e. labels, guards, etc.)
are in place. Check that nuts, bolts, and screws are tight.
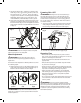
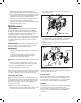
Changing the Tines
NOTE: The machine is tted with four tilling blades that can
easily be changed in pairs. Both of the steel blade tine pairs
can be tted on the left or right, as required. Always change
both tine pairs at the same time to avoid imbalance and
damage to the machine.
To replace the tines, follow the steps below:
1. While standing on a at and stable surface, switch o the
unit and remove the plug from the extension cord.
2. Remove the 2 bolts and 2 nuts, then remove the steel
blade tines (Fig. 10).
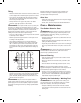
3. Clean the drive shaft with biodegradable oil (Fig. 11).
4. Place the new tines onto the drive shaft so that the holes
on the axles line up with the holes on the drive shaft
(Fig. 11).
5. Insert the 2 bolts through the holes and secure them with
the 2 nuts (Fig. 11).
IMPORTANT:
The tines must be set in the correct turning
direction. Note the way the old tines came o and replace the
new ones exactly the same way.
Power Cord
If the power cord is damaged, it must be replaced in order to
avoid a safety hazard. Contact your authorized Snow Joe
®
+
Sun Joe
®
dealer or call the Snow Joe
®
+ Sun Joe
®
customer
service center at 1-866- SNOWJOE (1-866-766-9563).
Repair
This product does not contain any parts that can be repaired
by the consumer. Contact an authorized Snow Joe
®
+
Sun Joe
®
dealer or call the Snow Joe
®
+ Sun Joe
®
customer
service center at 1-866-SNOWJOE (1-866-766-9563) for
assistance.
Fig. 10
2 bolts + 2 nuts
Steel blade
tines
Drive
shaft
Fig. 11
2 bolts + 2 nuts