
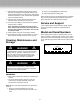
Replacement Part List

6
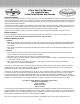
Assembly
Machine Body and Handle Assembly
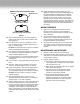
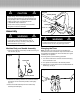
1. Take out the machine and auxiliary handle and locking nut
from the box. (Fig. 2a)
2. Assemble the auxiliary handle on the machine and insert
the locking nut into the auxiliary handle, screw tightly.
(Fig. 2b)
3. Ensure the handle assembly and the machine body
assembly are xed tightly.
Changing the Tines
Note: The tines in the motor housing is provided by the
manufacturer and the manufacturer only recommends to use
the supplied and installed tines. Ensure the tines are in good
condition prior to operation.
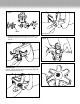
To exchange tines, use the following procedure:
1. Turn off the switch of the cultivator and remove the plug
from the extension cord.
2. The operator should stand on at and safe position.
3. Remove the nut with socket wrench and disassemble the
blades. (Fig. 3 & Fig. 4)
m CAUTION m
Inspect wiring, which, if damaged during shipping,
may cause serious bodily injury during equipment use.
If any damage is seen or suspected, do not assemble.
Instead, contact Snow Joe Customer Service
(1-866-SNOW JOE) for assistance.
Handle with care during assembly so that electrical
wiring does not become damaged.
m WARNING m
Please remove the plug prior to disassembling
or mounting of parts and accessories in order to
reduce the risk of injury. Use of any other parts not
recommended can result in injury.
Locking Nut
Auxiliary Handle
Fig. 2a
Locking Nut
Auxiliary Handle
Fig. 2b
m WARNING m
To reduce the serious risk, only use the tines suited to
this tiller and do not use of any other type of tines.
Fig. 3