R OPERATOR’S MANUAL A Division of Snow Joe®, LLC 2-IN-1 ELECTRIC POLE + CHAIN SAW 10-INCH | 8-AMP Model SWJ807E-RM Form No. SJ-SWJ807E-RM-880E-V1 THANKS FOR YOUR PURCHASE OF A REMANUFACTURED PRODUCT. To make sure you get the most out of your product, be sure to register online at snowjoe.com to enjoy full product support.
R OPERATOR’S MANUAL A Division of Snow Joe®, LLC 2-IN-1 ELECTRIC POLE + CHAIN SAW 10-INCH | 8-AMP Model SWJ807E-RM IMPORTANT! Form No. SJ-SWJ807E-RM-880E-V1 substantial non-skid footwear, and close-fitting clothing is recommended when working outdoors with power tools. Safety Instructions 10. Wear protective hair coverings to contain long hair. All Operators Must Read These Instructions Before Use 11.
Electrical Safety cords as shown in Table 1. Table 1. Method of Securing Extension Cord 1. Ground fault circuit interrupter (GFCI) protection should be provided on the circuit(s) or outlet(s) to be used for the 2-in-1 pole + chain saw. Receptacles are available having built-in GFCI protection and may be used for this measure of safety. Cord set 2. To prevent electric shock, use only with an extension cord suitable for outdoor use, such as SW-A, SOW-A, STW-A, STOW-A, SJW-A, SJOW-A, SJTW-A, or SJTOW-A.
• Cut wood only. Do not use the chain saw for any other purpose. For example, do not use the chain saw to cut plastic, masonry or non-wood building materials. Using the chain saw in these incorrect ways could result in serious damage to you and your tool. spring back and strike the operator, causing severe injury or death. • Do not carry a plugged-in unit. Carry the pole chain saw from one place to another with the unit unplugged.
• Watch for shifting of wood or other forces that may pinch the chain. • Use extreme caution when re-entering a previous cut. • Use the low-kickback chain and guide bar supplied with this 2-in-1 pole + chain saw. Only use genuine Snow Joe® + Sun Joe® replacement parts designed specifically for use with this 2-in-1 pole + chain saw. • Never use a dull or loose chain. Keep the chain sharp and properly tensioned. • Follow the manufacturer’s sharpening and maintenance instructions for the saw chain.
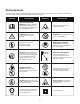
Safety Symbols The following table depicts and describes safety symbols that may appear on this product. Read, understand, and follow all instructions on the machine before attempting to assemble and operate. Symbols Descriptions Symbols Descriptions READ THE OPERATOR'S MANUAL(S) – Read, understand, and follow all instructions in the user manual(s) before attempting to assemble and operate. Keep bystanders and children a safe distance away.
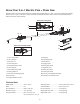
Know Your 2-in-1 Electric Pole + Chain Saw Read the owner’s manual and safety instructions carefully before operating the 2-in-1 pole + chain saw. Compare the illustration below to the 2-in-1 pole + chain saw in order to familiarize yourself with the location of the various controls and adjustments. Save this manual for future reference. Back of the cutting head 10 11 9 R 6 4 2 1 8 12 R 16 14 7 13 15 17 5 3 19 20 Back of the removable handle 21 18 1. 10 in. cutting chain 12. Soft grip 2.
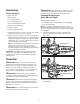
mWARNING! Before performing any maintenance, make Unpacking sure the tool is unplugged from the power supply. Failure to heed this warning could result in serious personal injury. Carton Contents Installing/Replacing the Guide Bar and Chain • Electric chain saw • Telescoping pole • 10 in. (25 cm) guide bar Tools and supplies required: • 10 in.
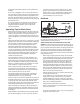
Fig. 6 Fig. 3 R Cutting bar R Chain Loop 6. Hold the chain in position on the bar and place the loop around the sprocket. Fit the bar flush against the mounting surface so that the bar studs are in the long slot of the bar and the adjusting pin is in the chain tension pin hole (Fig. 7). 3. Remove the old chain from the bar. 4. Lay out the new saw chain in a loop and straighten any kinks.
9. Remove all slack from the chain by turning the chain tensioner screw clockwise until the chain seats snugly against the bar with the drive links in the bar groove (Fig. 9). 2. While pulling the handle lock, use the other hand to grasp the front hand grip and slide the removable cutting head up to remove it (Fig. 11). NOTE: The chain is correctly tensioned when there is no sag on the underside of the guide bar; the chain is snug, but can be rotated by hand without binding.
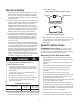
Chain Saw Assembly 1. To remove the cutting head from the telescoping pole, PULL the cutting head lock back to release, and grasping the front hand grip, SLIDE UP to remove the cutting head (Fig. 14). Operation Starting and Stopping mCAUTION! • Before starting the saw, remove the oil tank cap and add bar & chain oil to the top of the oil level window (Fig. 17). One minute of use will consume approximately 0.15 fl oz (4 ml) of oil. Refill when the oil level drops to 1/4 of a tank. Fig.
mWARNING! Do not operate the 2-in-1 pole + chain saw Fig. 18 in a tree, on a ladder, or on a scaffold. Using the tool under such circumstances is extremely dangerous. Extension cord restraint hook mCAUTION! The chain will continue to run for several seconds after turning off the tool. Appliance cord Do not use the 2-in-1 pole + chain saw under wet conditions.
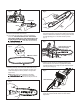
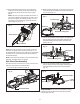
3. Extend the pole to the desired length (Fig. 21). Fig. 23 NOTE: Push poles toward each other to shorten the pole or pull them away from each other to lengthen the pole. Only extend the pole to the minimum length required to reach the limb to be cut. Fig. 21 Hex key wrench Cam-lock nut 4. Lock the pole in position by closing the cam-lock (Fig. 22), and ensure that the pole is secure. If the pole telescopes when the cam-lock is closed, the nut may need tightening.
Basic Cutting Procedure This unit is designed for trimming small branches and limbs up to recommended 7.5 in. (19 cm), not to exceed a max cut of 9.5 in. (24 cm) in diameter depending on type of wood. Practice cutting a few small limbs using the following technique to get the “feel” of using the saw before you begin a major sawing operation. • Release the trigger ON/OFF switch as soon as the cut is completed.
Basic Cutting Procedures • Before felling is started, consider the natural lean of the tree, the location of larger branches and the wind direction to help you judge which way the tree will fall. than the maximum cutting thickness. • Remove dirt, stones, loose bark, nails, staples and wire from the tree. mWARNING! Do not cut limbs or trees that are larger • Take the proper stance in front of the wood with the saw turned off (Fig. 15).
Fig. 29 Fig. 30B 2 1 1 1 2 mWARNING! Pay special attention to where the branches • When the log is supported on both ends (Fig. 30C), cut 1/3 the diameter from the top (overbuck). Then make the finishing cut by underbucking the lower 2/3 to meet the first cut. are lying on the ground and recognize the following risks: 1). the branches may be under tension; 2). the direction in which the branch will fall may differ from that anticipated; 3). the tree may be unstable after the branch has been cut.
– warm, may be too tight upon cooling. Check the “cold tension” before next use. The chain must be re-tensioned whenever the flats on the drive links hang out of the bar groove (Fig. 31). When bucking on a slope, always stand on the uphill side of the log. When cutting through the log, maintain control by releasing the cutting pressure near the end of the cut without relaxing your grip on the chain saw handles. Do not let the chain contact the ground. Fig.
Guide Bar Maintenance Sharpen the chain as follows (Fig. 32): • Secure the bar firmly, with the chain mounted, in a suitable vise. When the guide bar shows signs of wear, turn it over on the saw to distribute the wear for maximum bar life. Feathering or burring of the bar rails is a normal process of bar wear. You should smooth such faults with a file as soon as they occur. • Tighten the chain if it is loose.
Troubleshooting Table Problems Corrective Action The saw motor fails to start • Check that you installed the extension cord properly into the saw power cord receptacle and that you plugged the extension cord into a live 120 V outlet. If you cannot find the cause of the problem or are uncertain what to do, then have the saw inspected by an authorized Snow Joe® + Sun Joe® dealer or call the Snow Joe® + Sun Joe® customer service center at 1-866-SNOWJOE (1-866-766-9563) before using it.
Optional Accessories mWARNING! ALWAYS use only authorized Snow Joe + Sun Joe® replacement parts and accessories. NEVER use replacement parts or accessories that are not intended for use with this saw. Contact Snow Joe® + Sun Joe® if you are unsure whether it is safe to use a particular replacement part or accessory with your saw. The use of any other attachment or accessory can be dangerous and could cause injury or mechanical damage.
SNOW JOE® + SUN JOE® REFURBISHED GOODS WARRANTY GENERAL CONDITIONS: Snow Joe® + Sun Joe® may from time to time change the design of its products. Nothing contained in this warranty shall be construed as obligating Snow Joe® + Sun Joe® to incorporate such design changes into previously manufactured products, nor shall such changes be construed as an admission that previous designs were defective.
snowjoe.