
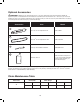
Replacement Part List


14
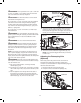
Basic Cutting Procedures
mWARNING! Do not cut limbs or trees that are larger
than the maximum cutting thickness.
• Practice cutting a few small logs using the following
techniques to get the feel of using the saw before you
begin a major sawing operation.
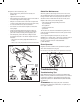
• Take the proper stance in front of the wood with the saw
turned o (Fig. 15).
• Squeeze the trigger and let the chain accelerate to full
speed before entering the cut.
• Hold the saw with both hands rmly. Always keep your
left hand on the front handle and your right hand on the
rear handle so that your body is to the left of the chain
line.
• Keep the unit running the entire time you are cutting,
maintaining a steady speed.
• Let the chain do the work; exert only light downward
pressure. If you force the cut, damage to the bar, chain,
or unit can result.
• Do not put the pressure on the saw at the end of the cut.
• Always cut with both feet on solid ground to prevent
falling.
• Do not cut above chest height since it is dicult to
control kickback forces with a saw held high.
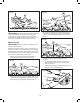
Felling a tree
• When bucking and felling are performed by two or more
people at the same time, the felling operation should be
separated from the bucking operation by a distance of at
least twice the height of the tree being felled. Trees should
not be felled in a manner that would endanger any person,
strike any utility line or cause any property damage. If the
tree does make contact with any utility line, the company
should be notied immediately.
• The chain saw operator should keep on the uphill side of
the terrain as the tree is likely to roll or slide downhill after
it is felled.
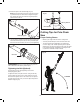
• An escape path should be planned and cleared as
necessary before cuts are started. The escape path
should extend back and diagonally to the rear of the
expected line of fall as illustrated (Fig. 27).
• Before felling is started, consider the natural lean of the
tree, the location of larger branches and the wind direction
to help you judge which way the tree will fall.
• Remove dirt, stones, loose bark, nails, staples and wire
from the tree.
Notching undercut
Make the notch 1/3 the diameter of the tree, perpendicular to
the direction of falls as illustrated (Fig. 28).
Make the lower horizontal notching cut rst.
This will help to avoid pinching either the saw chain or the
guide bar when the second notch is made.
Felling backcut
• Make the felling back cut at least 2 in. (50 mm) higher than
the horizontal notching cut as illustrated (Fig. 16). Keep
the felling back cut parallel to the horizontal notching cut.
Strategically position the felling back cut so that enough
wood is left to act as a hinge. The hinge wood keeps the
tree from twisting and falling in the wrong direction. Do
not cut through the hinge.
• As the felling gets close to the hinge, the tree should
begin to fall. If there is any chance that the tree may not
fall in the desired direction or it may rock back and bind
the saw chain, stop cutting before the felling back cut is
complete and use wedges of wood, plastic or aluminium
to open the cut and drop the tree along the desired line of
fall.
• When the tree begins to fall, remove the chain saw from
the cut, stop the motor, put the chain saw down, then
use the retreat path planned. Be alert for overhead limbs
falling and watch your footing.
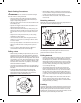
Limbing
Limbing is the process in which branches are removed from a
fallen tree. When limbing, leave larger lower limbs to support
the log o the ground. Remove the small limbs in one cut as
illustrated (Fig. 29). Branches under tension should be cut from
the bottom up to avoid binding the chain saw.
Fig. 27
2 in. (50 mm)
2 in. (50 mm)
Fig. 28