
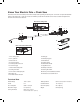
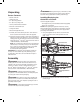
Replacement Part List


9
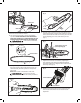
9. Remove all slack from the chain by turning the chain
tensioner screw clockwise until the chain seats snugly
against the bar with the drive links in the bar groove
(Fig. 9).
NOTE: The chain is correctly tensioned when there is no
sag on the underside of the guide bar; the chain is snug,
but can be rotated by hand without binding. For more
information on chain tensioning, see the maintenance
section beginning on pg. 15.
10. Tighten the end cover nut using the hex key wrench.
NOTE: If the chain is too tight, it will not rotate. Loosen the
end cover nut slightly and turn the chain tensioner 1/4 turn
counterclockwise. Lift the tip of the guide bar up and retighten
the end cover nut. Ensure that the chain can be rotated by
hand without binding.
NOTE: A new chain tends to stretch; check the chain tension
frequently, and adjust tension as required.
Pole Chain Saw Assembly
The machine comes in the chain saw mode. To convert it to a
pole chain saw, follow the instructions below.
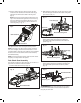
1. Pull the handle lock toward you (Fig. 10).
2. While pulling the handle lock, use the other hand to grasp
the front hand grip and slide the removable cutting head
up to remove it (Fig. 11).
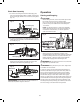
3. Connect the removable cutting head and the telescoping
pole by aligning their ends together and sliding the
removable cutting head downwards until it clicks into
position (Fig. 12).
4. Connect the removable handle and the telescoping
pole by aligning the their ends together and sliding the
removable handle upward until it clicks into position
(Fig. 13).
mWARNING! Always make sure that both the cutting
head lock and the handle lock are locked securely before
using the pole chain saw.
Fig. 9
Chain tensioner
Blade screwdriver
Fig. 10
Removable handle
Handle lock
Fig. 11
Removable cutting head
Front hand grip
Handle lock
R
Fig. 12
Removable cutting head
Telescoping
pole
Fig. 13
Telescoping pole
Removable handle