
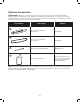
Replacement Part List


14
Basic Cutting Procedures
mWARNING! Do not cut limbs or trees that are larger
than the maximum cutting thickness.
• Practice cutting a few small logs using the following
techniques to get the feel of using the saw before you
begin a major sawing operation.
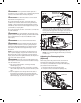
• Take the proper stance in front of the wood with the saw
turned o (Fig. 15).
• Squeeze the trigger and let the chain accelerate to full
speed before entering the cut.
• Hold the saw with both hands rmly. Always keep your
left hand on the front handle and your right hand on the
rear handle so that your body is to the left of the chain
line.
• Keep the unit running the entire time you are cutting,
maintaining a steady speed.
• Let the chain do the work; exert only light downward
pressure. If you force the cut, damage to the bar, chain,
or unit can result.
• Do not put the pressure on the saw at the end of the cut.
• Always cut with both feet on solid ground to prevent
falling.
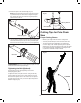
• Do not cut above chest height since it is dicult to
control kickback forces with a saw held high.
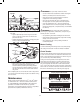
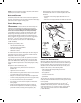
Limbing
Limbing is the process in which branches are removed from a
fallen tree. When limbing, leave larger lower limbs to support
the log o the ground. Remove the small limbs in one cut as
illustrated (Fig. 27). Branches under tension should be cut from
the bottom up to avoid binding the chain saw.
mWARNING! Pay special attention to where the
branches are lying on the ground and recognize the following
risks:
1). the branches may be under tension; 2). the direction in
which the branch will fall may dier from that anticipated; 3).
the tree may be unstable after the branch has been cut.
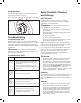
Bucking a Log
mWARNING! Do not buck logs that are larger than the
maximum cutting thickness.
Bucking is the process in which a log is cut into lengths. It is
important to make sure your footing is rm and your weight is
evenly distributed on both feet. When possible, the log should
be raised and supported by the use of limbs, logs, or chocks.
Follow these simple directions for easy cutting:
• When the log is supported along its entire length as
illustrated (Fig. 28A), cut from the top (overbuck).
• When the log is supported on one end (Fig. 28B), cut 1/3
the diameter from the underside (underbuck). Then make
the nishing cut by overbucking to meet the rst cut.
• When the log is supported on both ends (Fig. 28C), cut
1/3 the diameter from the top (overbuck). Then make the
nishing cut by underbucking the lower 2/3 to meet the
rst cut.
1
2
1
Fig. 27
1
Fig. 28A
1
2
Fig. 28B