
Replacement Part List

8
Unpacking
Carton Contents
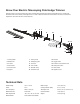
• Electric hedge trimmer head
• Rear handle with telescoping pole
• Blade cover
• Shoulder strap
• Manuals with registration card
1. Carefully remove the electric pole hedge trimmer and
check to see that all of the above items are supplied.
2. Inspect the product carefully to make sure no breakage or
damage occurred during shipping. If you nd damaged or
missing parts, DO NOT return the unit to the store. Please
call the Snow Joe
®
+ Sun Joe
®
customer service center at
1-866-SNOWJOE (1-866-766-9563).
NOTE: Do not discard the shipping carton and packaging
material until you are ready to use the electric pole hedge
trimmer. The packaging is made of recyclable materials.
Properly dispose of these materials in accordance with
local regulations or save the packaging for long-term
product storage.
IMPORTANT! The equipment and packaging material are
not toys. Do not let children play with plastic bags, foils,
or small parts. These items can be swallowed and pose a
suocation risk!
Assembly
m
WARNING! The pole hedge trimmer must be fully
assembled before operation! Do not use a pole hedge trimmer
that is only partly assembled or assembled with damaged
parts!
Follow the assembly instructions step-by-step and use the
gures provided as a visual guide to easily assemble the pole
hedge trimmer.
Do not connect the pole hedge trimmer to the power supply
before it is completely assembled.
NOTE: Take care of small parts that are removed during
assembly or when making adjustments. Keep them secure to
avoid loss.
Assembling the Tool
The telescoping pole and trimmer head come unassembled.
Before using the pole hedge trimmer, an easy assembly is
required.
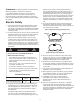
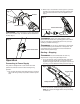
1. Align the telescoping pole with the trimmer head.
2. Insert the telescoping pole into the trimmer head locking
base until the lock holes click into place (Fig. 1).
NOTE: The grooves must be aligned with the arrow
positions near the locking base.
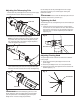
3. Slide the locking knob onto the locking base and rotate
the locking knob clockwise to secure (Fig. 2).
4. Make sure the rear handle is properly aligned with the
blade.
mWARNING! Make sure the telescoping pole is inserted
to a full stop and the locking knob is properly tightened before
using the pole hedge trimmer.
mWARNING! Failure to lock the telescoping pole as
directed above could result in serious injury or death.
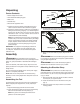
Attaching the Shoulder Strap
mWARNING! Always attach the shoulder strap to the
pole hedge trimmer. Use the shoulder strap to help support the
trimmer while in use; do not carry the pole hedge trimmer with
only your hands.
1. Wear the shoulder strap over the left shoulder so that the
hook stays at your right hand side.
2. Fasten the carabiner hook to the bracket on the pole
(Fig. 3).
3. Adjust the length of the strap to attain a comfortable
working position.
Locking base
Lock hole
Locking
knob
Trimmer head
Telescoping
pole
Fig. 1
Fig. 2
Locking base
Locking knob