
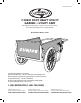
Replacement Part List
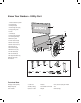


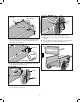


6. Stand the cart on end with the front angle clamp down on
the oor. Temporarily place the four large at washers on
the inside of the front angle clamp (Fig. 6).
7. Lay the front panel down onto the front angle clamp, on
top of the four large washers (Fig. 7).
NOTE: The washers are used here as shims (spacers) and not
for assembly. They will be removed and used for wheel and
axle assembly.
8. Position a side panel against a side angle clamp, resting
on top of the front panel (Fig. 8).
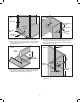
9. Secure a supporting strap on the side angle clamp and
the front angle clamp by two M6 x 25 screws, 2 at
washer, and 2 hex nuts (Fig. 9).
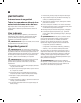
10. Secure the side panel with the side angle clamp by a
M6 x 25 screw, a at washer, and a hex nut (Fig. 10).
11. Secure the side panel with the front angle clamp by a
M6 x 25 screw, a at washer, and a hex nut (Fig. 11).
Fig. 6
Large washers
Fig. 7
Front panel
Fig. 8
Side angle
clamp
Front panel
Side panel
Bottom
panel
M6 x 25
screw
Fig. 9
Supporting
strap
Flat
washers
Hex nuts
Side panel
Front
panel
Front angle
clamp
Side angle
clamp
Flat washer
Fig. 10
Side
panel
Side angle
clamp
M6 x 25
screw
Hex nut
Front
panel
Bottom
panel
5