
Operating Guide


Unpacking
NOTE: Before beginning assembly, make sure that all of
the parts and hardware listed below are present. If any part
is missing or damaged, do not attempt to assemble the
product. Contact the Snow Joe
®
+ Sun Joe
®
customer service
department at 1-866-SNOWJOE (1-866-766-9563).
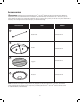
Parts
1. Screen hook 4. Fire bowl
2. Screen 5. Cast stone base
3. Log grid
Hardware
6. M6 ring screw 7. M6 nut
Assembling the Fire Pit
No Tools Required
Choose a soft and level location for assembly. Remove all
parts from the packaging, and check for missing parts.
1. Attach the M6 ring screw to the screen using the M6 nut
(Fig. 1).
2. Place all parts on the cast stone base (Fig. 2).
Care and Maintainence
Lighting
1. Make sure there is only a small amount of ash in the
bottom of the bowl.
2. Place a layer of dry kindling or a natural re-starter onto
the center of the log grid.
3. Above the kindling or re-starter, place a layer of dry
seasoned hardwood that is cut to lengths that are no
more than 3/4 the diameter of the bowl.
4. Use a match to light the kindling or re-starter.
5. Using the hook that is provided and heat-resistant gloves,
replace the spark guard once the kindling or re-starter is
lit.
Tending the Fire
You may need to shift and/or add logs for an ideal re pit
experience. DO NOT place a hot mesh screen cover or hot re
pit tools onto combustible surfaces such as grass, wooden
decks or furniture.
Fig. 1
Hardware Used: M6 ring screw (x1)
Hardware Used: M6 nut (x1)
M6 ring screw
Screen
M6 nut
Fig. 2
Screen hook
Screen
Log grid
Fire bowl
Cast stone
base
4