
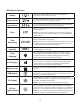
Replacement Part List

16
Replacement + Installation
of the Battery
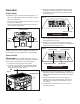
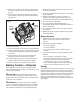
1. Use only batteries meeting the following criteria:
• Battery type: Sealed lead-acid, AGM. (deep cycle)
• Nominal voltage: 12 V D.C.
• Capacity: 60, 80, 90 or 100 Ah
• Battery should comply with UL 1989 standard
• When installing the battery, make sure the polarity
connections are correct.
NOTE: Battery has to be recharged immediately once
purchased. All rechargeable batteries gradually discharge
when left standing. Periodic charging is necessary to
maintain maximum battery capacity.
mWARNING! Study all battery manufacturers' specic
precautions and warnings in advance before assembly.
Incorrect connection may cause a short circuit and personal
injury. Follow all recommended guidelines.
mCAUTION! Risk of explosion if battery is replaced by
an incorrect type. Dispose of used battery properly. Do not
dispose of battery in a re. The battery may explode.
mCAUTION! Servicing of battery should be performed
only by a factory-authorized service center. When replacing the
battery, replace with the same type of battery.
mCAUTION! Do not open or mutilate battery. Released
chemicals are harmful to the skin and eyes and are toxic.
mCAUTION! A battery can present a risk of electrical
shock.
2. The following precautions should be observed when
working on battery:
• Remove watches, rings, or other metal objects.
• Use tools with insulated handles.
• Wear rubber gloves and boots.
• Do not lay tools or metal parts on top of battery.
• Disconnect charging source prior to connecting or
disconnecting battery terminals.
• Determine if battery is inadvertently grounded. If
inadvertently grounded, remove source from ground.
Contact with any part of a grounded battery can result
in electrical shock. The likelihood of such shock can be
reduced if such grounds are removed during installation
and maintenance.
Replacing the battery
1. Tools required:
• Phillips screwdriver
• Electrical tape
• Adjustable wrench
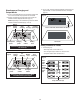
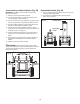
2. Remove the six screws and open the upper cover
(Fig. 27).
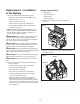
3. Unfasten the 4 screws to remove the xed bar securing
the battery (Fig. 28).
Fig. 27
Screws
Fig. 28
Fixed bar
Screws