
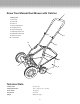
Replacement Part List


Assembly
1. Before attempting to assemble, empty carton and
compare parts with packing list on page 2.
NOTE:
• Carefully remove the parts from the box.
• Inspect the parts to make sure no breakage or damage
occurred during shipping.
• Do not discard the packing material until all parts are
examined.
• If any parts are damaged or missing, please call
1-866-766-9563 for assistance.
• Be sure to tighten the knobs when assembled to
prevent the handle from rocking.
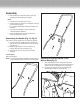
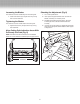
Assembling the Handle (Fig. 1 & Fig. 2)
This product normally requires 6 to 10 minutes for assembly.
1. Insert the two center handle pieces into the left and
right side of the top handle and secure with two knobs
provided. (Fig. 1)
2. Attach the top handle to the lower handle using
carriage bolts and knobs provided. (Fig. 2)
3. Tighten all the knobs on the joints of the handle
assembly.
Tools Required
Pliers (Not included)
NOTE: Do not tighten the bolts completely until all bolts have
been inserted through the holes in the handle pieces.
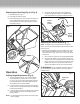
Attaching the Lower Handle to the
Mower Base (Fig. 3)
1. After assembling the handle, line up the holes at the
lower end of each handle arm with the short posts that
extend out from the side plates of the mower base.
2. Clamp the both side arms to line up with the posts
while pressing inwards on the handle bars.
Fig. 1
Fig. 2
Fig. 3
3
Post
Handle bars