
Use and Care Guide


Blade Maintenance
IMPORTANT: The mower blade is sharp and can cause severe
personal injury if handled incorrectly. Wrap the blade or wear
protective gloves, and use extra caution when handling.
The steel blade is designed to provide a ne cut in long or
tough grass. Deterioration in the quality of cut indicates blade
wear or damage.
mWARNING! An excessively vibrating lawn mower
indicates that the blade is not properly balanced or has
become deformed from striking an object. In this case, the
blade must be repaired or replaced. Please follow the proper
maintenance procedures for blade care or call the
Snow Joe
®
+ Sun Joe
®
customer service center for assistance
at 1-866-SNOWJOE (1-866-766-9563).
Blade Replacement
mWARNING! Wear heavy duty gloves when handling the
blade.
IMPORTANT: Only use original replacement parts specied for
this lawn mower.
You can purchase a replacement blade (Model MJ408E-74)
and other genuine replacement parts by ordering online at
snowjoe.com or, to order by phone, contact Snow Joe
®
+
Sun Joe
®
customer service at 1-866-SNOWJOE
(1-866-766-9563). The use of parts that do not meet the
original equipment specications may lead to improper
performance of the lawn mower, may compromise operator
safety, and will void the manufacturer's warranty.
1. Disconnect the electrical supply to the lawn mower and
wait until the blade comes to a complete stop.
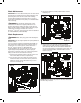
2. Turn the lawn mower on its side, put a block of wood
between the blade and the mower deck to prevent the
blade from turning. Loosen the blade nut by a 15 mm
wrench or socket (Fig. 16).
3. Remove the blade nut, washer, blade insulator, and the
blade (Fig. 17).
4. Make sure the rotor assembly is pushed completely
against the motor shaft. Place the new blade against the
rotor assembly. Make sure the new blade is installed with
the curved ends pointing up towards the mower deck, and
replace the blade insulation, the blade washer, and the
blade nut (Fig. 18).
NOTE: Make sure all parts are placed in the exact order same
with when they removed.
Fig. 16
Wood block
Wrench
Blade nut
Blade
Fig. 17
Blade
insulation
Blade
washer
Blade nut
Fig. 18
Rotor assembly
Motor shaft
12