
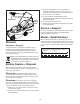
Replacement Part List


14
mWARNING! An excessively vibrating mower indicates
that the blade is not properly balanced or has become
deformed from striking an object. In this case, the blade must
be repaired or replaced. Please follow the proper maintenance
procedures for blade care.
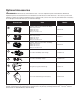
Blade Replacement
IMPORTANT: Only use original replacement parts specied
for this mower. The use of parts that do not meet the original
equipment specications may lead to improper performance
of the lawn mower, may compromise operator safety.
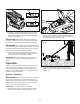
1. Disconnect the safety key to the mower.
2. Turn the mower on its side to expose the underside of the
blade housing.
3. Use a cloth to grip the blade or wear heavy-duty gloves.
4. Using the spanner provided, remove the bolt and
the washer securing the blade by turning the bolt
counterclockwise, then carefully remove the blade
(Fig. 16).
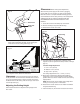
5. Fit the new blade, the washer and the bolt back on
following the same steps in reverse order (Fig. 17).
Storage
Follow the steps below to prepare the lawn mower for storage:
1. Remove the safety key from the slot.
2. Clean the mower with a damp cloth or hand brush.
3. Inspect the mower carefully for worn, loose or damaged
parts. Check connections and screws and tighten if
necessary. Pay special attention to the mower blade and
replace/sharpen if it shows signs of wear. Refer to the
Maintenance and Care section.
4. Store the mower indoors in a dry, clean and cool area
out of the reach of children. Do not store the unit next to
corrosive materials, such as fertilizer and rock salt.
5. Do not cover the lawn mower with a solid plastic sheet.
Plastic coverings trap moisture around the mower, which
can damage the unit.
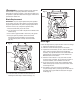
6. The handle on your lawn mower can be folded for
compact storage. Start by loosening the handle knobs on
each side of the upper handle and fold down the upper
handle (Fig. 18).
Fig. 16
Blade
Spanner
Fig. 17
Blade
Bolt
Washer