
Replacement Part List


13
2. Cutting Sequence – First cut both sides; start at the
bottom and work towards the top. This prevents cuttings
from falling into an area that you have yet to trim.
3. Trimming the Top – Where the branches have grown
extremely long, cut back the hedge in several stages. The
shorter cuttings obtained are best suited for composting.
4. Pruning Thick Branches – When older hedges are to be
cut a substantial amount, use pruning shears or some
other device to trim thicker branches (greater than 0.3 in.
[8 mm] in diameter) to the desired length before starting
work with the hedge trimmer.
To shape precisely, run a taught line between the extreme
edges of the hedge and then trim along the length of the
line.
Ensure that the blade does not come into contact with any
object made of hard material that could damage it, such
as fencing wire or metallic plant supports.
Shearing Tips
mWARNING! Only use the grass shear blade for this
operation.
NOTE: Use the telescoping pole for shearing grass at lower
position if necessary. Adjust the pole length and pole head
angle according to the intended use before operation.
1. Avoid shearing grass in a stooped or bent over position for
lengthy periods of time. If prolonged stooping or bending
is unavoidable, then regularly interrupt by standing upright
and successively bending backwards several times.
2. Pay attention when performing work close to trees and
bushes. The cutting device can damage sensitive bark,
and damage fence posts.
3. Do not move the product too fast as this will result in
ineective cutting and possible damage.
4. Walk, never run, when using the product with the
telescope pole.
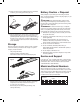
5. Cut repeatedly from up and down in layers when the grass
is very high (Fig. 30).
6. Keep the cutting device at an angle of about 10° to the
ground when shearing. Avoid touching the ground as this
can ruin the lawn and damage the product.
7. Let the cutting device do the work. Let it work at its own
pace, never press it into the area to be cut.
8. Carefully maneuver the product around objects, such as
trees and bushes, ensuring it does not come into contact
with them. Avoid that the cutting device comes in contact
with sensitive plants.
9. Our Environment – At Snow Joe
®
+ Sun Joe
®
, we care
about the environment and consider what we may do to
protect it. If you share this concern, you may already be
aware of the suggestions below; if not, please consider
them as a small step in protecting our future.
Don't throw your clippings in a trash bag; where possible,
dispose of your garden waste in a landll. Alternatively,
many communities provide a collection point where you
can dispose of your garden waste in an environmentally-
friendly manner.
Maintenance
mWARNING! Always switch the product o and let the
product cool down before performing inspection, maintenance
and cleaning work.
1. Keep the ventilation vents of the tool clean at all times. If
possible, prevent foreign matter from entering the vents.
2. If the enclosure of the trimmer requires cleaning, do not
use solvents to clean it. Only use a moistened soft cloth.
Never let any liquid get inside the tool; and never immerse
any part of the tool into a liquid.
3. The blade rail should be cleaned and treated with light
machine oil or spray lubricant (such as WD40, CRC 5.56
or RP7) after each use. When a job lasts for a long period
of time, it is recommended that the blade rail also be
treated with spray lubricant at regular intervals during
operation.
4. Inspect the product before each use for worn and
damaged parts. Do not operate it if you nd broken and
worn parts.
Blade Maintenance
To ensure years of ecient and trouble-free operation, blade
cleaning should be performed if sap and debris have built-
up, or if you live in an area where the soil is sandy. Cleaning
unusually heavy deposits may require removal of the blades.
NOTE: Snow Joe
®
+ Sun Joe
®
will not be held responsible for
any damage or injuries caused by repair of the trimmer by an
unauthorized person or by mishandling of the trimmer.
1. Keep the cutting blades clean and free of debris. Remove
trimmings.
R
Fig. 30