
Replacement Part List


16
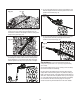
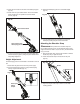
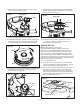
2. Insert the rear handle into the end of the telescoping pole
(Fig. 26).
3. Press down the quick release button. Ensure the release
button snaps rmly into position to lock the handle
securely (Fig. 26).
4. To remove, disconnect rear handle and cutting head from
ends of telescoping pole by lifting the quick release button
and pulling straight out.
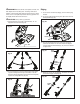
Height Adjustment
The telescoping pole can be extended or shortened for ease of
use.
1. Disconnect the grass trimmer from the power supply.
2. Unlock the telescoping pole by turning the telescoping
locking coupler clockwise (Fig. 27).
3. Extend the telescoping pole to a comfortable height
(Fig. 28).
4. Lock the telescoping pole in position by turning the
telescoping locking coupler counter-clockwise.
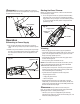
Attaching the Shoulder Strap
mWARNING! Always attach the shoulder strap from
the unit before starting motor. Use the shoulder strap to help
support the trimmer while in use; do not carry the trimmer with
only your hands.
1. Wear the shoulder strap over the left shoulder so that the
buckle stays at your right hand side.
2. Fasten the shoulder strap to the buckle on the pole
(Fig. 29).
3. Adjust the length of the strap to attain a comfortable
working position.
Fig. 26
Grass trimmer with
telescoping pole assembly
Quick release button
Rear
handle
Fig. 27
Telescoping
locking
coupler
Fig. 28
Fig. 29
Buckle
Shoulder strap