
Replacement Part List


10
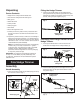
To start the hedge trimmer:
1. Hold the hedge trimmer rmly with both hands. Your right
hand is slightly bent and is holding the rear handle, and
your left hand is straight and is holding the front handle.
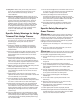
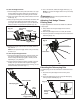
2. Press and hold the hand safety switch located on the front
handle (Fig. 10).
3. With your right hand, press and hold safety lock button with
your thumb, then squeeze the on/o trigger switch with
your ngers. Once the tool powers on, you can release the
safety lock button and proceed with operation (Fig. 10).
4. Release the trigger switch and the hand safety switch to
stop the tool.
NOTE: Do not press the trigger switch until you are ready
to make a cut.
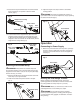
To start the pole hedge trimmer:
1. Hold the pole hedge trimmer rmly with both hands. Your
right hand is holding the rear handle and and your left
hand is holding the telescoping pole or auxiliary handle
depending on your preference.
2. Push and hold the safety lock button (located on the rear
handle) with your thumb and then squeeze the trigger
switch with your ngers. Once the tool is running, you can
release the safety lock button (Fig. 11).
3. To turn the tool OFF, release the trigger switch (Fig. 11).
NOTE: Do not press the trigger switch until you are ready
to make a cut.
mWARNING! Blade continues operation after tool is
turned o/trigger released.
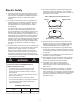
Adjusting Pole Hedge Trimmer
Pivoting Head
The pole hedge trimmer head can be rotated into 5 dierent
cutting angles.
1. Always disconnect the pole hedge trimmer from the
power supply.
2. Place the pole hedge trimmer on a sturdy at surface.
3. Press the pivot button and adjust the trimmer head to the
desired angle (Fig. 12).
Extending the Telescoping Pole
The telescoping pole can be extended or shortened for ease
of use.
1. Disconnect the pole hedge trimmer from the power
supply.
2. Unlock the telescoping pole by turning the telescoping
locking coupler clockwise (Fig. 13).
Fig. 10
Front handle
Hand safety
switch
Trigger switch
Safety lock
button
Rear
handle
Fig. 11
Telescoping pole
auxiliary handle
Safety lock button
Rear
handle
Trigger switch
Fig. 12
Pivot button
-20º
0º
20º
40º
60º
Fig. 13
Telescoping
locking
coupler