
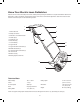
Replacement Part List

9
• To ensure that the extension cord is not an impediment,
turn the unit in such a manner so that the cable relief
holder on the bar always faces the side that has been
treated.
mWARNING! When your dethatching session is
complete, disconnect the power supply and wait until the
cylinder has come to a complete stop before transporting the
unit.
• Set the tine adjustment knob to the transport position
(setting 0) when transporting the unit (see "Setting the
working positions" on page 7).
• Lift the unit to transport it over steps and sensitive
surfaces (e.g. tiles).
• Always clean the unit after each use (see “Cleaning and
Storage”).
Cleaning + Storage
Work that is not described in these instructions must be
carried out by an authorized Snow Joe
®
+ Sun Joe
®
service
center. Only use original and identical replacement parts.
• Wear gloves when handling the tine cylinder.
• Prior to all maintenance and cleaning work, always switch
OFF the unit, disconnect the plug from the power supply
and wait until the cylinder has stopped completely.
mWARNING! Do not jet water onto the unit and do not
clean it under owing water. Failure to comply could result in
danger of electric shock and damage to the unit.
When you have completed your dethatching session, remove
plant residues adhering to the wheels, the ventilation opening,
the grass ejector opening and the tine cylinder. Do not use
hard or pointed objects for this purpose as they could damage
the unit.
• Completely empty the thatch collection bag.
• Always keep the unit clean. Do not use cleaning agents or
harsh solvents.
Storage
• Store the unit in a dry, locked-up place out of the reach of
children.
• Let the motor cool completely before placing the unit in a
closed room.
• Do not wrap nylon sacks around the unit as such
coverings trap moisture and can damage the unit.
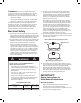
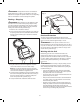
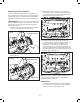
• Loosen the handle knobs so that the bar can be folded up
for space-saving storage. Ensure that the cables are not
squeezed when you collapse the handle (Fig. 8).
Maintenance
mWARNING! Always turn o the dethatcher and
unplug the power cord from the outlet before performing any
maintenance task.
General Maintenance
• Clean the unit with a slightly damp cloth and pH-neutral
soap. Use a brush for areas that are hard to reach.
• Pay close sttention to cleaning the air vents with a cloth
and a brush after EVERY use.
• Remove stubborn dirt with high pressure air (max. 3 bar).
• Check for worn or damaged parts. Replace worn parts as
necessary or contact an authorized Snow Joe
®
+ Sun Joe
®
service center for repair before resuming work with the
dethatcher.
• Regularly check for obvious defects such as loose,
dislodged or damaged cutting devices, loose xings and
worn or damaged components.
• Check that covers are undamaged and correctly tted.
Carry out necessary maintenance or repairs before
resuming work with the dethatcher.
• This product does not contain any parts that can be
repaired by the consumer. Contact a qualied service
technician at an authorized Snow Joe
®
+ Sun Joe
®
service
center to have the unit checked and repaired.
Cutting Device
mWARNING! Wear safety gloves when working near or
on the cutting device. Use appropriate tools to remove debris.
Never use your bare hands!
• Keep the raker tines clean and free of debris.
• Apply a small amount of suitable lubricant along the edge
of the tine cylinder to maintain good cutting performance.
Fig. 8
Upper handle knob
Upper handle
Lower
handle
knob
Lower
handle