
Replacement Part List

7
Operation
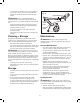
Setting the Working Positions (Using the
tine depth control knob)
NOTE: Before dethatching your lawn, prep the area by mowing
the lawn to a height of approximately 2 in. (5 cm). This will
minimize tine wear and prevent unnecessary motor overload.
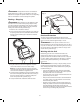
The dethatcher has 5 principal position settings:
Setting 0 (+9 mm): Transport position
This position sets the maximum safety spacing between
the tool and the oor.
Setting 1 (+6 mm): Working position
Set this position when working with a new implement.
Settings 2 – 4 (+3 mm, 0 mm, -3 mm, respectively):
Readjustment positions
The working position can be lowered with increased spring tine
wear. The readjusting depth amounts to approximately 3 mm
per setting. Use the millimeter scale readings for ne setting.
NOTE: When the unit is delivered it is in the transport position
(setting 0).
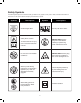
mCAUTION! The unit must be switched o and
disconnected from the power supply before adjusting the
tine settings.
Press the adjustment knob down and turn it to the required
position until it locks in place (the knob will immediately rise
after it is locked into a setting) (Fig. 5).
Installing the Optional Thatch
Collection Bag (Sold Separately)
The collection bag is delivered in a folded state and
must therefore be assembled before it is mounted on
the unit.
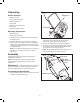
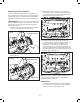
1. Fit the support rod into the collection bag (Fig. 3).
2. Clip the protective plastic straps onto the support
rod (Fig. 3).
Mounting the Thatch
Collection Bag
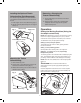
1. Lift the thatch bag cover.
2. Push the pins on the collection bag rods into the
sockets found inside the housing (Fig. 4).
3. Release the thatch bag cover so that it holds the
collection bag in position.
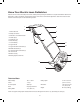
Fig. 3
Support rod
Protective plastic straps
Collection bag
Fig. 4
Pin
Thatch collection bag
Thatch
bag cover
Removing + Emptying the
Thatch Collection Bag
1. Lift the thatch bag cover and take out the thatch
collection bag.
2. Empty the bag's contents into a suitable waste
receptacle. Mount the bag back into position
before resuming work.
3
2
1
0
4
Fig. 5