
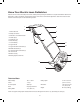
Replacement Part List

6
Unpacking
Carton Contents
• Dethatcher housing
• Upper handle bar assembly
• Middle handle bar (2)
• Lower handle
• Extension cord restraint holder
• Cable clip (2)
• Manual with registration card
Mounting Accessories
• Phillips screws (2)
• Handle knobs and bolts (4)
1. Carefully remove the dethatcher and all other items from
the shipping carton.
2. Check that all the items in the above list are supplied.
3. Inspect the product carefully to make sure no breakage or
damage occurred during shipping. If you nd damaged or
missing parts, DO NOT return the unit to the store. Please
call 1-866-766-9563.
NOTE: Do not discard the shipping carton and packaging
material until you are ready to use your new electric
dethatcher.
Assembly
Carefully follow the instructions below to assemble your
AJ799E electric dethatcher.
NOTE: The packaging is made of recyclable materials.
Properly dispose of these materials in accordance with
regulations.
mWARNING! Do not connect the dethatcher to the power
supply until assembly is complete. Failure to comply could
result in accidental starting and severe personal injury.
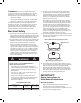
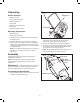
Connecting the Handle Bars
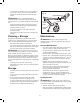
1. Insert the lower handle into the motor housing and secure
it with the two Phillips screws (Fig. 1).
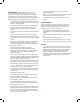
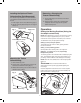
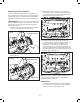
2. Secure the two middle handle bars to the lower handle
using the rst set of knobs and bolts (A). Tighten the
knobs on each side to ensure a secure t (Fig. 2).
3. Hang the cable relief holder on the upper handle (Fig. 2).
4. Connect the upper handle to the middle handle bars using
the second set of knobs and bolts (B). Tighten the knobs
on each side to ensure a secure t (Fig. 2).
NOTE: The two middle handle bars can be secured in two
positions depending on your height preference.
Fig. 1
Phillips screw
Lower handle
Fig. 2
Upper handle
Height
adjustment
holes
Middle handle bar
Cable relief
holder
Lower
handle
B
A