
User Manual


9
IMPORTANT! Never allow the battery pack to become fully
discharged as this will cause irreversible damage to the
battery.
6. When charging is complete, remove the battery from the
charger by pulling the push lock button and sliding the
battery backward to unlock it from the charger.
Assembly
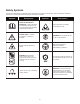
m
WARNING! To avoid serious personal injury, read and
understand all safety instructions provided.
mWARNING! Do not insert battery until assembly is
complete. Failure to comply could result in accidental starting
and possible serious personal injury.
mWARNING! Before performing any maintenance,
make sure battery is removed. Failure to heed this warning
could result in serious personal injury.
mWARNING! To prevent serious personal injury,
make sure the switch is in the OFF (0) position, the battery is
removed and the impeller has come to a complete stop before
attaching or detaching the tubes.
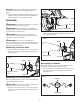
Assembling for Blower Mode
1. Align the notches on the blower + vacuum tube with the
slots on the air outlet and slide together. Rotate to lock
into place (Fig. 4).
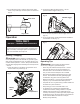
Assembling for Vacuum Mode
Make sure both the blower + vacuum tube and collection bag
are assembled for Vacuum mode.
mCAUTION! Only use vacuum mode in workshops and
garages to clean up sawdust, dirt, and dust.
1. Align the notches on the blower + vacuum tube with the
slots on the air inlet and slide together. Rotate to lock into
place (Fig. 5).
2. Align the notches on the collection bag with the slots on
the air outlet and slide together. Rotate counter clockwise
to lock into place (Fig. 6).
Assembling the Nozzles
Attach either of the three nozzles to the air outlet only to blow
ne debris from hard-to-reach nooks and crannies.
1. Align the notches on the inside of the large nozzle with the
slots on the air outlet and slide together. Rotate to lock
into place (Fig. 7).
Fig. 4
Blower + vacuum
tube
Air outlet
Notch
Slot
Fig. 5
Blower + vacuum tube
Air inlet
Notch
Slot
Fig. 6
Collection bag
Air outlet
Notch
Slot
Fig. 7
Large nozzle
Notches