
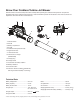
Replacement Part List


8
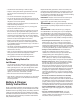
Charging the Battery
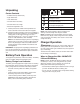
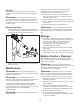
1. Push the push lock button on the battery to pull the
battery pack out of the equipment (Fig. 1).
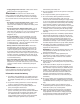
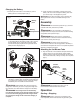
2. Check that the mains voltage is the same as that marked
on the rating plate of the battery charger. Then, plug the
charger adapter into an appropriate AC power outlet.
Connect the charger plug into the charge socket of the
battery to start charging (Fig. 2).
3. The battery will take approximately 5 hours to charge.
The battery indicator LEDs will twinkle and illuminate one
by one during the charging process. Unplug the charger
immediately when the 3 LEDs are all illuminated.
mCAUTION! FIRE HAZARD. When disconnecting the
charger from the battery, be sure to unplug the charger from
the outlet rst, then disconnect the charger from the battery.
mWARNING! This charger does not automatically
turn o when the battery is fully charged. Please take care
not to leave the battery plugged into the charger. Switch
o or unplug the charger at the mains when charging is
complete.
4. Timely recharging of the battery will help prolong the
battery's life. You must recharge the battery pack when
you notice a drop in the equipment's power.
IMPORTANT! Never allow the battery pack to become fully
discharged as this will cause irreversible damage to the
battery.
Assembly
m
WARNING! To avoid serious personal injury, read and
understand all safety instructions provided.
mWARNING! Do not insert battery until assembly is
complete. Failure to comply could result in accidental starting
and possible serious personal injury.
mWARNING! Before performing any maintenance,
make sure battery is removed. Failure to heed this warning
could result in serious personal injury.
mWARNING! To prevent serious personal injury,
make sure the switch is in the OFF (0) position, the battery is
removed and the impeller has come to a complete stop before
attaching or detaching the tubes.
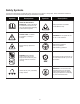
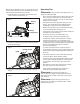
Attaching the Jet Blower Tube
1. Align the notches on the cordless turbine jet blower body
with the notches on the upper blower tube and slide
together until they click into place. Repeat with the upper
tube and the lower tube, making sure they click into place
(Fig. 3).
mWARNING! To avoid the risk of injury, it is not
recommended to disassemble the blower tube.
Operation
Starting + Stopping
mCAUTION! Starting, stopping, and restarting a DC
motor repeatedly within a few seconds can generate a great
Fig. 1
Battery
pack
Battery
Compartment
Push
lock
button
Fig. 2
Battery
indicators
Fig. 3
Lower
blower
tube
Cordless
turbine jet
blower body
Upper
blower
tube
Notches