
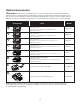
Replacement Part List


12
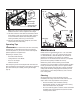
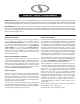
3. When reaching the proper grinding depth, lock the
grinding depth locking knob by rotate it clockwise
(Fig. 11).
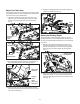
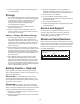
Basic Sharpening Procedure
1. Put on your protective gear and make sure the immediate
area is clear of bystanders.
2. Insert the battery into the battery compartment on the
back of the machine, until it clicks into position. Press the
On/O switch on the ON (I) side to turn on the machine
(Fig. 14).
3. Hold the upper handle and slowly lower the motor head
assembly (Fig. 15). If the setting is still o, turn o the unit
and remove the battery before making adjustments.
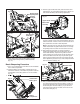
4. It's normal that during the operation there will be a slight
amount of sparks. Lift the motor head assembly often and
examine the tooth. If there's a full curve of the tooth with a
shiny metal nish, the tooth is well sharpened.
Note: A good grind occurs when the contact between the
wheel and the teeth are gradual and smooth. Do not keep
the grinding wheel in contact with one tooth for too long.
5. After sharpening one tooth, turn o the machine by
pressing the OFF(O) side of the On/O switch. Lift up the
motor head assembly. Flip the chain guide lock to the
unlock position and move the chain so that the next chain
tooth comes before the chain stop. Flip the chain guide
lock to the lock position and continue to sharpen the next
tooth. Repeat this process until you have sharpened all the
teeth on the same side (Fig. 16).
6. After you nished sharpening all of the teeth on one side,
turn o the machine and remove the battery. Loosen the
swivel angle adjusting knob and reset the swivel angle to
the same angle on the other side (e.g. if you use 20° on
right as the swivel angle for one side, set it to 20° on left
for the other side) (Fig. 17).
Fig. 12
Grinding depth
adjusting knob
Decrease the depth
Increase
the depth
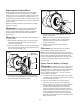
Fig. 13
Only touch the
inside edge
Do not touch
the bottom
Fig. 14
Battery pack
Battery
compartment
On/O switch
Fig. 15
Upper handle
Motor head
assembly
Fig. 16
Chain guide lock
Move the chain
Chain stop