
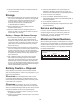
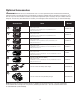
Replacement Part List


11
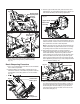
Adjust the Chain Stop
If the grinding wheel is not touching the chain tooth that needs
to be sharpened when the motor head assembly is folded down,
move the chain stop as indicated below.
1. Loosen the chain stop locking knob so the chain stop
adjusting knob can be screwed by hand (Fig. 7). Rotate
the chain stop adjusting knob to move the chain stop
(Fig. 8).
2. During adjusting, fold down the motor head assembly to
see if the grinding wheel touches the tooth (Fig. 9).
3. When the chain stop is in the correct position, lock the
chain stop locking knob and make sure the chain stop will
not move anymore (Fig. 7).
4. Flip the chain guide lock to the lock position. Make sure
the chain is hold securely (Fig. 10).
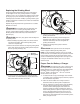
Adjust the Grinding Depth
The grinding depth must be adjusted properly so that the
grinding wheel will not cut too deep between the teeth, which
will cause the metal between the teeth being cut and damage
to the chain.
1. Fold down the motor head assembly and check if the
grinding wheel properly touches the inside curve of the
tooth to be sharpened. If not, loosen the grinding depth
locking knob on the back to adjust the grinding depth
(Fig. 11).
2. Adjust the grinding depth by turning the grinding depth
adjusting knob (Fig. 12). The grinding wheel should just
touch the inside edge of the tooth, not the bottom of the
tooth (Fig. 13).
Fig. 7
Chain stop
locking
knob
Unlock
Lock
Fig. 8
Chain stop
adjusting knob
Forward
Backward
Fig. 9
Motor head
assembly
Grinding
wheel
Chain
tooth to be
sharpened
Touching
Fig. 10
Unlock
Chain guide lock
Lock
Fig. 11
Unlock
Grinding depth
locking knob
Lock