WARMING CABINET for Blankets and Towels ARMOIRE CHAUFFANTE pour couvertures et serviettes Models / Modèles PHC51G PHC61G PHC115G PHC101G INSTRUCTION MANUAL MODE D’EMPLOI Write Model & Serial Numbers here: Écrivez les numéros de modèle et de série ici: FELIX STORCH, INC. _____________________________ 770 Garrison Avenue _____________________________ An ISO 9001:2008 registered company Bronx, New York 10474 www.summitappliance.
Table of Contents Important Safeguards ................................ 2 – 3 Location of Parts .............................................. 3 Installation .................................................... 4 - 5 Before Using the Warming Cabinet .............. 4 Installing Your Appliance ......................... 4 - 5 Operation ...................................................... 6 - 7 Loading the Warming Cabinet ...................... 6 Turning On the Warming Cabinet ................
IMPORTANT SAFEGUARDS Your safety and the safety of others are very important to us. We have provided several important safety messages in this manual. Read all safety messages and always obey them when operating this appliance. Serious injury or even death can result if you do not follow these instructions. WARNING! To reduce the risk of fire, electric shock or injury when using this appliance, follow these basic precautions: Use two or more people to move and install this appliance.
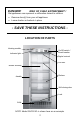
DANGER! RISK OF CHILD ENTRAPMENT ! Old appliances can represent a suffocation hazard to children. Remove door(s) from your old appliance. Leave shelves or baskets in place. - SAVE THESE INSTRUCTIONS LOCATION OF PARTS Heating module On/Off switch / circuit breaker Indicator light Digital controls Lint filter Blower channel Shelves Handle Self-closing door Lock Grille NOTE: Model PHC115G is shown here as an example.
INSTALLATION Before Using the Warming Cabinet Remove the exterior and interior packing. Check to be sure shelves are installed and that the strips of tape holding them in place have been removed. Level the appliance with the adjustable legs provided. The circuit breaker on the control panel should be in the OFF position. Clean the interior surfaces with lukewarm water using a soft cloth.
The marked electrical rating of the detachable powersupply cord or extension cord should be at least as great as the electrical rating of the appliance; If the appliance is of grounded type, the extension cord should be a grounding type 3-wire cord; and The cord should be arranged so that it will not drape over the countertop or tabletop where it can be tripped over, snagged, or pulled on unintentionally, especially by children.
OPERATION NOTE: This appliance is designed to heat towels and blankets to a temperature no higher than 150°F. The process of heating the contents from an ambient room temperature of 72°F up to 150°F usually takes approximately 30 minutes, depending on the amount of contents. When loading items into the cabinet for heating, be sure there is a minimum of 1 inch of space between the items and the walls and fan to allow for proper circulation of air.
Turning Off the Warming Cabinet To turn off the appliance, switch the circuit breaker on the control panel to OFF. Reducing the Set Point Temperature The operating temperature is factory-set to 150°F, but you can reduce this "Set Point" by following this procedure: 1. Turn on the power by switching the circuit breaker on the control panel to RESET. 2. Press and release the SET button. 3. Press either the UP or DOWN arrow on the control panel to reach the desired temperature (Set Point). 4.
CLEANING AND MAINTENANCE Cleaning Unplug the appliance and remove all contents. Wash the interior liner with a solution of lukewarm water and mild soap, rubbing with the grain. Wipe off all soap residue when finished. Do not use detergents, scouring powder, spray cleaners or the like on the liner, as these may cause odors in the cabinet. Wash shelves in a mild detergent solution and dry with a soft cloth. Wipe the exterior surface with a soft cloth dampened with soapy water and then dry with a soft cloth.
Preventive Maintenance Twice a year, place a thermometer near the fan inlet of the cabinet in order to check the accuracy of the temperature setting. The actual temperature should be within plus or minus 3 Fahrenheit degrees of the set temperature. TROUBLESHOOTING You can easily solve many common problems with your appliance, saving you the cost of a possible service call. Try the suggestions below to see if you can solve the problem before calling a service technician.
WIRING DIAGRAM Revised June16, 2014 10
LIMITED WARRANTY ONE YEAR LIMITED WARRANTY Within the 48 contiguous United States, for one year from the date of purchase, when this appliance is operated and maintained according to instructions attached to or furnished with the product, warrantor will pay for factory-specified parts and repair labor to correct defects in materials or workmanship. Service must be provided by a designated service company. Outside the 48 states, all parts are warranted for one year from manufacturing defects.
Table des matières Mesures de sécurité importantes .......... 13 – 14 Emplacement de pièces ................................. 14 Installation ................................................ 15 - 16 Avant d'utiliser l'armoire chauffante............. 15 Installation de votre appareil ................ 15 - 16 Fonctionnement ....................................... 17 - 18 Chargement de l’armoire chauffante .......... 17 Mise sous tension de l’armoire chauffante..................... 17 - 18 Mise hors tension ..
Mesures de sécurité importantes Votre sécurité et celle des autres est très importante pour nous. Nous avons fourni plusieurs messages de sécurité importants dans ce manuel. Lisez tous les messages de sécurité et respectez-les toujours lorsque vous utilisez cet appareil. Des blessures graves ou même la mort peuvent survenir si vous ne suivez pas ces instructions.
• Soyez conscient du fait que la température du contenu de l'armoire chauffante peut être supérieure à la température affichée. Toujours vérifier la température de couvertures chauffantes et les serviettes avant d'utiliser. DANGER! RISQUE D'ENFANT PRIS AU PIÈGE! Les anciens appareils peuvent représenter un danger d'étouffement pour les enfants. Enlevez la porte de votre ancien appareil. Laissez les étagères ou des paniers en place.
Installation Avant d'utiliser l'armoire chauffante Retirez le emballage extérieur et intérieur. Assurez-vous que les étagères sont installées et que les bandes de papier collant qui les maintiennent en place ont été enlevées. Nivelez l'appareil avec les pieds réglables fournis. Le disjoncteur sur le panneau de commande doit être en position OFF. Nettoyez les surfaces intérieures avec de l'eau tiède à l'aide d'un chiffon doux.
Si l'appareil est de type mis à la terre, la rallonge devrait aussi être d’un type mis à la terre à 3 fils; et Le cordon soit placé de sorte qu'il ne pende pas du comptoir ou de la table où l'on peut trébucher, ou il peut accrocher ou peut être accidentellement tiré (surtout par les enfants).
Fonctionnement REMARQUE: Cet appareil est conçu pour chauffer serviettes et couvertures à une température ne dépassant pas 150°F. Le processus de chauffage du contenu à partir d'une température ambiante de 72°F jusqu’à 150°F prend habituellement 30 minutes, en fonction de la quantité de contenu. Lorsque vous chargez les articles dans l'armoire pour le chauffage, assurez-vous qu'il ya un minimum de 1 pouce d'espace entre les objets et les murs et le ventilateur pour permettre une bonne circulation de l'air.
Lorsqu'il fonctionne correctement, l'armoire chauffante maintiendra les températures à portée de deux à quatre degrés de son point de consigne. Mise hors tension de l'armoire chauffante Pour éteindre l'appareil, mettez le disjoncteur sur le panneau de commande sur OFF. Réduire la température du point de consigne La température de fonctionnement est réglé en usine à 150°F, mais vous pouvez réduire ce «Set Point» (point de consigne) en suivant cette procédure: 1.
Nettoyage et entretien Nettoyage Débranchez l'appareil et retirez tous les contenus. Lavez le revêtement intérieur avec une solution d'eau tiède et de savon doux, en frottant avec le grain. Essuyez tous les résidus de savon lorsque vous avez terminé. Ne pas utiliser de détergents, de poudre à récurer, nettoyants en aérosol ou similaire sur le revêtement, que ceux-ci peuvent causer des odeurs dans l'armoire. Lavez les étagères dans une solution de détergent doux et séchez avec un chiffon doux.
Entretien préventif Deux fois par an, placez un thermomètre à proximité de l'entrée du ventilateur de l'armoire afin de vérifier l'exactitude du réglage de température. La température réelle doit être de plus ou moins 3 degrés Fahrenheit de la température de consigne.
Dépannage Vous pouvez facilement résoudre nombreux problèmes communs avec votre appareil, vous épargnant le coût d'un appel de service possible. Essayez les suggestions ci-dessous pour voir si vous pouvez résoudre le problème avant d'appeler un technicien de service. Guide de dépannage Problème L'appareil ne chauffent pas. Appareil est allumé, mais n'atteint pas la température de consigne. La porte ne se ferme pas correctement. Cause possible Pas branché; l'alimentation est coupée.
Schéma de câblage (W) White/Blanc (14AWG) (B) Black/Noir (14AWG) (G) Green/Vert (14AWG) Câble électrique de 6 pieds de longueur 14AWG Fusible Ventilateur tangentiel Mise à terre Interrupteur fin de course de sécurité Bobine de chauffage Interrupteur fin de course de sécurité Bornier Barre à mine Voyant Capteur de température En marche/ hors tension Révisé 16 juin 2014 22
Garantie limitée UN AN DE GARANTIE LIMITÉE Dans les 48 États américains contigus, pendant un an à partir de la date d'achat, lorsque cet appareil est utilisé et entretenu conformément aux instructions jointes à, ou fournies avec le produit. Le garant paiera pour les pièces spécifiées en usine et pour la main-d’œuvre pour corriger les vices de matériaux ou de fabrication. Le service doit être fourni par une compagnie de service désignée.