FELIX STORCH, INC. 770 Garrison Avenue Bronx, New York 10474 www.summitappliance.com TWO-DOOR FROST-FREE REFRIGERATOR / FREEZER Models FF874 FF1074 FF1274 User's Manual Thank you for purchasing our SUMMIT product. This easy-to-use manual will guide you in getting the best use of your refrigerator. Please record the model and serial numbers, which are found on a label at the back of your appliance.
IMPORTANT SAFEGUARDS This unit is not designed to operate in enclosed spaces. When placing your unit, make sure you allow adequate airflow on all sides. Read all of the instructions before using this appliance. When using this appliance, always exercise basic safety precautions, including the following: 1. Use this appliance only for its intended purpose, as described in this User's Manual. 2. This refrigerator must be properly installed in accordance with the Installation instructions before it is used.
10. This refrigerator should not be recessed or built into an enclosed cabinet. It is designed for freestanding installation only. 11. Do not operate your refrigerator in the presence of explosive fumes. DANGER! Risk of child entrapment! Before you throw away your old refrigerator or freezer, take off the doors. Leave the shelves in place so that children may not easily climb inside. SAVE THESE INSTRUCTIONS for future use.
Table of Contents Important Safeguards ....................................................................................1 Parts and Features .........................................................................................4 Installation ......................................................................................................5 Unpacking Your Refrigerator .................................................................5 Adjusting Your Refrigerator .....................................
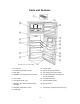
Parts and Features 1. Ice cube tray 10. Freezer shelf 2. Full-width freezer door shelves 11. Gallon storage compartment 3. Door shelf 12. Can storage (not on all models) 4. Adjustable front leveling legs (not shown) 13. ½-width shelf storage compartment (not on all models) 5. Clear crisper 14. Full-width door shelf 6. Clear glass crisper cover 15. Crisper humidity control 7. Adjustable wire shelves (number varies by model) 16. Air flow control 8. Adjustable temperature control 17.
Installation Unpacking Your Refrigerator 1. Remove all packaging material. This includes the foam base and all adhesive tape holding the refrigerator accessories inside and out. Slide out and remove plastic or foam guard used to secure the compressor from shipping damage due to vibration and shock. 2. Inspect and remove any remains of packing, tape or printed materials before powering on the refrigerator.
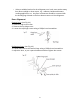
Select a suitable location for the refrigerator on a hard, even surface away from direct sunlight or heat source, e.g., radiators, baseboard heaters, cooking appliances, etc. Any floor unevenness should be corrected with the leveling legs located on the front bottom corners of the refrigerator. Door Alignment Freezer Door: (see Fig. #1) 1. Remove hinge cover screw. 2. Remove the top hinge cover. 3. Loosen the top hinge screws using a Phillips head screwdriver. Refrigerator Door: (see Fig. #2) 1.
Reversing the Door Swing Left/right door opening method: This appliance allows you to reverse the door opening from left to right and back. You can select your preference of door opening by following the procedure to make the change. Dismantling: 1. Affix refrigerator and freezer doors by sticking adhesive tape on left and right sides to hold doors in place. 2. As shown in Fig. #1, dismantle the hinge box cover on the upper part of the freezer door with a Phillips head screwdriver.
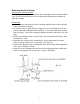
Reinstallation: (See Figs. #4 and #5) 1. Remove the lower pivot pin from the bracket of the lower hinge by turning counter-clockwise. Move the pin to the opposite hole and tighten. 2. Loosen the screws holding the lower hinge bracket and remove the hinge. 3. Align the holes in the lower hinge bracket to the corresponding holes in the opposite side of the cabinet. Insert and tighten the screws. 4.
Refrigerator Features and Use General Features Adjustable temperature dial: Your refrigerator will automatically maintain the temperature level you select. The temperature control dial has seven (7) settings plus OFF. 1 is the warmest. 7 is the coldest. Turning the dial to OFF stops cooling in both the refrigeration and freezer sections. At first, set the dial to 4 and allow 24 hours to pass before adjusting the temperature to your needs.
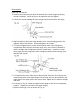
Crisper and Crisper Cover To remove and install the crisper: (See Fig. #7) 1. Grip the crisper firmly and slide out completely. 2. Replace the crisper by placing it properly in position and gently sliding it back into place. Removing or replacing the crisper cover: (See Fig. #8) 1. Carefully grasp the crisper cover and slide out to remove. 2. To replace, slide the rear of the crisper cover into the right and left slots above the crisper area and gently slide back into place.
Food Storage Information Fresh Food When storing fresh food that is not prepackaged, be sure to wrap or store it in airtight and moisture-proof material unless otherwise noted. This will ensure proper shelf life and prevent the transfer of odors and tastes. Wipe containers before storing to avoid needless messes. Eggs should be stored in an upright position in their original carton to maximize shelf life.
Frozen Food Proper freezer storage requires correct packaging. All foods must be in packages that do not allow the flow of air or moisture in or out. Improper storage will result in odor and taste transfer and will result in the drying out of the improperly packaged food. Follow package or container instructions for proper storage. Packaging recommendations: Plastic containers with air-tight lids Heavy-duty aluminum foil Plastic wrap made from saran film Self-sealing plastic bags.
Proper Refrigerator Care and Cleaning Cleaning and Maintenance Warning: To avoid electric shock, always unplug your refrigerator before cleaning. Ignoring this warning may result in death or injury. Caution: Before using cleaning products, always read and follow manufacturer's instructions and warnings to avoid personal injury or product damage. General: Prepare a cleaning solution of 3-4 tablespoons of baking soda mixed with warm water.
Light Bulb Replacement 1. 2. 3. 4. 5. 6. 7. 8. Switch off power to refrigerator. Remove the highest shelf. Allow light bulb to cool before removing. Pinch the plastic cover between fingers and thumb and gently pull to the left. Remove the bulb by screwing it counter-clockwise. Always replace with an appliance-type light bulb rated at 15 watts or less. Do not exceed the 15-watt rating at any time. To replace cover, insert rear clips first and gently push front clip in until the cover snaps into place.
Troubleshooting Refrigerator does not operate Check that thermostat control is not in the OFF position. Check that refrigerator is plugged in. Check if there is power at the AC outlet by inspecting the fuse or circuit breaker. Food temperature appears too warm There may have been frequent door openings. Allow time for recently added warm food to reach fresh food or freezer temperature. Check gaskets for proper seal. Adjust temperature control to colder setting.
Limited Warranty PARTS AND LABOR WARRANTY INFORMATION SUMMIT Appliances are manufactured to provide outstanding value, and your satisfaction is our goal on every product. All SUMMIT major appliances carry a one year limited warranty on both parts and labor. All refrigerators and freezers carry an additional four years on the compressor. Certain exclusions may apply. Certain models (including SUMMIT ranges, wall ovens, and cook tops) are manufactured for us in the U.S.
IMPROPER USE: Summit assumes no liability for parts or labor coverage for component failure or other damages resulting from improper usage or installation or failure to clean and/or maintain product as set forth in the warranty packet provided with the unit.