
User Manual


2.3 Configure the Manner of Obtaining an IP Address
Here are the steps required to use facilities on Windows CE or Windows Mobile to configure the manner of
obtaining an IP address:
Select Programs, then Settings, then the Connections tab at the bottom of the Settings screen
Select Connections and then Advanced
On the Advanced Connections screen, select the Network Card button and then select the Summit WLAN
Adapter from the list of available network devices
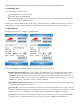
On the screen that appears, choose that a server will assign an IP address (using DHCP) or enter a specific
IP address
If you select the Name Servers tab, you can statically configure DNS servers, but if you use DHCP for IP
address assignment then DNS usually is supplied by the same server that hands out IP addresses
2.4 Connect to Your WLAN
Two methods exist for configuring the radio for operation on a wireless network. The first and preferred method
is to use SCU, which is described in detail in the next section of this guide. The other method is to use WZC,
which is the Microsoft program for configuring any WLAN card.
2.4.1 Preferred Method: Use SCU
To use SCU to connect to your wireless network, first initialize SCU (see Section 3.1) and go to the Profile
window by tapping the Profile tab. The Default configuration profile, if not modified, does not specify an SSID,
an EAP type, or a method of data encryption. As a result, if the Default profile is the active profile, then the radio
will associate only to an AP that broadcasts its SSID and requires no EAP type and no encryption. If no profile
has been created for the WLAN to which you want to connect, then use the following steps to create and select a
profile for your WLAN:
Go to the Main window by tapping the Main tab.
Tap the Admin Login button to have privileges to make changes to profiles. The default password is
“SUMMIT”. If you administrator has changed that password, then you must ask your administrator for
assistance in creating a profile for your WLAN.
Go to the Profile window by tapping the Profile tab.
Tap the New button. When a pop-up screen prompts for a name, enter any alpha-numeric name to identify
this profile (as unique from other profiles that are defined).
Tap the OK button to return to the Profile tab.
Tap the Commit button to save the profile name.
When a message pops up to indicate that this command has been saved, select OK on that pop-up to return
to the Profile window.
To configure the SSID for the network to which you wish to associate, enter an SSID in the text box to the
right of “SSID”, and select the Commit button and OK at the pop-up.
To configure authentication and encryption, use the appropriate drop-down boxes on the window, and enter
credentials for IEEE 802.1X EAP types or WEP keys just below the drop-down boxes. (To view the
security drop-down boxes, you may have to minimize the alpha-numeric keyboard provided by the
operating system.)
Configure any other settings that are dictated by the network administrator for the SSID to which you must
associate, being sure to tap Commit after you configure all settings.
Tap the Main tab. In the Active Profile drop-down box will appear the newly created profile. Select this
profile, and the Summit radio will attempt to connect to the network using the following steps:
Associate to the SSID
Authenticate to the network
If EAP authentication is being used, derive dynamic encryption keys
If DHCP is being used by the network, obtain an IP address