
Installation Guide

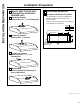


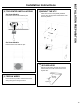


Table Of Contents
- READ AND SAVE THESE INSTRUCTIONS
- IMPORTANT SAFETY INFORMATION
- IMPORTANT SAFETY INFORMATION
- READ AND SAVE THESE INSTRUCTIONS
- Controls
- Filter
- Surfaces
- Stainless Steel Surfaces (on some models)
- Painted Surfaces (on some models)
- Do not use steel wool pads or other abrasive cleaners; they will scratch the surface.
- When cleaning the hood surfaces, be certain that you do not touch the light with moist hands or cloth. A warm or hot light may break if touched with a moist surface. Always let the light cool completely before cleaning around it.
- Lights
- Installation Preparation
- Installation Preparation
- Installation Preparation
- Installation Preparation
- Installation Preparation
- Installation Preparation
- Installation Preparation
- Installation Instructions
- Installation Instructions
- DISCLAIMER OF IMPLIED WARRANTIES; LIMITATION OF REMEDIES

12
2
PREPARING MOUNTING
A
To install to the bottom of cabinet
Use the diagram or hood as a template and
mark the locations on the cabinet for the
keyhole screws.
Drive the 4 (F) screws partway into the bottom
of the cabinet (or wood shims).
Hood mounting screws (4)
Cabinet front
X
10
1
⁄
4
”
2
1
⁄2”
Wood shims
(recessed
-
bottom
cabinets only)
Center
line
Cabinet Bottom
Installation Preparation
1" = 2.5 cm ; 1' = 0.3 m
INSTALLATION PREPARATION
Cabinet
X
24”
10
3
⁄
4
”
30”
13
3
⁄
4
”
36”
16
3
⁄
4
”
1
SELECT VENT OPTION THAT
YOUR INSTALLATION WILL
REQUIRE (A-D)
A
Outside top exhaust
(Vertical duct—3
1
⁄4” x 10” Rectangular)
B
Outside top exhaust
(Vertical duct—7” Round)
C
Outside rear exhaust
(Horizontal duct—3
1
⁄4” x 10”
Rectangular)
D
Recirculating
(Unit is shipped from the factory in
this configuration)