
Installation Guide

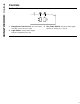
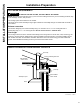
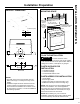
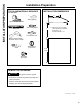
Table Of Contents
- READ AND SAVE THESE INSTRUCTIONS
- IMPORTANT SAFETY INFORMATION
- IMPORTANT SAFETY INFORMATION
- READ AND SAVE THESE INSTRUCTIONS
- Controls
- Filter
- Surfaces
- Stainless Steel Surfaces (on some models)
- Painted Surfaces (on some models)
- Do not use steel wool pads or other abrasive cleaners; they will scratch the surface.
- When cleaning the hood surfaces, be certain that you do not touch the light with moist hands or cloth. A warm or hot light may break if touched with a moist surface. Always let the light cool completely before cleaning around it.
- Lights
- Installation Preparation
- Installation Preparation
- Installation Preparation
- Installation Preparation
- Installation Preparation
- Installation Preparation
- Installation Preparation
- Installation Instructions
- Installation Instructions
- DISCLAIMER OF IMPLIED WARRANTIES; LIMITATION OF REMEDIES

10
Installation Preparation
1" = 2.5 cm; 1' = 0.3 m
INSTALLATION PREPARATION
TOOLS AND MATERIALS REQUIRED
(NOT
INCLUDED)
Safety glasses
Pencil and tape measure
Spirit level
Wire cutter/stripper
UL listed wire nuts
Electric drill, #2 Phillips,
flat head, and
9
⁄32" drill bit
Torx 10, 15, 20
driver
Strain relief for
junction box
Aluminized
Duct tape
INSTALLATION DIMENSIONS
12"
X
X = Distance from hood to cooktop
(varies depending on installation)
Required Min. = 24"
Recommended Max. = 30"
34"-36"
Typical
REMOVE THE PACKAGING
Wear gloves to protect against
sharp edges.
• Remove the hardware bag, literature package and
other boxed parts.
• Remove and properly discard the protective plastic
wrapping and other packaging materials.
CAUTION