
Operating Guide


47
IMPORTANT!READANDFOLLOWALLINSTALLATIONANDMAINTENANCEINSTRUCTIONS,INCLUDINGCLEANINGTHEUNITASSPECIFIED,AND
REPLACINGGASKETSANNUALLY,ANDPARTSASNEEDED.
ENGLAND’SSTOVEWORKSISNOTRESPONSIBLEFORANYDAMAGEORINJURYINCURREDDUETONEGLECT,ORDUETOUNSAFEINSTALLATIONOR
USAGEOFTHISPRODUCT.CALLTECHNICALSUPPORTWITHANYQUESTIONS.
REPLACINGCOMPONENTS
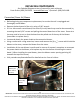
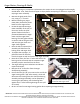
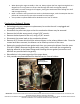
VacuumSwitch
Beforebeginninganycomponentreplacement,becertaintheunitisunpluggedand
thoroughlycooleddown.
Removethebackpaneloftheunit,usinga5/16”wrench.
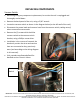
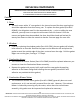
Locatethevacuumswitchasshowninthediagrambelow(ontheleftwalloftheunit).
Disconnectthepowerleads
andvacuumhosefromthevac uumswitch,takingnoteof
whereconnectionsweremade.
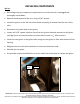
Removethe(2)screwswhichholdthe
vacuumswitchtothevacuumswitch
bracket,usingaPhillipsscrewdriver.
Installationisthereverseofremoval;be
absolutelycertainthewiresandvacuum
hoseareconnectedastheypreviously
were(andaccordingtothewiringdiagram
inthismanual).
Visityoutube.com/heatredefinedfor
detailedservice‘howto’videos.
Vacuum
Switch