
Installation Guide


OWNER′S MANUAL
13
EN
EN
CAUTION:
ALWAYS FOLLOW THE CHEMICAL MANUFACTURER'S DIRECTIONS, AND THE HEALTH AND HAZARD WARNINGS.
POOL MAINTENANCE & DRAINAGE
Do not add chemicals if the pool is occupied. This can cause skin or eye irritation. Concentrated chlorine solutions can damage the pool liner. In no event is
Polygroup
®
, the buyers/retailers, or any other party liable for costs associated with the loss of pool water, chemicals, or water damage. Keep spare filter cartridges on
hand. Replace cartridges every two weeks. We recommend the use of Polygroup
®
Filter Pump with all of our aboveground pools. To purchase a Polygroup
®
Filter
Pump or other accessories, visit our website at support.polygroupstore.com or call Polygroup
®
Consumer Services.
EXCESSIVE RAIN: To avoid damage to the pool and overfilling, drain out the rainwater immediately so the water level stays below the Fill Line.
How to Drain Your Pool and Long-Term Storage
1. Check local regulations for specific directions regarding disposal of swimming pool water.
2. Remove the protective foam ring on the drainage cap.
3. Follow these steps for water drainage:
4. Place the other end of the garden hose in an area where the water can be safely drained away from the house and other nearby structures.
5. When the water stops draining, start lifting the pool from the side opposite to the drain valve to drain any remaining water and empty the pool completely.
6. After drainage, lock the drain valve and close the drain cap.
1
2
a) Turn the drain cap
counterclockwise
a) Flip the drain cap
and reinsert it to
the drain valve
c) Close the drain cap
b) Push and turn the drain
cap counterclockwise
for about a quarter
turn (90
o
) to lock
b) Return the drain
cap from the valve
c) Flip the drain cap
and reinsert it to
the drain valve
e) The drain valve is
now open, water will
begin to flow out.
f) Attach a 5/8” garden
hose to the drain valve
d) Push and turn the
drain cap clockwise
for about a quarter
turn (90
o
) to unlock
1
2
NOTE: NEVER step on the drain valve.
7. Remove all connecting parts. Detach the Easy Link T-Fitting from the Horizontal Beams first before detaching the others. To detach the T-Fitting from
Horizontal Beams, press the push-button under each T-Fitting that locks the two parts together and pull.
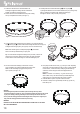
8. Be sure that the pool and all parts are completely dry before storage. Air dry the liner in the sun until it is completely dry before folding (see drawing
1
).
Sprinkle some talcum powder to prevent the vinyl from sticking together and to absorb any residual moisture.
9. Create a square shape. Starting at one side, fold one-sixth of liner into itself twice. Do the same on the opposite side (see drawings
2
&
3
).
10. Once you have created two opposing folded sides, simply fold one over the other like closing a book (see drawings
4
&
5
).
11. Fold the two long ends to the middle (see drawing
6
).
12. Fold one over the other like closing a book, and finally compact the liner (see drawing
7
).
13. Store the liner and accessories in a dry, temperature-controlled storage location above 32°F (0°C) and below 104°F (40°C).
14. The original packaging can be used for storage.
15. Go around and check all fittings, Push-buttons of O-Pins ,
Legs, and Beams are properly installed and secured in place.
Make sure the drain fitting is plugged securely and the
cap is in place (see Figure 10).
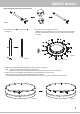
8. Insert the Vertical Legs 3 into the Leg Caps 6
(see Figure 3).
9a. Lay the pool liner on the ground (see Figure 4).
Note: Ensure the pool is between 10 to 21 feet away from any electrical outlets.
b. Place the connected parts around the pool liner, one set by one set near each
top sleeve.
10a. Slide a set of Horizontal Beam with T-Fitting into one sleeve of the liner (see Figure 5).
Note: 1. Leave the set with Easy Link T-Fitting to be installed LAST.
2. Make sure the vertical part of the T-Fitting faces down and away from the liner to avoid puncturing the liner.
b. Slide the next set of HorizontalBeam with T-Fitting into the sleeve beside the first set (see Figure 6).
Then, link the open end of the horizontal beam with the T-Fitting of the first set.
Press the push-button while sliding the parts together. Release the push-button for the parts to snap into place and lock tight.
Setup Instructions
1. Locate a level and flat area to set up the pool. Make sure the ground is free from sharp objects as they may puncture the pool.
2. Carefully unfold the pool liner in the area selected and inspect the seams for manufacturing defects.
3. It is recommended to let the pool sit out in direct sunlight for about 2 hours prior to installation (see TIP above).
4. LIFT the pool liner across the ground. DO NOT drag the liner from one location to another location.
5. Locate the pool so that the pump opening is 10 to 21 feet away from the electrical outlet.
6. Remove all parts from the packaging.
7. Connect each Horizontal Beam
2
with a T-Fitting
4
to form as a set (see Figure 1).
a) Press and hold the push-button below the T-Fitting, then connect it to one end of the Horizontal Beam.
b) Push the Horizontal Beam and T-Fitting together and release the push-button. It should snap into place and lock the T-Fitting and Horizontal Beam together.
If they are securely attached, you could feel the end of the O-Pin from the base of the Horizontal Beam.
c) Repeat Steps a) & b) for the other T-Fitting sets and one Easy Link T-Fitting
5
set (see Figure 2).
2
4
1
3
6
* Image for reference only
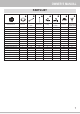
IMPORTANT: BEFORE ADDING WATER TO YOUR POOL YOU MUST INSTALL THE POOL WALL
FITTINGS OR ENTIRE FILTRATION SYSTEM FIRST. BEFORE ADDING WATER TO YOUR POOL
FOLLOW THE INSTRUCTIONS BELOW.
If your pool included openings or you are going to purchase a filter pump system, position the Suction & Return fitting locations so they are 10 to 21 feet
from the electrical outlet you plan to use for the pool pump.
If your pool came with Fittings - Install both the Suction and Return fittings to the pool wall before filling the pool.
1 2 3
4
5 6 7
ENEN
Please Note: The Black Rubber gasket (Gasket) should always be slid over
the threaded plastic suction or return fitting and be on the inside before the
fitting is placed through the pool wall to make a watertight connection.
Make sure to put on both the Water Cap and the Service Plug while you fill
your pool, or until you are ready to add a filtration system.
SUCTION FITTING RETURN FITTING
NOTE: For Sand Filter Pump / Cartridge Filter Pump
CP2000-C, please follow the Sand Filter Pump /
Cartridge Filter Pump CP2000-C owner’s manual to set up
the fitting. Please check the water pump’s instruction manual
for more instructions.
SFX SKIMMERPLUS FILTER PUMP
Pool
exterior
Pool
exterior
Pool interior
Pool interior
GasketService Plug
Return Fitting Suction Fitting
Washer
RF Nut
90° Elbow
Locking Ring
Return Fitting
Diverter
Horizontal Beam with T-Fitting Set
Horizontal Beam with Easy Link T-Fitting Set
11. Continue to slide the sets of Horizontal Beams and
T-Fittings through the remaining sleeves and link them
together to create the top frame structure.
12. Connect the set of Horizontal Beam and Easy Link T-Fitting
until you completed the full circle (see Figure 7).
13. Carefully slide the connected Vertical Legs 3 with Leg Caps 6
up through the belts that runs around the middle of the pool (see Figure 8a).
Tip: For smaller pools without a belt, slide the vertical legs up
through the sleeves on the pool wall (see Figure 8b).
CAUTION:
• Not following the steps above will make the pool fill unevenly and it may lean to
one side and collapse (see figure 11). Your pool should be straight and vertical to the ground.
If your pool is leaning at all, the ground may not be level and you will need to start over.
• Do not press the T-Fitting push button when filling the water in the pool or using the pool.
Only press the T-Fitting push button when the pool is empty.
WARNING!
FAILURE TO FOLLOW THE INSTRUCTIONS ABOVE WILL CAUSE POOL TO COLLAPSE
WILL VOID THE WARRANTY.
14. Look through the hole at the bottom of the T-fitting, as you insert the Vertical
Leg 3 with Leg Cap 6, rotate it until the buttons align with the holes and pop out,
locking the Vertical Leg in place (see Figure 9). Do this for all Vertical Legs.
Note: Each Vertical leg has a V-Shaped Spring Pin 7 pre-installed.
There is an extra pin included with your pool parts.
Tip: To avoid distortion during the assembly of the pool frame, connect one
Vertical Leg to every three T-Fitting so the frame can stand comfortably.
Connect the rest of the Vertical Legs to to finish assembling the pool.
Push-
Button
Pre-installed
O-pin
2
4
2
5
3
6
10’ - 21’
305 - 640 cm
3
3
16. Fill up the pool with about an inch (1”) [2.54 cm] of water. Stop filling
and smooth out all the wrinkles from the pool floor, working outwards
from the center, so that it fills evenly. Gently tug the Vertical Legs
outwards to ensure all legs are vertical and perpendicular to
the ground.
Note: If more than 1 to 2 inches (1”-2”) [2.54 cm-5.08 cm] of
water collects on any one side before the pool starts filling in the
center, the pool is not level enough, and must be corrected.
17. Install the filtration system as per its instruction manual.
18. Continue to fill the pool to approximately 8 inches (8”) [20.32 cm]
below the top rim.
Figure 1
Figure 2
Figure 3
Figure 4
Figure 5 Figure 6
Figure 7 Figure 8a Figure 8b
Figure 9
Figure 10
Figure 11
Pool exterior
Pool interior
SUCTION FITTING
Thrust Washer
Split Suction Fitting Lock Nut Solo Suction Fitting Lock Nut
Lock Nut Seal Ring
GasketSuction FittingWater Cap
RETURN FITTING
Pool interior
Pool exterior
RX CARTRIDGE FILTER PUMP
Return FittingService Plug Gasket Fitting Lock
Nut
Pool
interior
Pool exterior
For USA only
or
Solo Suction Fitting Lock Nut
Lock Nut Seal Ring
Thrust WasherGasketSuction FittingWater Cap