Original Instructions Instrukcjeoryginalne Справка X 18-50 PLEASE READ CAREFULLY BEFORE USING THE CONSOLE Внимательно прочтите перед использованием консоли Przeczytać uważnie przed użyciem konsoli Réf: 400643- 01 - GB-PL-RU /DIS Les Portes de Bretagne P.A. de la Gaultière – 35220 CHATEAUBOURG France Tél :(33)02-99-00-84-84 · Fax : (33)02-99-62-39-38 Site Internet : www.sulky-burel.com E-Mail : info@sulky-burel.
Ogólne przepisy bezpieczeństwa pracy Niebezpieczeństwo. Zagrożenie wyciekiem hydraulicznym pod wysokim ciśnieniem, zdolnym do przenikania do wnętrza ciała ludzkiego. Przeczytać instrukcję obsługi przed zastosowaniem układu hydraulicznego. Ryzyko zniszczenia maszyny patrz instrukcja Zagrożenie części w ruchu, nie zbliżać się Uwaga nie przekraczać ładowności PL Niebezpieczeństwo. Przy używaniu wyrobów chemicznych, stosować odpowiednią odzież ochronną. Niebezpieczeństwo.
Safety regulations Danger. Risk of escaping high-pressure hydraulic fluid which can penetrate in the body. Read the user manual before maintenance of the hydraulic system. Risk of damage to the machine Consult the instruction leaflet. Danger Moving parts, keep away. Caution Payload should not be exceeded GB Danger. When manipulating chemical products, wear adapted protection clothes. Danger. Particules ejected by the machine at high speed. Keep away from the machine when the tractor engine is running.
Правила безопасности Опасность. Риск утечки под высоким давлением гидравлической жидкости, которая может попасть в организм человека. Перед использованием гидросистемы ознакомьтесь с инструкцией по эксплуатации. Опасность повреждения машины см инструкцию Опасно движущиеся детали, не приближаться Внимание полезная нагрузка не выше RU Опасность. При работе с химикатами используйте специальную защитную одежду. Опасность. Выброс из машины мелких частиц на высокой скорости.
English Pages 8-11 12-13 14-17 18-19 20-25 Pages PRESENTATION • A Description of the system (version: Stop & Go, Econov) • B Tractor interface connections • C Setting up the rate sensor • D VISION console control unit • E Functions 1 PROGRAMMING 26-37 • A Drive rate calibration 38-45 • B Output flow rate adjustment 46-47 • C Selecting the fertilizer 48-51 • D Selecting the working width 52-53 • E Funktion Tribord 3D 54-55 • F Rate adjustment function Pages CONTENTS 56-69 • G Stop & Go function 70-87
Język polski Strony 8-11 12-13 14-17 18-19 20-25 Strony 26-37 38-45 46-47 48-51 52-53 54-55 Strony SPIS TREŚCI Prezentacja • A Przedstawienie systemu (wersja : Stop & Go, Econov) • B Złącza traktora • C Podłączenie czujnika prędkości • D Skrzynka sterująca konsoli VISION • E Funkcje PROGRAMOWANIE • A Kalibrowanie prędkości jazdy • B Ustawianie prędkości rozrzucania nawozu • C Wybór nawozu • D Wybór szerokości roboczej • E Funkcje Tribord 3D • F Funkcja modulacji dawki 56-69 • G Funkcja Stop&Go 70-87 •
Русский СОДЕРЖАНИЕ Страницы Описание 8-11 12-13 14-17 18-19 20-25 • A Описание системы (версия: Stop & Go, Econov) • B Соединение с трактором • C Установка датчика скорости • D Блок управления консолью VISION • E Описание функций 1 Страницы Программирование 26-37 38-45 46-47 48-51 52-53 54-55 • A Калибровка скорости перемещения • B Настройка расхода • C Выбор типа удобрения • D Выбрать ширину захвата • E Функции правого борта 3D • F Функция изменения дозы 56-69 • G Функция Stop & Go 70-87 • H Функция
Presentation / Prezentacja / Описание A 11 1 &- 1 4 GHI 7 PQRS 2 ABC 5 JKL 8 TUV 0 6 7 3 DEF 6 MNO 9 WXYZ .
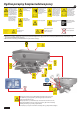
Presentation / Prezentacja / Описание GB A Description of VISION CAN STOP&GO a) Introduction b) Présentation 1 VISION console • The VISION CAN STOP&GO system is an instrument for measuring and controlling the spreading of granular fertilisers with continuous weighing. 2 12-volt electrical power supply 3 Forward speed sensor (optional) • The information on the weight given by the VISION CAN STOP&GO system cannot be used for commercial transactions.
Presentation / Prezentacja / Описание A 11 11 6 7 1 9 10 2 2 8 8 13 13 5 5 3 12 Kg 12 4 7 4 5 10 8 9
Presentation / Prezentacja / Описание GB A Description of VISION CAN ECONOV a) Introduction • The VISION CAN ECONOV system is an instrument for measuring and controlling the spreading of granular fertilisers with continuous weighing. • The information on the weight given by the VISION CAN ECONOV system cannot be used for commercial transactions. • The VISION CAN ECONOV spreader must be used only for the tasks for which it was designed.
Presentation / Prezentacja / Описание 142 mm B 75 mm 12 237 mm
Presentation / Prezentacja / Описание GB B Connection to the tractor a) Hitching • The machine is fitted with a category II three-point linkage. The machine’s working position is horizontal. - Fit the transmission checking that its length corresponds correctly to the tractor. The speed of the PTO is 540 rpm. (Or optionally 1000 rpm for model 50) - Connect the shutters’ hydraulic opening and closing control. (Hydraulic version).
Presentation / Prezentacja / Описание C a) c) d) 14 b)
Presentation / Prezentacja / Описание GB C Installation of the speed sensor b) From the front axle drive shaft The speed information may be obtained either: ➪ From the tractor’s wheel, ➪ From a tractor’s front axle drive shaft 4x4. ➪B y radar information for the pre-fitted and compatible tractors. ➪ by GPS antenna. For fitting the sensor, follow the instructions. This mounting option is probably one of the most accurate ones as the shaft has a strong reduction ratio in relation to the forward speed.
Presentation / Prezentacja / Описание c 16
Presentation / Prezentacja / Описание GB C e) By the Teejet MATRIX 540 guidance console on its own - Use the cable fitted with the RS 232 connector and make the connection with the Vision console, on the RS 232 connector located on the top port. 1 f) By the Teejet MATRIX 540 guidance console with Stop & GO Smart Boom - Use the RS 232 cable of the Stop & Go smart boom and make the connection with the Vision console, on the RS 232 connector located on the top port.
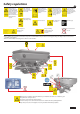
Presentation / Prezentacja / Описание D 3 1 18 4 10 8 9 5 11 7 2 6
Presentation / Prezentacja / Описание GB D VISION console control unit - 1 - Power on - 2 - Alphanumeric keypad - 3 - Multifunction screen - 4 - Function keys - 5 - Factory settings and dealer diagnostics menu key - 9 - “Information menu” key: used for consultation -10 - “Settings menu” key: used at the beginning of spreading -11 - SD card reader. The console operates as a drop-down menu. 1 - Take the time to read the information.
Presentation / Prezentacja / Описание E 14 13 a) 1 2 12 3 11 4 10 5 6 7 16 14 8 9 13 1 2 12 3 11 4 10 5 20 15 6 7 8 9
Presentation / Prezentacja / Описание GB E Description of functions a) Spreading menu Provides you with the main control information. - 1 - Time - 2 - Forward speed. It can be slightly different from that on the tractor’s speedometer. - 9 - Application rate test key -10 - Hydraulic or electric shutter opening / closing indicator with the STOP & GO and the ECONOV. -11 - Weight in the hopper (Actual) -12 - Desired rate per hectare.
Presentation / Prezentacja / Описание E b) 1 2 3 4 22 5 6 7 8
Presentation / Prezentacja / Описание GB E b) Information menu - 6 - Selection key for data saving function and adjustment The information menu is used for consultation to monitor the performance of the spreading site. - 7 - Active alarm information key. - 1 - Number of tonnes spread (theoretical) - 8 - Reset key for the hectare and tonnage counters. by GPS. 1 - 2 - Area spread in hectares.
Presentation / Prezentacja / Описание E c) 1 2 24 3 4 5
Presentation / Prezentacja / Описание GB E c) Settings menu The settings menu is used at the start-up of X either for the registration of the final data, or for the registration of the spreading-related data. - 1 - Console settings data: 1- Time settings. 2- Screen brightness settings. 3- Measurement unit settings. 4- Display language settings. 5- Help Use of FERTITEST import with a machine ECONOV. • Entering the fertiliser name with .
Programming / Programowanie / Программирование A a) 26
Programming / Programowanie / Программирование GB A Calibrating the forward speed - Press - Select the REG menu. to activate. - Advance to the 2nd peg mark, for a distance of approximately 100 m. a) Speed sensor - After stopping at the 2nd peg mark, press validate - Mark out 100 metres. to - Position the tractor at the first peg mark. ☞ The speed calibration is now complete. - Select the The VISION unit has calculated a tractor-specific coefficient and will save it in the memory. function.
Programming / Programowanie / программирование A 28 b)
Programming / Programowanie / Программирование GB A b) GPS speed antenna with RS 232 connector This antenna must be placed on a top, for example on the roof of a tractor’s cab. - Place the and - Baud rates settings, Select on keys then with . - Select At power on, wait 1 to 2 minutes. - Select Settings with the Garmin antenna - Connect this sensor to the RS 232 connector located behind the console and on the top port. - Select keys then with the .
Programming / Programowanie / программирование A b) 1 2 3 4 30 5 6 7
Programming / Programowanie / Программирование GB A Setting up the forward speed with the Garmin antenna Reception control. You may check the reception of the NMEA message - Select the menu - Select the To check the reception of the NMEA message function. - Select the menu - Choose sensor No. 5 with - Validate with - Select and a No. 6 is now displayed - Select - This No. 6 allows a minimum speed limit to be determined. When under this limit, the speed considered automatically reverts to zero.
Programming / Programowanie / программирование A C) 32
Programming / Programowanie / Программирование GB A c) Connection with a Sulky guidance bar alone or with the smart Boom using the NMEA protocol - Baud rates settings, Select - Select - Use the RS 232 connector located either on the bundle of the guidance bar or the Stop&Go smart Boom or the ECONOV smart Boom. - On the Teejet console no settings must be done. - On the VISION console you must configure the top port, on the VISION console select the button . . - Then select - Place keys and .
Programming / Programowanie / программирование A C) 34
Programming / Programowanie / Программирование GB A Forward speed settings to be done on the VISION console For each solution you must perform the corresponding settings on the guidance console and on the VISION console. Contact your dealer for information. - Select the menu - Select the If a cable that was not authorized by SULKY is used, the risk of irreversible damage of the VISION console is possible. function. - Choose sensor No.
Programming / Programowanie / Программирование A d) 36
Programming / Programowanie / Программирование GB A d) Forward speed simulation To stop simulation Speed simulation may be used: - Select and validate again. ☞when there is a problem with the sensor. ☞to simulate a shutter opening. ☞ to empty the fertiliser from the spreader when stationary. ☞aby stosować VISION bez DPA. - Select the menu. - Select the function. - Select the function. - Enter the forward speed with the numeric keypad. - Validate by to begin simulation.
Programming / Programowanie / программирование B a) b) 38
Programming / Programowanie / Программирование GB B Setting the application rate b) Calibration test with correction mode - Select the menu - Select the To set the flow rate, there are two correction modes: static or dynamic function. - Select a) Tare You must perform a tare (reset to zero of the weight indicator) regularly for example after 3 or 4 loadings. - Select . - Validate by .
Programming / Programowanie / программирование B 1) c d b 40 a
Programming / Programowanie / Программирование GB B 1) Static correction The console displays weight acquisition, for a few seconds. a Select the static mode From that moment the “T Factor” which defines the fertiliser is updated and stored in the memory, until the next test. - Perform the tare if required - Load the spreader d The VISION unit operates in PDA mode for the rest of the plot. You may repeat the test as soon as you want. Or you may switch to the dynamic correction mode.
Programming / Programowanie / программирование B 2) c b 42 a
Programming / Programowanie / Программирование GB B c At the end of spreading, shutter closed, 2) Dynamic correction (*) a Select the dynamic mode - Select the correction. - Perform the tare if required - Select the menu. function and place on to stop the Important In dynamic correction mode, you must always be in “STOP” function. - Load the fertiliser spreader - Select the function and place on . b Spread the fertiliser contained in the hopper.
Programming / Programowanie / Программирование B c) 44
Programming / Programowanie / Программирование GB B - Enter the weight obtained in kg and validate with . c) Static calibration test When you want to use the fertiliser spreader to spread specific products such as slug repellent or when spreading with a low rate per hectare, it is recommended to calibrate the “T Factor” of the product with a static test. - Install the calibration test kit on the right-hand side (see Manual X). - Select the function. - Select for product calibration.
Programming / Programowanie / Программирование C 46
Programming / Programowanie / Программирование GB C Selecting the fertiliser For a complete use of the VISION capacities, it is recommended to save your different fertilisers in the memory in the 8 possible memories. Before each spreading, retrieve the corresponding fertiliser or the one that is closest from a physical point of view (grading, density etc.). The factory default for the “T Factors” is 1. After each calibration test, the console retains the last “T Factor” calculated in the memory.
Programming / Programowanie / Программирование D 48
Programming / Programowanie / Программирование GB D Selecting the working width - Match the width selected in the VISION unit with the spreading width used when working. a) For a standard or a Stop & Go machine - Match the width selected in the VISION unit with the spreading width used when working. - Select . - Enter the value in metres using the numeric keypad and validate with . - Select to exit.
Programming / Programowanie / Программирование D 50
Programming / Programowanie / Программирование GB D b) For an ECONOV machine This adjustment is done for the total width example - Match the width selected in the VISION unit with the spreading width used when working. = Chute mark when 3 sections are open on the left and/or on the right. - Select .
Programming / Programowanie / программирование E 52
Programming / Programowanie / Программирование GB E Tribord 3D function With an ECONOV machine, the Tribord 3DI is called “smart” because it has a self-adjustment function in relation to the type of fertiliser. 1) Select the Tribord function. • Pressing the key once allows you to enable the Tribord function in yield mode, wait 2 to 3 s. The icon displays . In concrete terms, the output of the tribord electric actuator moves differently based on the width adjustment.
Programming / Programowanie / программирование F 54
Programming / Programowanie / Программирование GB F Rate adjustment function • Pressing the dose/ha. or key once allows you to adjust • After pressing the or a new icon is displayed or key once or several times, . • To return to dose programming, you must press and hold the ou key. PL F Funkcja modulacji dawki 2 • 1 wciśnięcie przycisku lub pozwala na modulację dawki /ha. • Po wykonaniu 1 lub kilku wciśnięć przycisku lub , ukazuje sie nowy piktogram lub .
Programming / Programowanie / программирование G 56
Programming / Programowanie / Программирование GB G STOP & GO function Optimising fertiliser spreading in headlands and field borders. All you need to do to make this possible is configure 2 boom sections to be used within the guidance bar. Description of the system Each boom section will correspond to a fertiliser spreader disc.
Programming / Programowanie / Программирование G 1 &- 4 2 ABC 5 6 JKL MNO 7 8 9 PQRS TUV 0 58 3 DEF GHI WXYZ .
Programming / Programowanie / Программирование GB G System wiring The Stop & Go system uses electric actuators that act directly on the spreader shutters. They have been specially designed to ensure a rapid opening and closing speed. Wiring procedure: - Connect the relevant wires from the boom section control module to the 1 connector. When using the machine, it is possible to view the state of the shutters (open or closed) on the VISION console 1 Connector to link to the boom control GPS system.
Programming / Programowanie / Программирование G 60
Programming / Programowanie / Программирование GB G Settings A series of parameters needs to be defined within the guidance bar to enable it to operate in tune with both the Stop & Go unit and the actual state of the centrifugal fertiliser spreading. - First set all the distances relating to the positioning of the GPS antenna on the tractor roof. - Always position the antenna the same distance from the spreader if you change your tractor (see distance X1 and Y1 on the distance settings diagram opposite).
Programming / Programowanie / Программирование G ? 18 28 24 36 32 44 18 21 24 28 24 28 32 36 32 36 40 44 Y2 (m) -9 -10 -12 -14 -12 -14 -15 -15 -16 -17 -16,5 -16,5 LR (m) 9 10,5 12 14 12 14 16 18 16 18 20 22 LG (m) 9 10,5 12 14 12 14 16 18 16 18 20 22 X2 (m) 4,5 5,25 6 7 6 7 8 9 8 9 10 11 X3 (m) -4,5 -5,25 -6 -7 -6 -7 -8 -9 -8 -9 -10 -11 % 50 60 70 80 60 60 70 80 60 70 70 80 Tps (s) O 1 1 1 1 1 1 1 1 1 1 1 1 2,5
Programming / Programowanie / программирование GB G The overlap values in the table are an optimised average for different fertilisers. Nevertheless, for fertilisers such as potassium chloride and urea, the overlap rate should be increased by a further 10 percent. It is up to the user to adjust the values according to his judgement. LW (m) ➪ Working width (spreading) on the left-hand side. X2 (m) ➪ half working width distance on the right-hand side.
Programming / Programowanie / Программирование G A GPS Y1 Centre of the spreader Centre de l’épandeur Środek rozsiewacza Centre of the spreader Центр разбрасывателя Mittelpunkt des Schleppers X1 Y2 X3 64 X2
Programming / Programowanie / Программирование GB G My settings dated Moje regulacje z datą Мои регулировки от (дата) ? ………… Day ………… Dzień ………… день ………… Month ………… Miesiąc ………… месяц PL RU ………… Year ………… Rok ………… год 18 28 24 36 32 44 18 21 24 28 24 28 32 36 32 36 40 44 Y2 (m) LR (m) LG (m) X2 (m) X3 (m) 2 % Tps (s) O Tps (s) C GB NOTES: The parameters should be saved for a machine used with a given set of blades (example 18-28) and a given width (example 24 metres).
Programming / Programowanie / Программирование G The user can comfortably spread fertiliser over the entire plot without needing to switch to manual mode. 66 Użytkownik może łatwo dokonać rozsiewu na całości swojej działki bez konieczności przechodzenia do trybu ręcznego. Пользователь может легко разбросать удобрения по всему обрабатываемому участку без перехода в ручной режим.
Programming / Programowanie / Программирование GB G Principle The Stop & Go system comprises two operating modes: automatic and manual. Automatic mode - Press the yellow “auto” button The yellow LED on indicates operation in automatic mode. Once a job is started in the guidance bar, the boom section control module will, where appropriate, send signals to control the electric actuators.
Programming / Programowanie / Программирование G The user can comfortably spread fertiliser over the entire plot without needing to switch to manual mode. 68 Użytkownik może łatwo dokonywać rozsiewu na całości swojej działki bez konieczności przechodzenia do trybu ręcznego. Пользователь может легко разбросать удобрения по всему обрабатываемому участку без перехода в ручной режим.
Programming / Programowanie / Программирование GB G The user may return to manual mode at any time to avoid dependence on the boom section control system. To return to the manual mode simply press the On / Off button. Or one of the L / R buttons allows you to return to manual. The position of the shutter corresponding to the button pressed will be reversed, while the other shutter will remain in the position that it was previously to automatic mode being switched off.
Programming / Programowanie / программирование H 1 70
Programming / Programowanie / Программирование GB H ECONOV function Optimising fertiliser spreading in headlands and field borders. Description of the system • The ECONOV system is able to retrieve the data from a guidance bar and/or its boom section control system in order to prevent over- and under-application in headlands and field borders. It also allows at the end of the plot to adjust the width at the last tramline to the most accurate one.
Programming / Programowanie / программирование H 1 72
Programming / Programowanie / Программирование GB H The configuration of the boom sections is pre-set, you must simply choose the profile corresponding to its width and to the characteristics of the vanes installed on the machine. The 840 GS guidance bar allows you to consider the actual distribution area of the fertiliser, a crescent shape will be displayed on the screen. Depending on the total spreading width, each boom section is represented by a rectangle.
Programming / Programowanie / программирование 1 H 2 4 3 + + 2 + 5 3 4 + 5+ + 1 6 + 6 7 8 10 9 11 + 3 4 + 1 6 + 5+ + 16 pIN 1 2 3 4 5 6 cOLOUr Red Brown Blue Violet Green Yellow Black + + 2 + 74 3 4 + 1 6 + 5+ + 1 2 7-штекерный раЗЪем + + (управление секциями штанги) + 3 4 + 1 6 + 5+ + FUNcTION Left external section Left central section Left internal section Right internal section Right central section Right external section 0V złączE 7 StykowE (zaRządzaniE SEkcjami
Programming / Programowanie / Программирование GB H System wiring The boom section control system can either be powered by connecting the two systems to the same cobo plug, or by using a “Y” shaped cobo fitting (one male plug, two female sockets), or alternatively by using a second cobo plug from the tractor. For the part located on the tractor side, these are from No. 1 to 6 . For the part located on the machine side, these are from No. 7 to 17 .
Programming / Programowanie / программирование H 76
Programming / Programowanie / Программирование GB H System wiring The ECONOV system uses electric actuators that act directly on the spreader shutters. The ECONOV system also uses electric actuators to manage the working width, and they are located on the machine’s chutes, one per side. On the VISION WPB console you can view the position (open or closed) for each boom section in automatic mode. Open boom section = Closed boom section = When the shutter is closed a cross is displayed.
Programming / Programowanie / Программирование H 78
Programming / Programowanie / Программирование GB H Settings A series of parameters needs to be defined within the guidance bar to enable it to operate in tune with both the ECONOV unit and the actual state of the centrifugal fertiliser spreading. - First set all the distances relating to the positioning of the GPS antenna on the tractor roof. - Always position the antenna the same distance from the spreader if you change your tractor (see distance Y0 on the distance settings diagram).
Programming / Programowanie / программирование H Y0 Y3 Y2 Y1 Y6 Y5 Y4 1 6 5 2 3 4 X3 X4 X2 X5 X1 X6 18 28 80 24 36 32 44 18 21 24 28 24 28 32 36 32 36 40 44 wIdTh OF A SecTION (m) SzerOkOść jedNej SekcjI (m) ШириНа секЦии (м) 3 3,5 4 4,66 4 4,66 5,33 6 5,33 6 6,66 7,33 x1 -7,5 -8,75 -10 -11,7 x2 -4,5 -5,25 -6 -7 -6 x3 -1,5 -1,75 -2 -2,33 -2 x4 1,5 1,75 2 2,33 x5 4,5 5,25 6 x6 7,5 8,75 y1 -7 -8 y2 -8 -9 y3 -9 y4 -10 -11,66 -13,33
Programming / Programowanie / программирование GB H The overlap values in the table are an optimised average for different fertilisers. T (s) O ➪ Expected time taken to control the opening of the shutters, in seconds Nevertheless, for fertilisers such as potassium chloride and urea, the overlap rate should be increased by a further 10 percent. T (s) C ➪ Expected time taken to control the closing of the shutters, in seconds It is up to the user to adjust the values according to his judgement.
Programming / Programowanie / программирование H Y0 Y3 Y2 Y1 Y6 Y5 Y4 1 6 5 2 3 4 X3 X4 X2 X5 X1 24 36 82 X6 32 44 40 50 24 28 32 36 32 36 40 44 40 42 44 48 50 4 4,66 5,33 6 5,33 6 6,66 7,33 6,66 7 7,33 8 8,33 -15 -9 -3 3 9 15 -8 -12,5 -15 -15 -12,5 -8 70 -13,33 -8 -2,66 2,66 8 13,33 -10,5 -12,5 -15,5 -15,5 -12,5 -10,5 60 -15 -9 -3 3 9 15 -10 -13 -16 -16 -13 -10 70 -16,7 -10 -3,33 3,33 10 16,7 -9,5 -13 -16 -16 -13 -9,5 70 -18,33 -11 -3,66 3,66 11 18,33 -9 -12,5
Programming / Programowanie / Программирование GB H X1 = Distance between the longitudinal axis of section No. 1 and the tractor advance axis. Y2 = Distance between the transversal axis of section No. 2 and the axis of the discs. X2 = Distance between the longitudinal axis of section No. 2 and the tractor advance axis. Y3 = Distance between the transversal axis of section No. 3 and the axis of the discs. X3 = Distance between the longitudinal axis of section No. 3 and the tractor advance axis.
Programming / Programowanie / Программирование H 84
Programming / Programowanie / Программирование GB H Principle The ECONOV system has two operating modes: automatic and manual. Automatic mode - Press the yellow “auto” button The yellow LED on indicates operation in automatic mode. Once a job is started in the guidance bar, the boom section control module will, where appropriate, send signals to control the electric actuators.
Programming / Programowanie / Программирование H 86
Programming / Programowanie / Программирование GB H The user may return to manual mode at any time to avoid dependence on the boom section control system. To open just one shutter (right or left) simply press the button corresponding to the desired side. Manual mode For example the two shutters are closed You want to open just one shutter, - for the left, press here - for the right, press here - Press the right button. The indicator turns on and confirms that you are in manual mode.
Programming / Programowanie / Программирование I 88
Programming / Programowanie / Программирование GB I “RTS” FERTITEST import functions Description The RTS (Ready To Spread) is an automated adjustment device for an ECONOV 40 or ECONOV 50 fertiliser spreader. For each fertiliser, you may import 6 essential parameters from FERTITEST on a SD card (! maximum capacity 2 GO/GB): - Fertiliser designation. - T factor (fertiliser flow index).
Programming / Programowanie / программирование I 90
Programming / Programowanie / Программирование GB I Operating stages of the RTS device 5- Select the working width. First you must use a SD card with a maximum capacity of 2 GO/GB. 6- Select the average rate/ha. On the SD card you must create an RDS file and in the file you import the data. RDS_DATA.XXX 1- Access the online FERTITEST database from the SULKY internet site: www.sulky-burel.com. 7- Import the data onto an SD card.
Programming / Programowanie / программирование I 92
Programming / Programowanie / Программирование GB I Before the FERTITEST import you must select a memory where the new fertiliser will be saved, the old memory will be deleted automatically when importing. Note To import more fertilisers, you must select a letter before every import. On the console there are 8 possible memories. By validating “Import Fertitest Data”, the VISION console performs a scan of the SD card and displays the products stored on the card.
Programming / Programowanie / программирование J a b c d 94
Programming / Programowanie / Программирование GB J Additional functions Set to metric by default. 1) Time/Date - Select - Select 1. - Adjust the values using keypad. - Select to exit. and from the numeric . to exit. 5) Help b c Adjust the brightness and the screen using d - Select 4 - Select Select 2 and 4) Language - Choose the translation using 2) Display (see example) a to exit. . Select to exit. 3) Units - Select 3.
Start-up A a) 1 2 3/4 5 2 ON b) 1 2 + 5 4 3 c) 2 3 1 5 96 7 6 4
Start-up GB A Stop & Go Version a) menu - 1 - Select the menu. - 2 - Check that all the parameters have been saved correctly: speed sensor - 3 - Select your correction mode and working width . . - 4 - Select TARE and set it to zero. - 5 - Select your fertiliser . Note You can now fill the hopper of the fertiliser spreader. b) Menu . - 1 - Select the menu. - 2 - Select the PAR/TOT menu.
Uruchamianie A a) 1 2 3/4 5 2 ON b) 1 2 + 5 4 3 c) 2 3 1 5 98 7 6 4
Uruchamianie PL A Wersja Stop & Go a) Menu - 1 - Wybierz menu REG. - 2 - Upewnij się, czy wszystkie parametry zostały właściwie wprowadzone i zapisane: współczynnik prędkości kość robocza . - 3 - Wybrać swój własny sposób korygowania oraz szero- . - 4 - Wybierz TARA i wyzeruj wartość. - 5 - Wybierz stosowane przez siebie nawozy . Uwaga Od tej chwili, można napełniać zbiornik rozsiewacza nawozu. b) Menu - 1 - Wybierz menu INFO. - 2 - Wybierz tryb PAR/TOT.
Запуск A a) 1 2 3/4 5 2 ON b) 1 2 + 5 4 3 c) 2 3 1 5 100 7 6 4
Запуск RU A Версия Stop & Go a) Меню - 1 - Выбрать меню REG. - 2 - Проверить правильность всех зарегистрированных параметров: коэффициент скорости захвата . - 3 - Выбрать режим коррекции и ширину . - 4 - Выбрать режим TARE и обнулить его. - 5 - Выбрать тип удобрения . Примечание: Теперь Вы можете заполнить бункер разбрасывателя удобрений. b) Меню - 1 - Выбрать меню INFO. - 2 - Выбрать режим PAR/TOT. - 3 - С помощью функции RAZ обнулить каждый счетчик.
Start-up B a) 1 2 3/4 5 2 ON b) 1 + 2 5 4 3 c) 2 3 1 5 102 7 6 4
Start-up GB B Econov Version a) menu - 1 - Select the menu. - 2 - Check that all the parameters have been saved correctly: speed sensor - 3 - Select your correction mode and working width . . - 4 - Select TARE and set it to zero. - 5 - Select your fertiliser . Note You can now fill the hopper of the fertiliser spreader. b) menu. - 1 - Select the menu. - 2 - Select the PAR/TOT menu.
Uruchamianie B a) 1 2 3/4 5 2 ON b) 1 + 2 5 4 3 c) 2 3 1 5 104 7 6 4
Uruchamianie PL A Wersja Econov a) Menu - 1 - Wybierz menu REG. - 2 - Upewnij się, czy wszystkie parametry zostały właściwie wprowadzone i zapisane: współczynnik prędkości kość robocza . - 3 - Wybrać swój własny sposób korygowania oraz szero- . - 4 - Wybierz TARA i wyzeruj wartość. - 5 - Wybierz stosowane przez siebie nawozy . Uwaga Od tej chwili, można napełniać zbiornik rozsiewacza nawozu. b) Menu - 1 - Wybierz menu INFO. - 2 - Wybierz tryb PAR/TOT.
Запуск B a) 1 2 3/4 5 2 ON b) 1 + 2 5 4 3 c) 2 3 1 5 106 7 6 4
Запуск RU A Версия Econov a) Меню - 1 - Выбрать меню REG. - 2 - Проверить правильность всех зарегистрированных параметров: коэффициент скорости захвата . - 3 - Выбрать режим коррекции и ширину . - 4 - Выбрать режим TARE и обнулить его. - 5 - Выбрать тип удобрения . Примечание: Теперь Вы можете заполнить бункер разбрасывателя удобрений. b) Меню - 1 - Выбрать меню INFO. - 2 - Выбрать режим PAR/TOT. - 3 - С помощью функции RAZ обнулить каждый счетчик.
Informations / Informacje / Информация A a) 108
Informations / Informacje / информация GB A Saving data a) Entering the names The console allows you to enter alphabetical information directly on the screen: fertiliser name or plot name for example. - Use the numeric keypad and its symbols: =A•B•C =J•K•L =T•U•V =D•E•F =M•N•O =W•X•Y•Z =G•H•I =P•Q•R PL A Zapisywanie danych a) Wprowadzanie nazw Konsola umożliwia bezpośredni zapis na ekranie informacji alfabetycznych : nazwy nawozu lub nazwy działki na przykład.
Informations / Informacje / информация A 110 b)
Informations / Informacje / информация GB A b) Saving sites Before: You must configure the ports. - Select the - Select settings menu. general settings. - Select 6 adjustment of ports with the keys and . or - Place the bottom port on “Load Pc” using the keys then . PL A b) Zapisanie pól uprawy Uprzednio : należy dokonać parametryzacji portów. - wybrać menu parametryzacji - wybrać . regulacji ogólnych. - wybrać 6 regulacji portów za pomocą przycisków lub i .
Informations / Informacje / Информация A 112
Informations / Informacje / информация GB A PRocEdURE foR SavinG SitES Each function has a maximum of 9 characters. 1) Saving sites ExamPLE: Func 1: JD 6920 and mEnU. - Select the screen Func 2: Durum wheat and icon located at the bottom centre of the ) to mEmoRiSE thE fUnctionS, vaLidatE thE 12 fUnctionS - Choose - If you are not entering any function, press - Choose « 3_EnR. RÉSUmÉ » (“3_save.summary”) - Enter the farm No. (example: then ) - Enter the field No. (example: then ) .
Informations / Informacje / информация A 114
Informations / Informacje / информация GB A 2) Consulting sites EditinG a LiSt of fUnctionS: - Enter the mEnU. menu. - Enter the menu “GEnERaL aP SEttinGS”. - Select the - Enter the menu using the vaLUE fUnction” keys “namE/ or - Using the key, change the name of the function (e.g.: TRACTOR) - Then edit a list for this function using the keys and the numeric keypad (e.g.: JD 6920) - Then validate and icon.
Informations / Informacje / информация A + - 116
Informations / Informacje / информация GB A d) Transferring saved sites to a PC or the SD card PRocEdURE foR tRanSfERRinG data fRom thE viSion Unit to a Pc 1) Before disconnecting the Vision unit from the tractor. - Check the settings of the VISION ports: - Enter the menu. - Enter the menu “GEnERaL aP SEttinGS”. 2) Connecting the VISION unit and the PC - Connect the RS 232 cable between the VISION unit (top port) and the PC (example: COM 1).
Informations / Informacje / информация A + - 118
Informations / Informacje / Информация GB A 3) Transferring data a) Switch on the VISION unit and the PC b) On the PC (Windows 98 minimum) In the menu: “start” “all programmes” “accessories” “communication” “hyper terminal” The “new connection” window is displayed: - choose the name that you want to give to your entry (example: NITROGEN 1) then validate. The “connection” window is displayed. - choose the type of port used (example: “com 1”).
Informations / Informacje / Информация A 120
Informations / Informacje / Информация GB A The Vision unit displays the last site saved, to consult the then “impr” (print). others, press - To transfer only the last site saved, press “dern” (last) then “impr” (print) - To transfer the entire data, press “plage” (range) then “impr” (print) - Then choose the page layout “text mode” (recommended) “csv mode” - Then validate.
Informations / Informacje / Информация A 122
Informations / Informacje / Информация GB A procedure for transferring data from the vision unit to the sd card reader - Set the bottom port on the RDS data module. menu - Select the icon. The VISION unit displays the memory capacity (example: 3/75) To consult the records or save them to the SD card: - Select the icon.
Informations / Informacje / Информация B 124
Informations / Informacje / информация GB B Automatic adjustment PRocEdURE foR USinG thE Sd caRd REadER with GPS adjUStmEnt. on thE Pc: - A recommendation map must be produced for each plot, in RDS format. The software to produce a recommendation map in RDS format is: 1) AGRIMAP available on http://www.isagri.com 2) FARMSTAR available on www.farmstar-conseil.fr 3) BGRID available on http://www.bgrid.fr 4) FARMWORKS http://www.farmworks.com 5) FARMSAT www.geosys.com 6) CERELIA www.cerelia.geosys-eu.
Informations / Informacje / Информация B 126
Informations / Informacje / информация GB B • At the end of the plot you must return to the menu and select and the icon. • Loading the recommendation on the Vision unit key - Use the ➪ The unit generates a file where you will find a map corre- - Press start sponding to the spreading performed - Then “1_aPPLy thE PLan”. Validate . - Enter the farm No. (example: then ) - Enter the field No. (example: then ) - Select . The Vision unit then loads the recommendation.
Informations / Informacje / информация c 128
Informations / Informacje / Информация GB C Diagnostics - Select the - Select mode. . The default values of the console are displayed. Any intervention on the console or the connection box must be carried out by a competent person, familiar with the equipment and trained by the personnel. - Contact your dealer. PL C Diagnoza - Wybierz tryb - Wybierz . . Są wyświetlone wartości domyślne konsoli.
Informations / Informacje / Информация D 130
Informations / Informacje / Информация GB D Maintenance - Follow the instructions in the machine’s user manual. - Do not use high-pressure cleansers, especially on the electrical parts of the machine. (Connection unit, socket, electric actuators). - Store the unit in a dry place, in its specially provided case. It is forbidden to do any welding work on the spreader. During the first hours of operating the machine, check the tightness of all screws.
Informations GB E Troubleshooting FAULT The unit will not switch on Check The forward speed is not correct Check Tonnage counter reading incorrect Check Calibration test Check SOLUTIONS - unit / power cable connections - power cable fuses - connection on unit - magnet / sensor distance - correct rotation of the magnet - sensor wire continuity (resistance 100Ω ± 10) - 100m coefficient - connection / machine - working width - forward speed - fertiliser coefficient - shutter opening and closing - ca
Informacje PL E Rozwiązywanie problemów Problem Urządzenie nie uruchamia się Sprawdź Prędkość jazdy jest nieprawidłowa. Sprawdź Odczyt licznika tonażu jest nieprawidłowy. Sprawdź Próba prędkości przepływu. Sprawdź Rozwiązanie - podłączenie urządzenia do źródła zasilania, - przewód zasilający bezpiecznika. - połączenia urządzenia, - odstęp magnesu czujnika, - obracanie się magnesu, - ciągłość przewodu czujnika (100Ω ± 10), - współczynnik 100 m.
Информация RU E Неисправности и способы их устранения Неисправность Блок управления не включается Скорость перемещения некорректна Счетчик тоннажа работает некорректно Калибровка расхода Способ устранения Проверить - клеммную коробку / кабели питания.