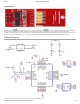
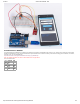
3/7/2018 SunFounder ESP8266 - Wiki Introduction ESP8266 is a highly integrated chip designed for the needs of a new connected world. Its AT instruction can check and control the IO ports and check the ID of the chip. The module supports three modes including AP, STA and AP+STA. When the AT instruction is used, the baud rate is 115200 by default. In addition, we provide a testing software SerialAssistant For ESP8266 developed by SunFounder.
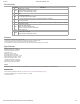
3/7/2018 SunFounder ESP8266 - Wiki Pin Functions Pin Name Description 1)UART_TXD,sending; 1 TXD 2)General Purpose Input/Output:GPIO1; 3)Pull-down is not allowed when startup; 2 GND GND 3 EN 4 IO2 5 RST 1)Working at high level; 2)Power off when low level is supplied 1)It should be high level when power on, hardware pull-down is not allowed; 2)Pull-up by default; External Reset signal, reset when low level is supplied; work when high level is supplied (high level by default); 1)WiFi Status ind
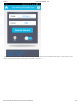
/7/2018 SunFounder ESP8266 - Wiki 4. Go to the WiFi management interface on your phone (Android) and you can see a network named SUNFOUNDER. Tap Connect; the original password is 123456789. 5. After the connection works, open the ESP8266 APP and tap the button Search device. If the device is found, a prompt message will appear at the bottom. http://wiki.sunfounder.cc/index.
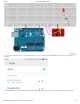
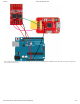
3/7/2018 SunFounder ESP8266 - Wiki 5.Tap the bulb icon for LED control in the app. Then you can see the LED connected to IO2 on the ESP8266 module brighten, so does the bulb, as shown below. Also the data at the bottom box will change from "LED is off!" to "LED is on!". http://wiki.sunfounder.cc/index.
3/7/2018 SunFounder ESP8266 - Wiki SerialAssistant For ESP8266 The Serial Assistant For ESP8266 V1.0 software is developed by SunFounder for ESP8266 module control on PC. Internally many instruction channels have already ben embedded so you can just click the buttons to inquire data from and control the module by instructions accordingly, which is efficient, convenient, and easy to use. You can download from: http://wiki.sunfounder.cc/images/5/5c/SerialCommunicate_For_ESP8266.
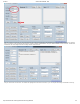
3/7/2018 SunFounder ESP8266 - Wiki Next, connect the FTDI module to the computer via a USB cable. Then open the SerialAssistant For ESP8266 software. Select the correct port and proper baud rate, click Open, as shown blow. http://wiki.sunfounder.cc/index.
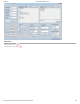
3/7/2018 SunFounder ESP8266 - Wiki After the connection is successful, you can inquire data from and configure the parameters of the ESP8266 by the instruction buttons as shown in the following figure. For example, modify AP SSID and AP Password. Originally, AP SSID: SUNFOUNDER, change it to SUNFOUNDER2; and AP Password: 123456789 to 1234567890. Then click Configure AP and the setting will work, as shown below: Also you can test other AT instructions.
3/7/2018 SunFounder ESP8266 - Wiki Resource ESP8266_AT_Command ESP8266_Module_User_Guide http://wiki.sunfounder.cc/index.

